iPhone 6 Plus Battery Replacement
Follow these instructions to replace the battery in your iPhone 6 Plus and restore its functionality; exercise caution if the existing battery exhibits swelling.
- To safeguard the display cables from potential harm, proceed with disassembling the front panel assembly as detailed in this guide.
- For those experienced with handling delicate components, the display assembly can be supported manually during battery extraction, allowing you to proceed directly to the battery disconnection process without first detaching the display.
To ensure peak functionality, following the steps in this guide, perform a battery calibration: Initially, fully charge the battery and continue charging for a minimum of two additional hours. Subsequently, deplete the battery completely by using your iPhone until it powers down. Conclude by charging the device continuously until it reaches a 100% charge level.
This procedure also details how to substitute the battery connector bracket.
Step 1 | Pentalobe Screws
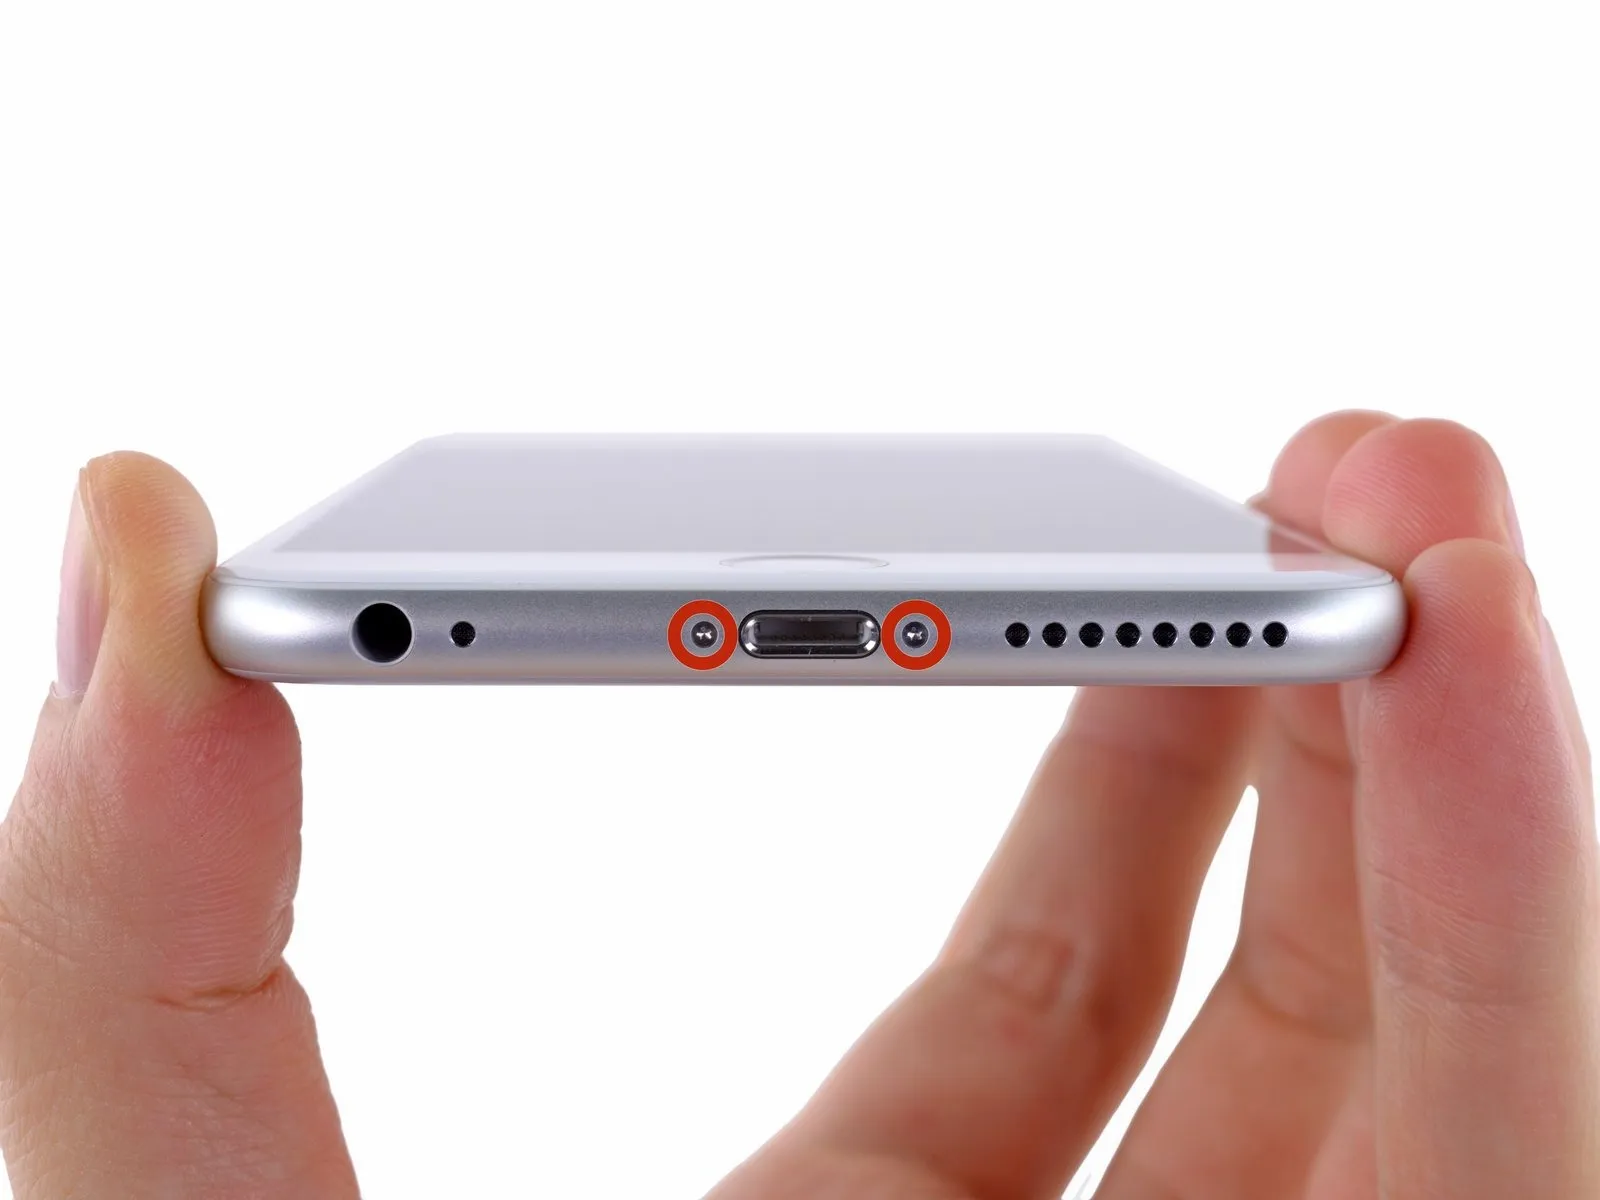
To prevent a potential fire or explosion hazard from the lithium-ion battery, ensure its charge level is less than 25% prior to beginning any disassembly procedures; a fully charged battery poses a significant risk of ignition if damaged.
To prevent electrical shock or damage, ensure the iPhone is completely de-energized prior to starting the repair process.
Using a Pentalobe screwdriver, detach the two screws measuring 3.6 mm located adjacent to the Lightning connector.
To prevent electrical shock or damage, ensure the iPhone is completely de-energized prior to starting the repair process.
Using a Pentalobe screwdriver, detach the two screws measuring 3.6 mm located adjacent to the Lightning connector.
Step 2 | Anti-Clamp instructions


To simplify the subsequent opening process, the following instructions utilize the Anti-Clamp tool, a custom design; if you do not have this tool, proceed directly to the instructions three steps further down.
Refer to the included guide for detailed procedures regarding Anti-Clamp operation.
To release the Anti-Clamp's arms, move the blue handle in a rearward direction.
Position the arms so they clear the left or right side of the iPhone, then gently move them into place.
Secure two suction cups, one to the front surface and one to the rear surface of the iPhone, placing them close to the lower edge, directly above the home button.
Apply vacuum by pressing the cups firmly against the surface you intend to work on.
To improve the Anti-Clamp's grip on your iPhone if the exterior feels excessively slick, apply adhesive tape to the device's surface.
Refer to the included guide for detailed procedures regarding Anti-Clamp operation.
To release the Anti-Clamp's arms, move the blue handle in a rearward direction.
Position the arms so they clear the left or right side of the iPhone, then gently move them into place.
Secure two suction cups, one to the front surface and one to the rear surface of the iPhone, placing them close to the lower edge, directly above the home button.
Apply vacuum by pressing the cups firmly against the surface you intend to work on.
To improve the Anti-Clamp's grip on your iPhone if the exterior feels excessively slick, apply adhesive tape to the device's surface.
Step 3


Moving the blue handle in a forward direction secures the arms in the locked position.
Rotate the handle fully, completing a 360-degree turn, observing for the initial signs of cup expansion.
Maintain parallel positioning of the suction cups; should misalignment occur, gently release the suction cups’ grip and reposition the arms.
Once sufficient space is created by the Anti-Clamp, carefully slide a prying tool or opening pick beneath the display assembly.
To ensure adequate separation, reposition the handle by 90 degrees.
Allow the Anti-Clamp device to function and gradually loosen the fitting by rotating it no more than 90 degrees every few seconds.
Rotate the handle fully, completing a 360-degree turn, observing for the initial signs of cup expansion.
Maintain parallel positioning of the suction cups; should misalignment occur, gently release the suction cups’ grip and reposition the arms.
Once sufficient space is created by the Anti-Clamp, carefully slide a prying tool or opening pick beneath the display assembly.
To ensure adequate separation, reposition the handle by 90 degrees.
Allow the Anti-Clamp device to function and gradually loosen the fitting by rotating it no more than 90 degrees every few seconds.
Step 4 | Front Panel Assembly

Carefully employ one suction cup to raise the front panel.
Using a suction cup, apply it to the display surface, positioning it directly over the home button area.
Ensure a leakproof connection by firmly applying pressure to the cup against the screen's surface.
To facilitate suction cup attachment on a severely cracked display, apply a sheet of clear packing tape across the damage; as an alternative, a robust adhesive tape can be used directly. Should these methods prove ineffective, secure the suction cup to the screen using superglue as a last resort.
Using a suction cup, apply it to the display surface, positioning it directly over the home button area.
Ensure a leakproof connection by firmly applying pressure to the cup against the screen's surface.
To facilitate suction cup attachment on a severely cracked display, apply a sheet of clear packing tape across the damage; as an alternative, a robust adhesive tape can be used directly. Should these methods prove ineffective, secure the suction cup to the screen using superglue as a last resort.
Step 5

Using one hand to secure the iPhone, gently lift the suction cup to create a small gap between the front panel and the rear enclosure.
Exercise caution and use steady, even pressure when installing the display assembly, as it requires a significantly tighter fit compared to typical device components.
Carefully separate the rear case from the display assembly by gently levering it away with a plastic opening tool, maintaining upward traction on the display using the suction cup.
To release the front panel assembly from the rear case, carefully disengage the multiple retaining clips, employing both the suction cup and plastic opening tool as needed.
Exercise caution and use steady, even pressure when installing the display assembly, as it requires a significantly tighter fit compared to typical device components.
Carefully separate the rear case from the display assembly by gently levering it away with a plastic opening tool, maintaining upward traction on the display using the suction cup.
To release the front panel assembly from the rear case, carefully disengage the multiple retaining clips, employing both the suction cup and plastic opening tool as needed.
Step 6


To detach the suction cup, depress the plastic projection to break the airtight seal.
Detach the display assembly's suction cup.
Detach the display assembly's suction cup.
Step 7


Carefully pivot the front panel assembly upwards, utilizing the phone's upper edge as a fulcrum to separate the home button end from the rear case.
Carefully position the display at a 90-degree angle, then secure it in an upright position using a support to allow for hands-free access during the repair process.
To avoid stressing the display's wiring during the repair, secure it temporarily with a rubber band.
As a temporary measure, an unused, sealed can of soda can substitute for the display during the repair process.
Carefully position the display at a 90-degree angle, then secure it in an upright position using a support to allow for hands-free access during the repair process.
To avoid stressing the display's wiring during the repair, secure it temporarily with a rubber band.
As a temporary measure, an unused, sealed can of soda can substitute for the display during the repair process.
Step 8


The front panel assembly pivots due to multiple clips situated along its upper edge, functioning as a partial hinge to enable a book-like opening motion.
To reassemble, position the clips beneath the rear case's upper border. Subsequently, move the front panel vertically until its superior edge is level with the rear case's superior edge.
To reassemble, position the clips beneath the rear case's upper border. Subsequently, move the front panel vertically until its superior edge is level with the rear case's superior edge.
Step 9

Using a Phillips screwdriver, detach the screws securing the battery connector bracket.
A single screw, measuring 2.3 millimeters, is required.
A single screw, measuring 3.1 millimeters, is required.
A single screw, measuring 2.3 millimeters, is required.
A single screw, measuring 3.1 millimeters, is required.
Step 10
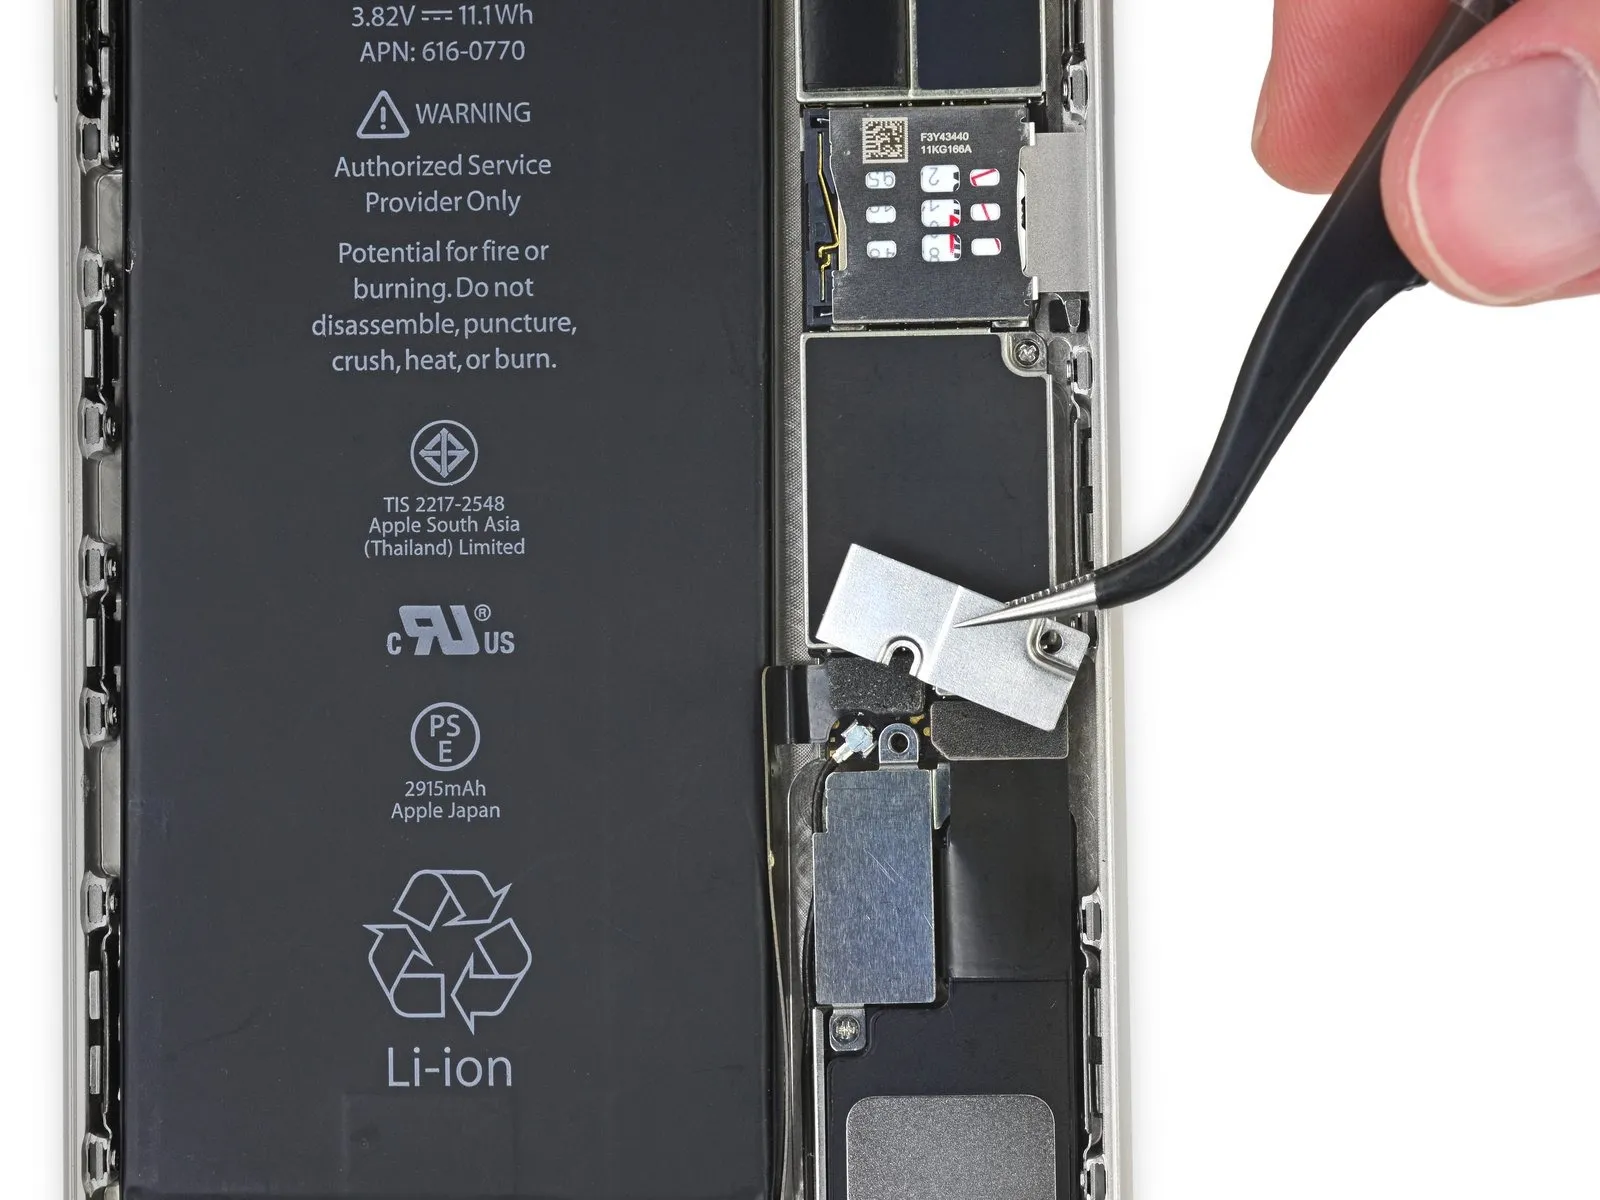
Detach the bracket securing the battery connector using a tri-point screwdriver, ensuring no damage to surrounding components.
Step 11
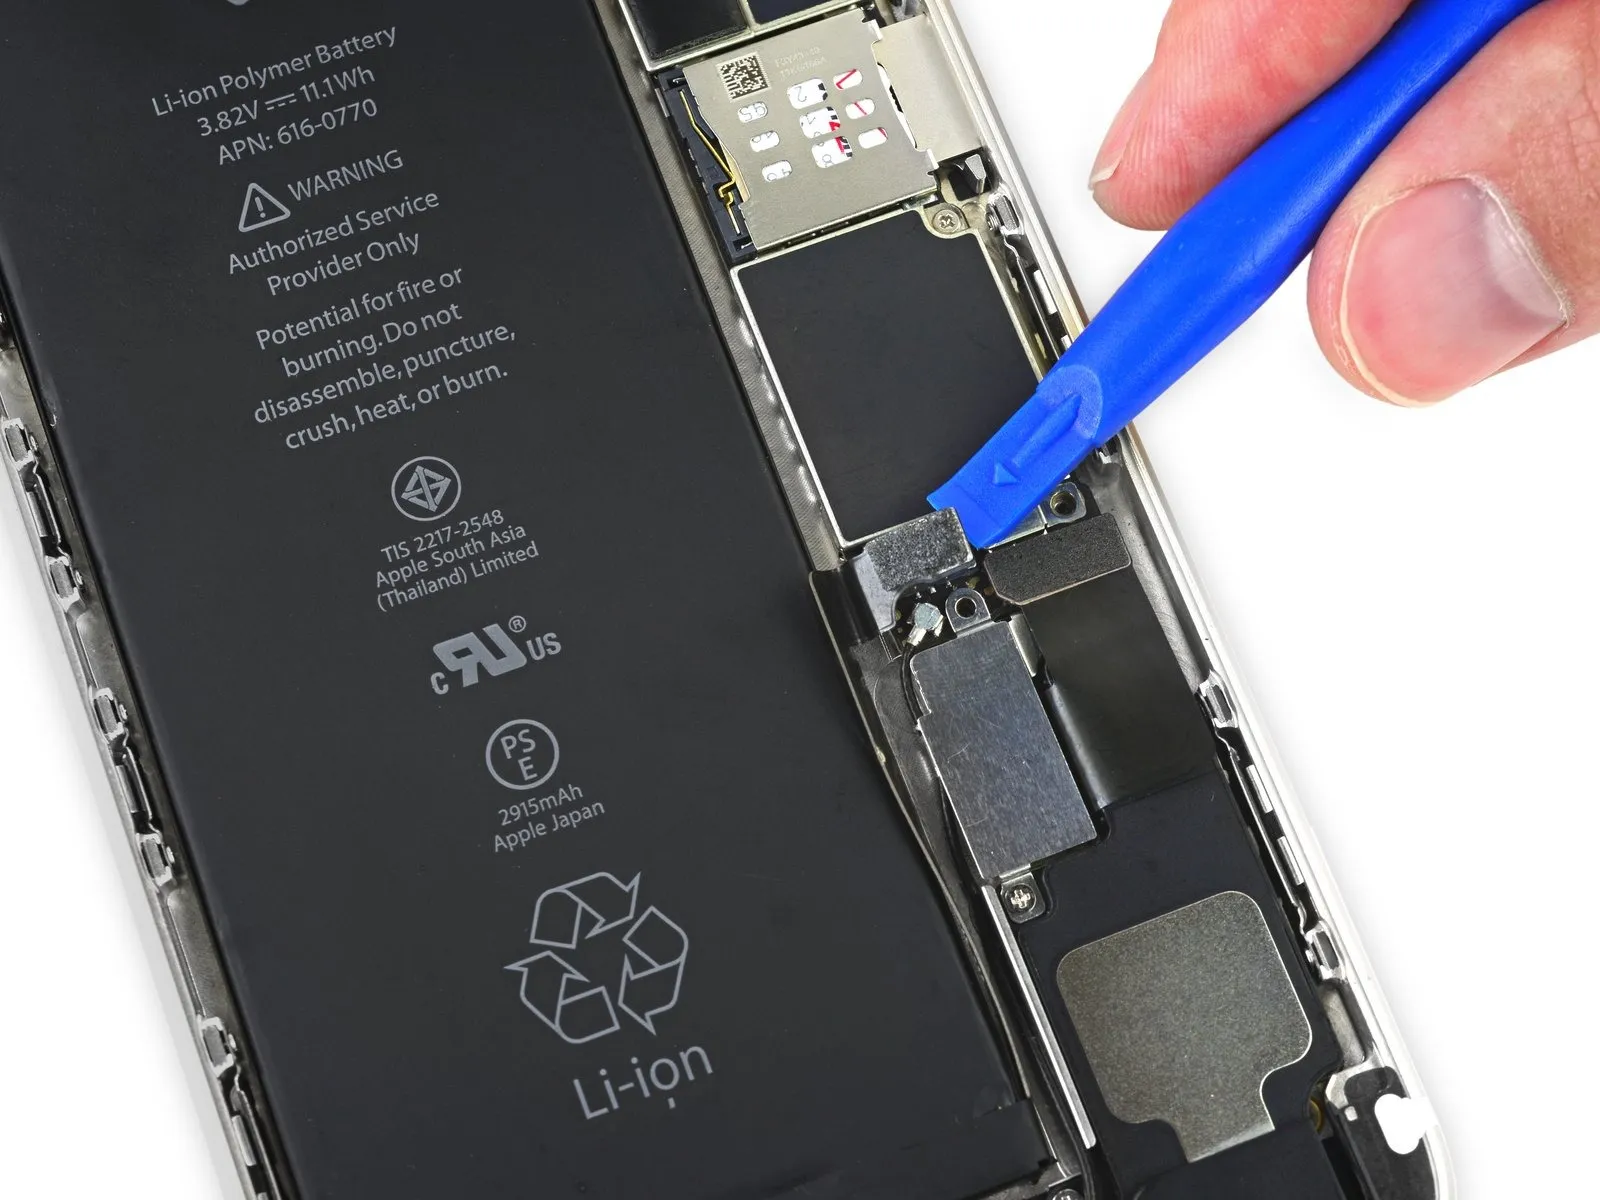
Carefully lift the battery connector away from its corresponding socket on the logic board, employing a clean fingernail or the tip of a specialized opening tool to avoid damage.
To prevent damage, focus your prying action solely on the battery connector itself; avoid applying force to the logic board socket, as this could result in complete connector failure.
To prevent damage, focus your prying action solely on the battery connector itself; avoid applying force to the logic board socket, as this could result in complete connector failure.
Step 12
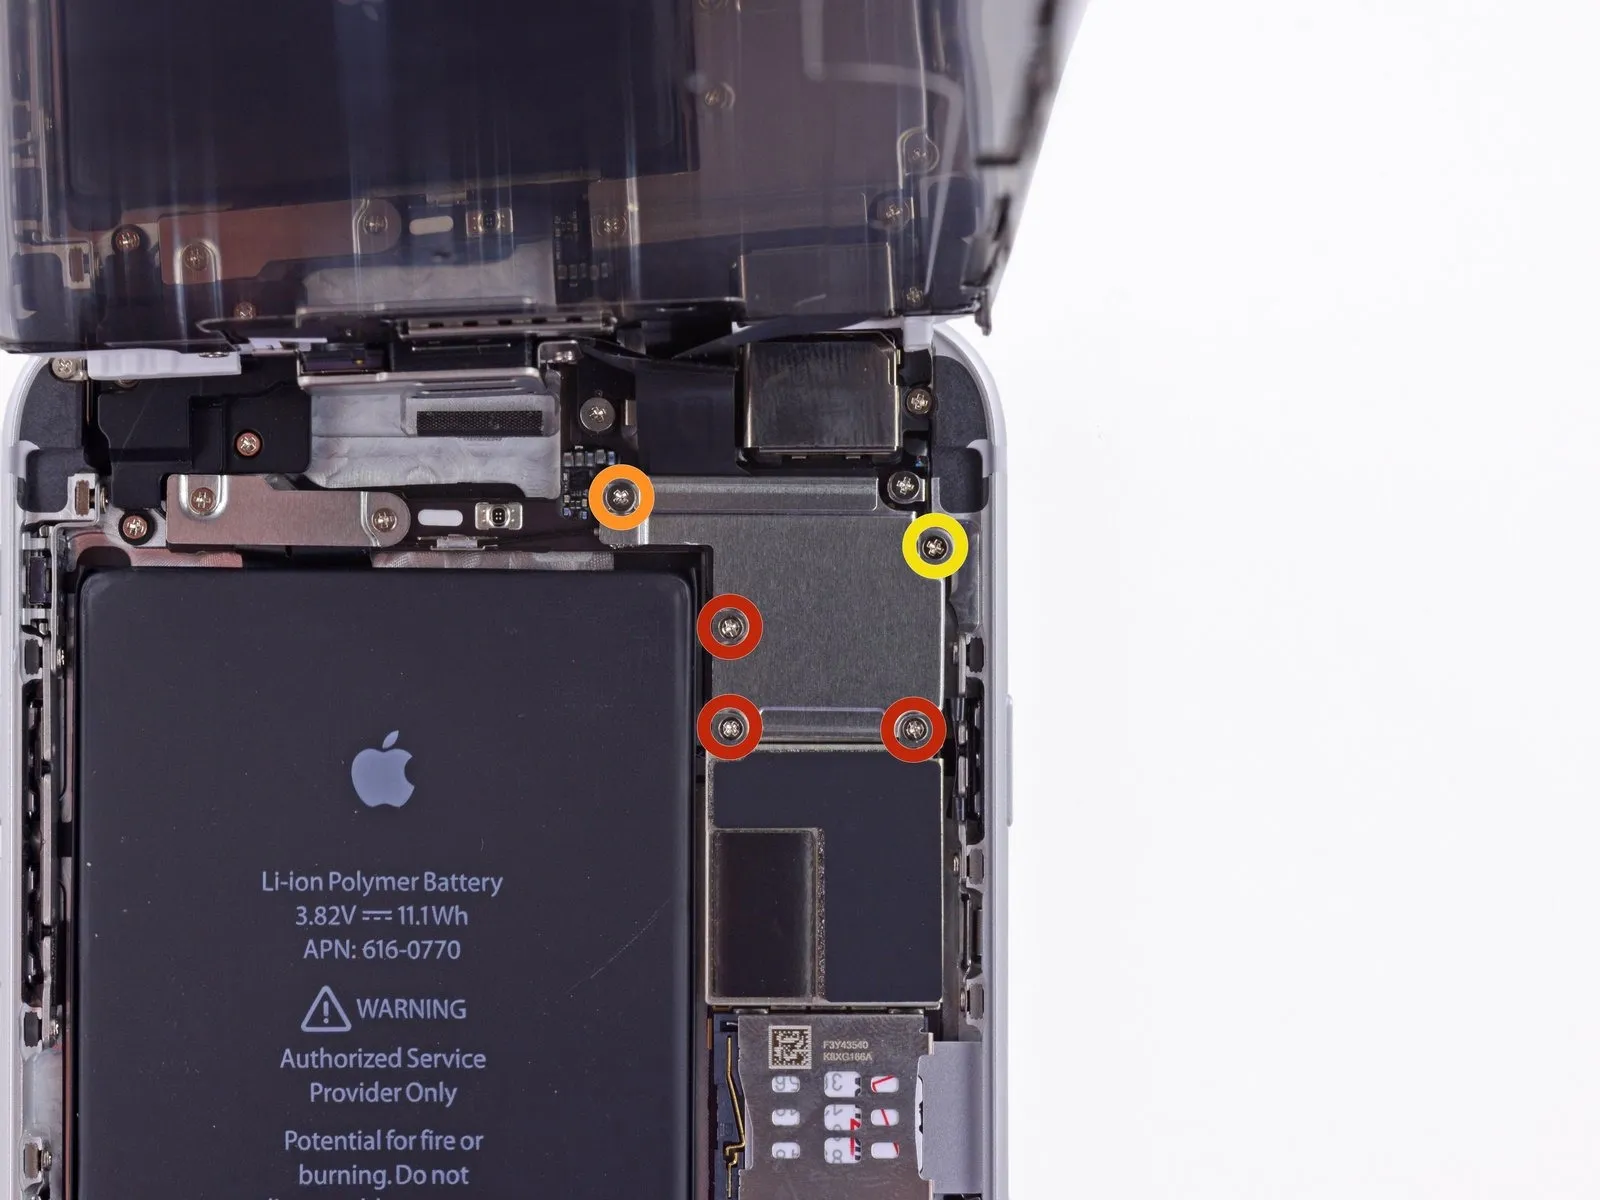
Using a Phillips screwdriver, detach the cable bracket from the front panel assembly by unscrewing the included screws.
Use three screws, each measuring 1.2 millimeters.
A screw with a 1.5-millimeter head diameter is required.
A screw with a 2.9 mm diameter is required.
Inserting screws with a greater length than those specified for the red-marked holes risks causing permanent damage to the logic board.
Use three screws, each measuring 1.2 millimeters.
A screw with a 1.5-millimeter head diameter is required.
A screw with a 2.9 mm diameter is required.
Inserting screws with a greater length than those specified for the red-marked holes risks causing permanent damage to the logic board.
Step 13

Detach the cable bracket securing the front panel assembly wiring harness to the logic board.
Step 14
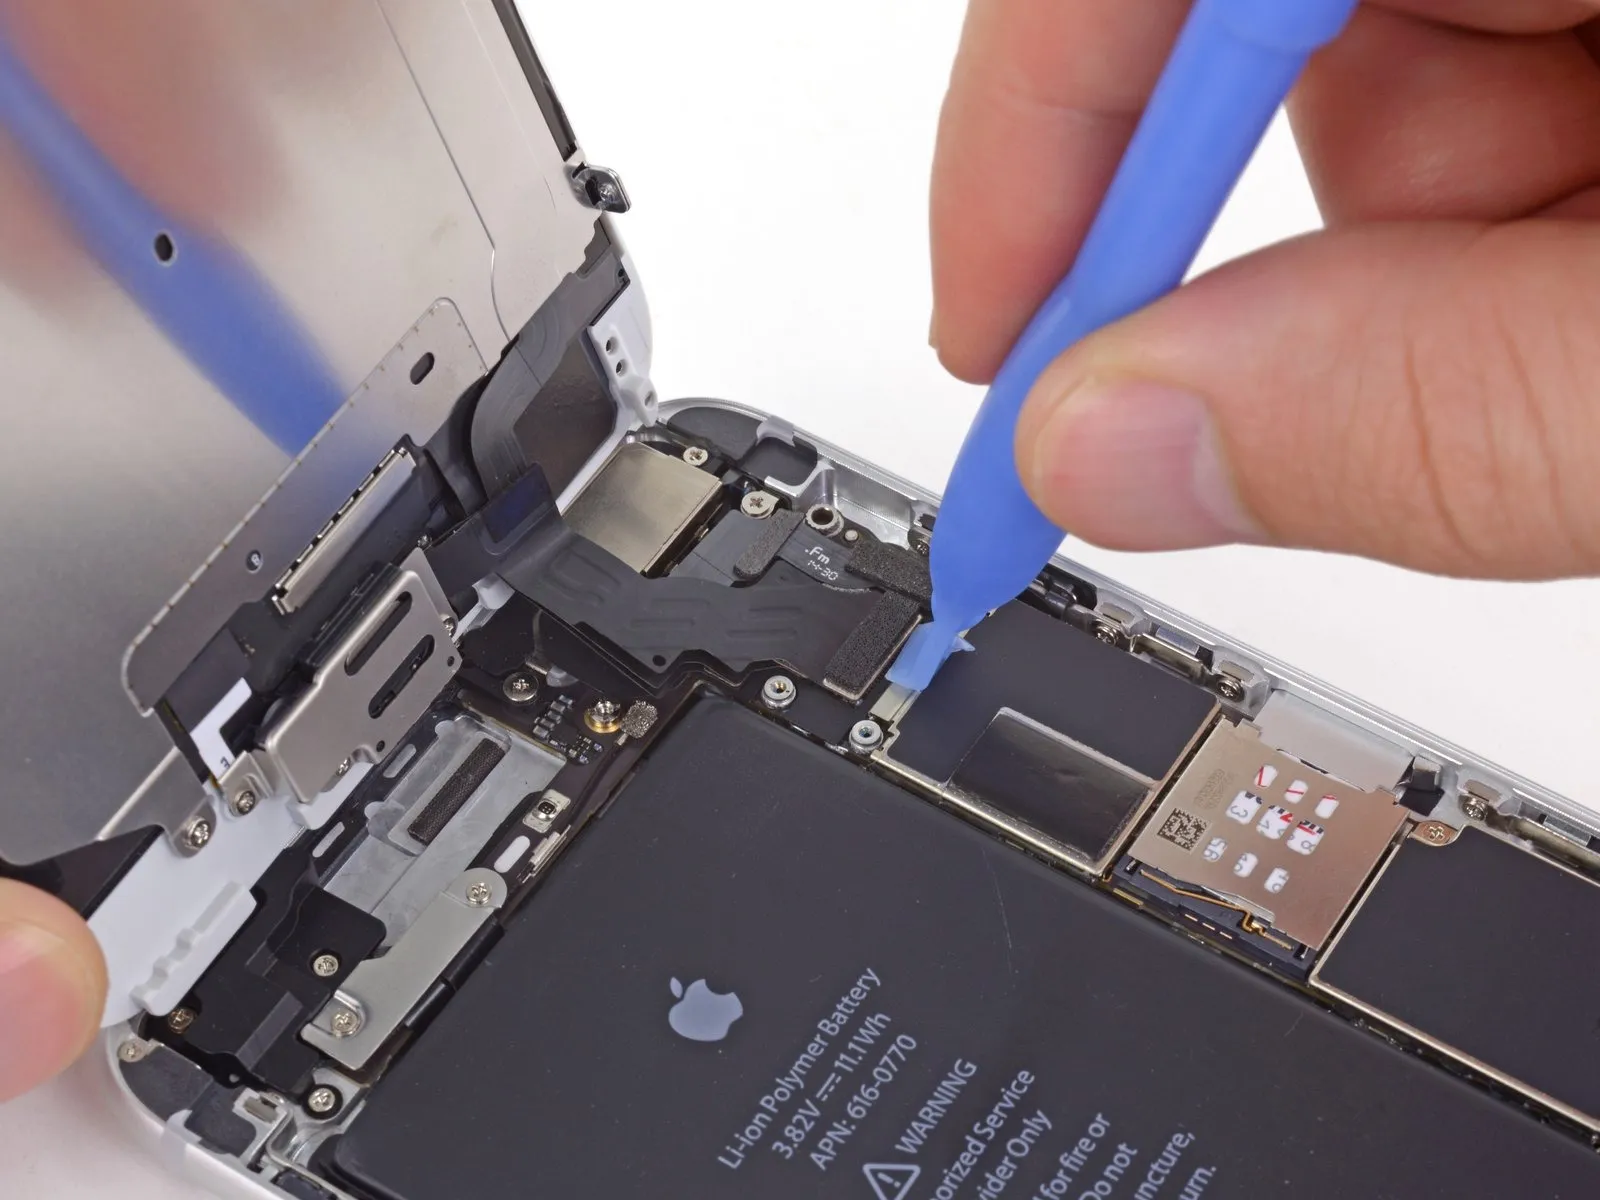

When proceeding with the following four steps, ensure that lifting force is applied solely to the cable connectors themselves, avoiding any upward pressure on the corresponding sockets located on the logic board.
Carefully maintain support for the front panel and then, using a fingernail or a thin opening tool, separate the front camera and earpiece speaker connector from its socket.
Carefully maintain support for the front panel and then, using a fingernail or a thin opening tool, separate the front camera and earpiece speaker connector from its socket.
Step 15
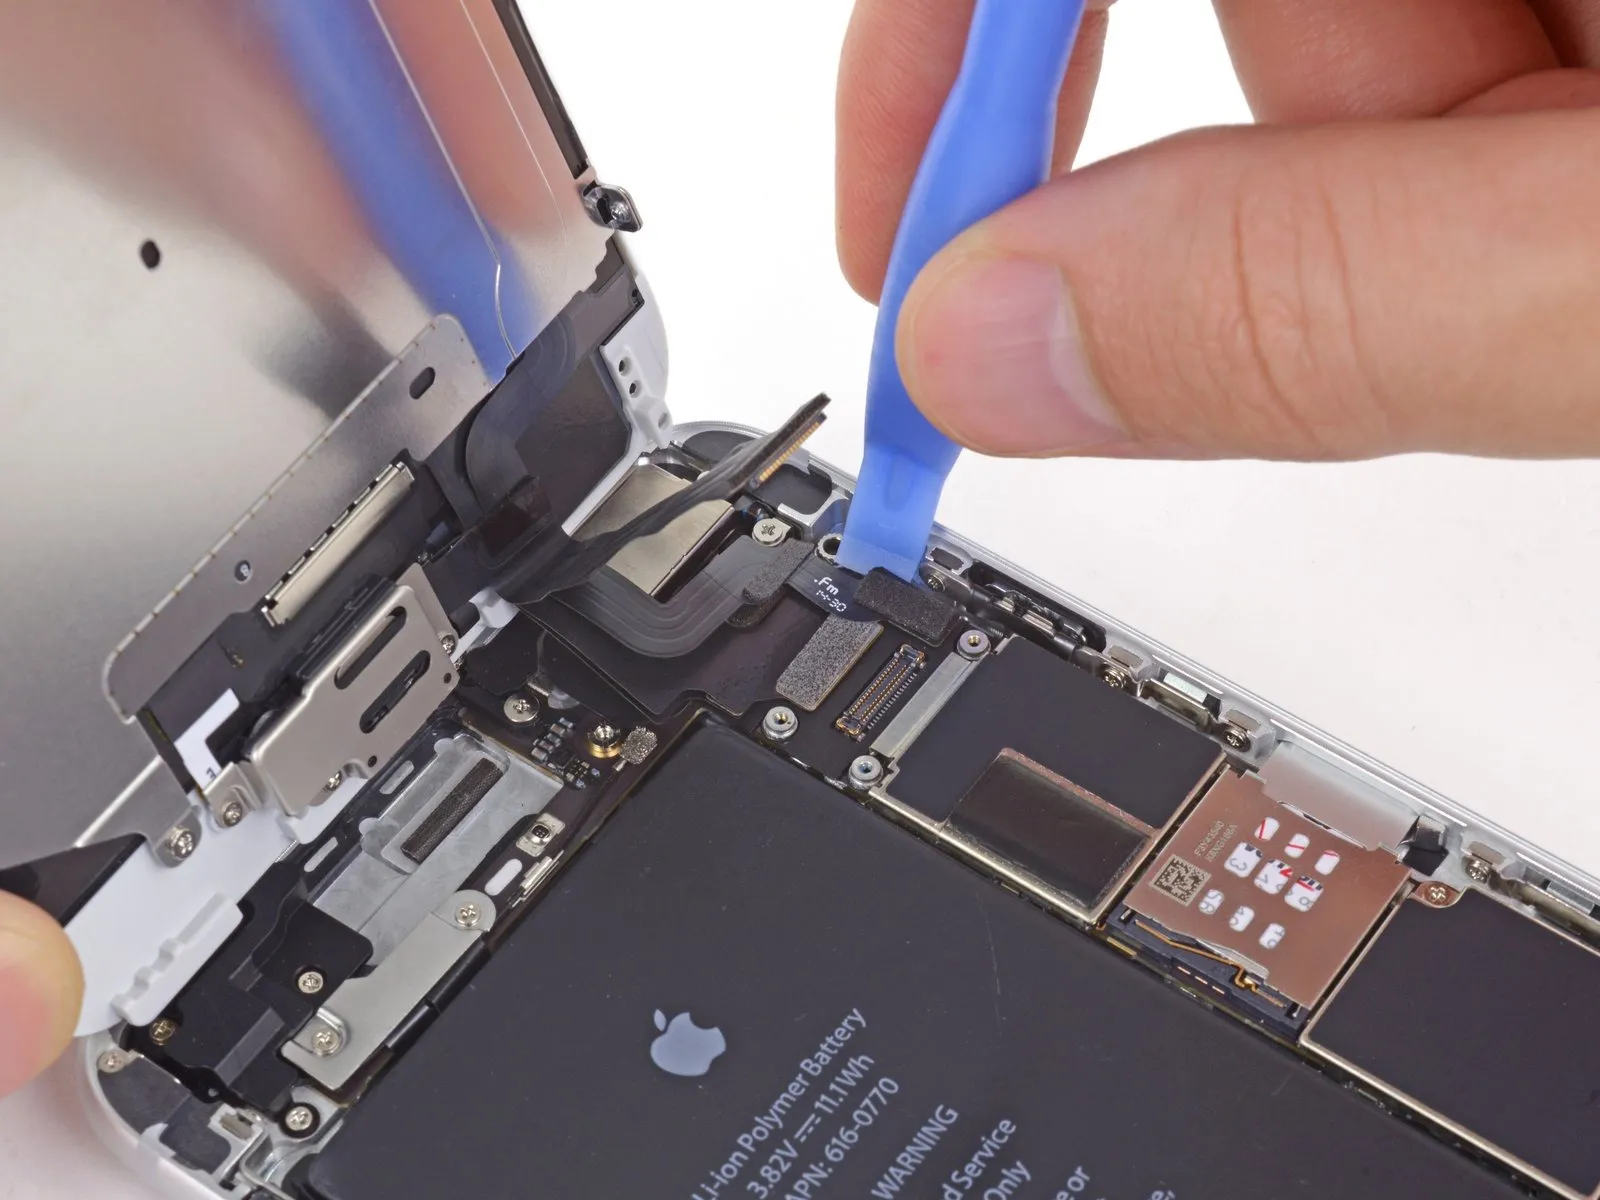

Carefully detach the connector securing the home button cable.
Step 16
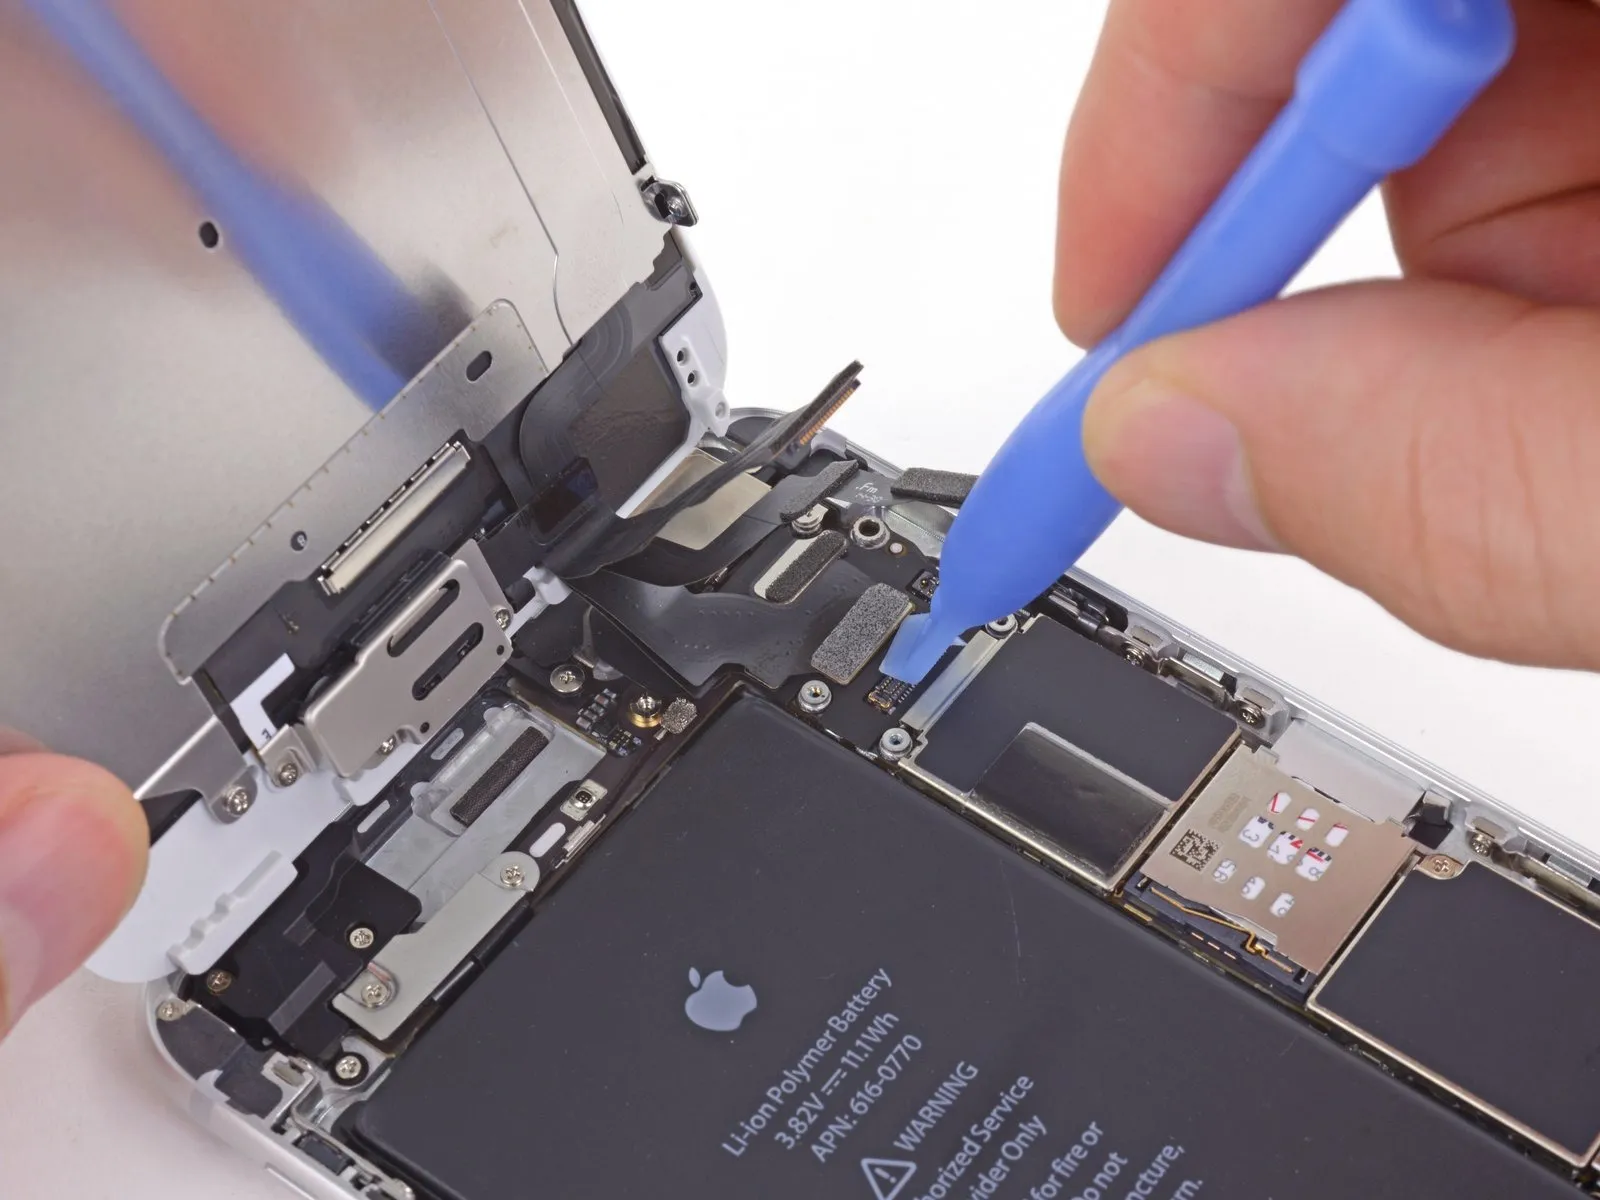

Prior to either detaching or reattaching the cable in this procedure, ensure the battery is disconnected.
Carefully detach the display data cable connector using a plastic opening tool.
To avoid a blank screen or white lines after reassembly, ensure the display data cable remains securely attached to its connector; should this issue arise, restore functionality by re-engaging the cable and then performing a power cycle, which is most reliably achieved by briefly disconnecting and reconnecting the battery connector.
Carefully detach the display data cable connector using a plastic opening tool.
To avoid a blank screen or white lines after reassembly, ensure the display data cable remains securely attached to its connector; should this issue arise, restore functionality by re-engaging the cable and then performing a power cycle, which is most reliably achieved by briefly disconnecting and reconnecting the battery connector.
Step 17


Carefully detach the digitizer cable connector.
To avoid potential digitizer damage or component bending, apply pressure to opposing ends of the digitizer cable connector during reconnection, rather than the central portion.
To avoid potential digitizer damage or component bending, apply pressure to opposing ends of the digitizer cable connector during reconnection, rather than the central portion.
Step 18
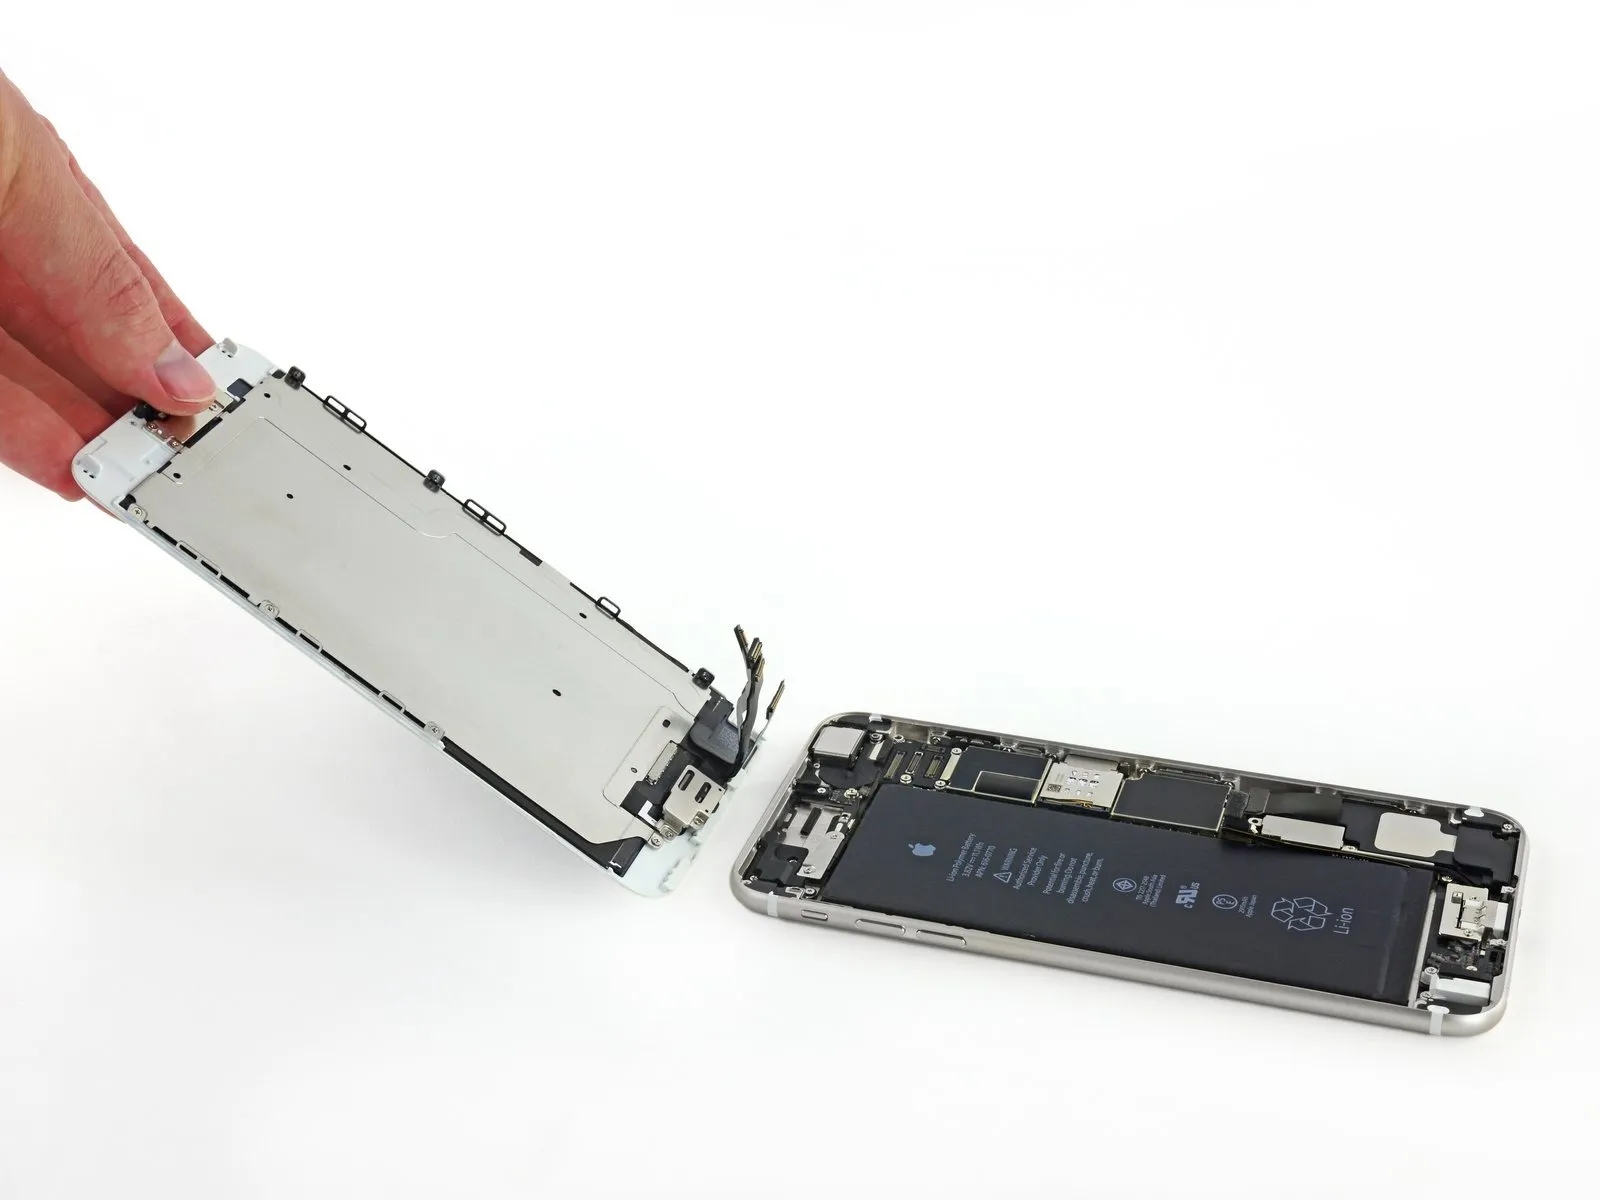
Detach the front panel assembly by disengaging it from the rear case.
Step 19 | Battery
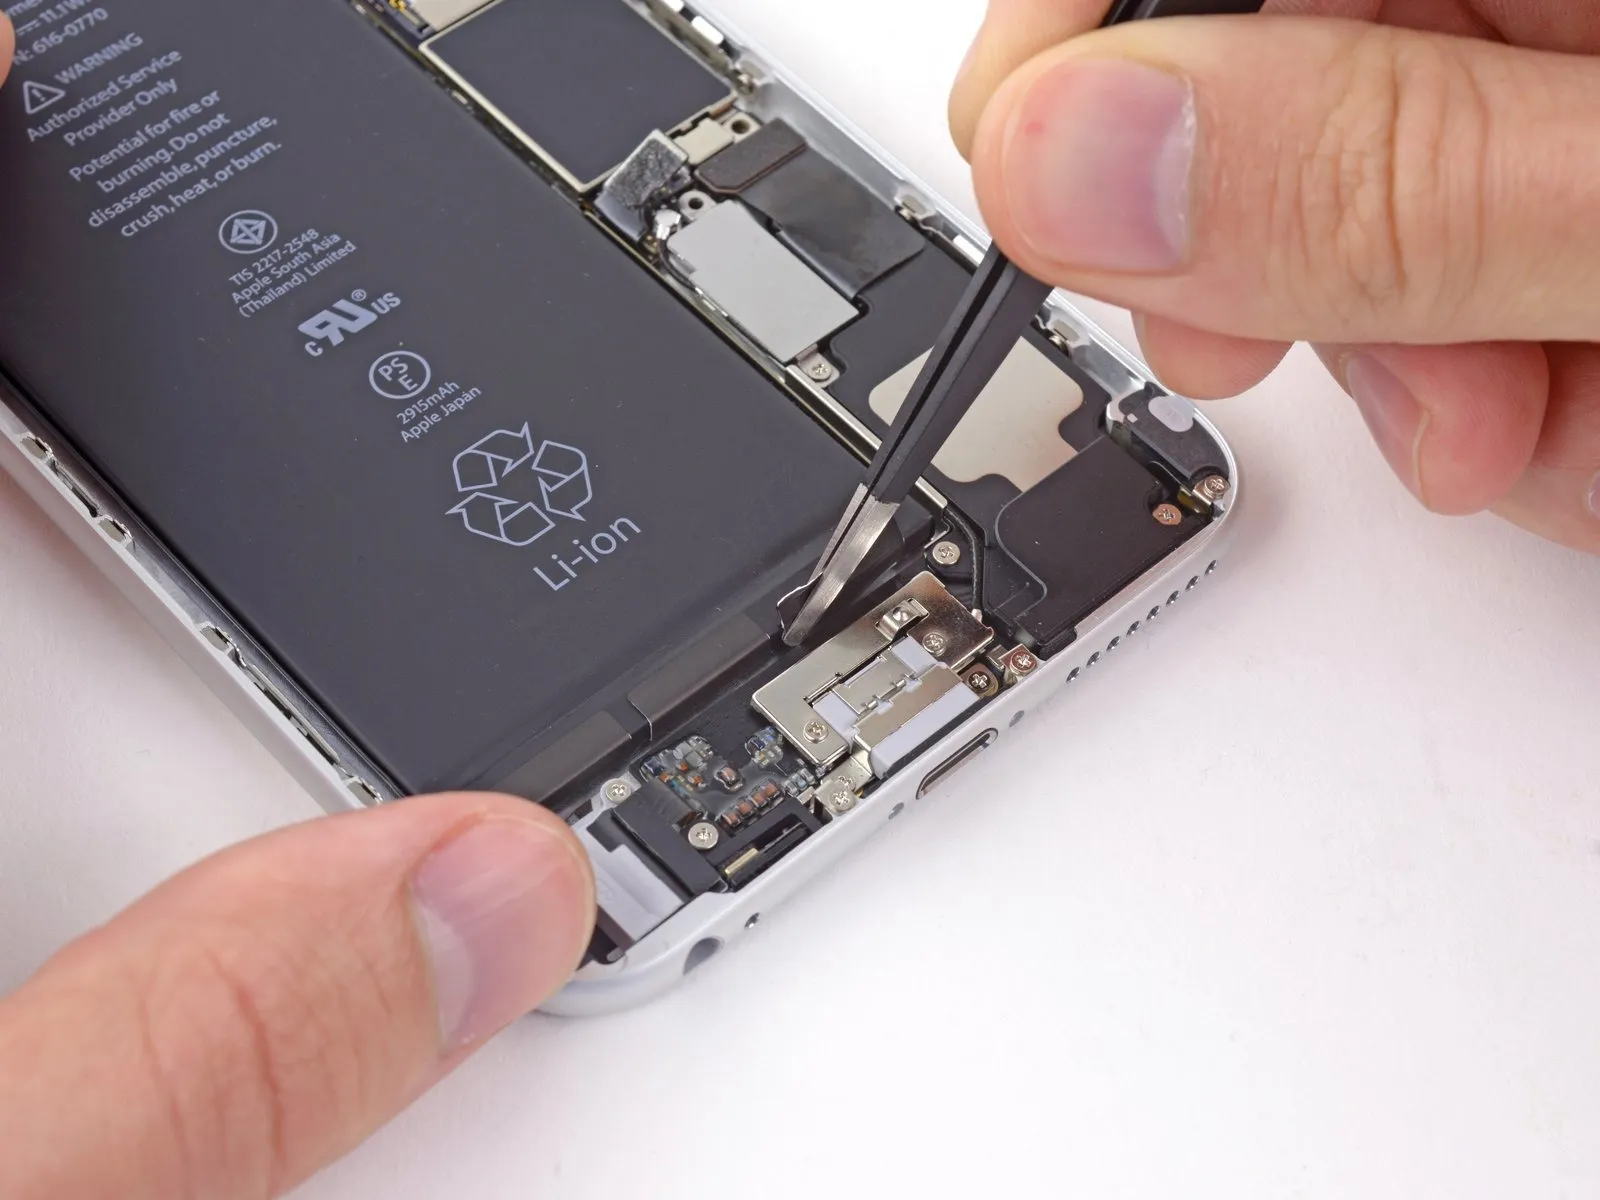
Carefully lift the adhesive securing the battery, starting at the lower right corner.
Exercise caution and utilize either your fingertips or a tool with a rounded, non-sharp tip to avoid damaging components, especially when in the vicinity of the lithium-ion battery; a puncture to this battery poses a risk of releasing hazardous substances and potentially triggering a fire.
Exercise caution and utilize either your fingertips or a tool with a rounded, non-sharp tip to avoid damaging components, especially when in the vicinity of the lithium-ion battery; a puncture to this battery poses a risk of releasing hazardous substances and potentially triggering a fire.
Step 20


To prevent the strips from adhering and tearing, maintain their flatness and avoid creases throughout this step.
Gently draw the adhesive strip, extending it downwards along the iPhone's length, separating it from the battery surface with a deliberate, gradual motion.
Gently extend the strip to allow for give before applying additional force; if resistance isn't noticeable, reduce pressure to prevent breakage.
Gently draw the strip outward, maintaining a shallow angle to prevent the adhesive from adhering to any nearby parts along the phone's bottom edge.
Avoid applying pressure to the battery while extracting the strip.
Apply steady, gradual force to the adhesive strip; it is designed to elongate significantly beyond its initial size, and it will detach from its position beneath the battery once it fully releases.
Should the battery's adhesive strips tear apart while removing it, carefully extract any detached adhesive fragments with your fingers or a tool possessing a flat, non-pinching end, then proceed with the removal.
Should the adhesive securing the battery tear or become inaccessible during removal, carefully eliminate any remaining adhesive segments before continuing with the subsequent steps.
Gently draw the adhesive strip, extending it downwards along the iPhone's length, separating it from the battery surface with a deliberate, gradual motion.
Gently extend the strip to allow for give before applying additional force; if resistance isn't noticeable, reduce pressure to prevent breakage.
Gently draw the strip outward, maintaining a shallow angle to prevent the adhesive from adhering to any nearby parts along the phone's bottom edge.
Avoid applying pressure to the battery while extracting the strip.
Apply steady, gradual force to the adhesive strip; it is designed to elongate significantly beyond its initial size, and it will detach from its position beneath the battery once it fully releases.
Should the battery's adhesive strips tear apart while removing it, carefully extract any detached adhesive fragments with your fingers or a tool possessing a flat, non-pinching end, then proceed with the removal.
Should the adhesive securing the battery tear or become inaccessible during removal, carefully eliminate any remaining adhesive segments before continuing with the subsequent steps.
Step 21


Carefully align the 4mm diameter dowel pins with their corresponding holes in both the upper and lower chassis halves, then gently press the two sections together until flush, ensuring no gaps exist and the pins are fully seated.
Carefully peel the second battery adhesive strip away from the opposite side of the battery.
Carefully draw the adhesive tab outward, extending it gradually to free it from the space between the battery and the rear case.
Maintain traction on the tab until it disengages fully; should breakage occur, attempt to recover any detached fragments and proceed with pulling or follow the subsequent instructions.
Carefully peel the second battery adhesive strip away from the opposite side of the battery.
Carefully draw the adhesive tab outward, extending it gradually to free it from the space between the battery and the rear case.
Maintain traction on the tab until it disengages fully; should breakage occur, attempt to recover any detached fragments and proceed with pulling or follow the subsequent instructions.
Step 22


Carefully align the 4mm diameter dowel pins with their corresponding holes in both the upper and lower chassis halves, then gently press the two sections together until flush, ensuring no gaps remain and avoiding excessive force that could damage the plastic components.
Carefully detach the remaining adhesive securing the battery to the device's base by gently lifting the battery adhesive tab located along the lower edge.
Carefully separate the battery from the rear case by lifting it vertically while the adhesive strip remains positioned between the two components, facilitating its removal.
To prevent the battery from being ejected from the iPhone during the final step, maintain firm pressure on it as the last adhesive strip is removed.
Gently draw the adhesive strip outward until it completely detaches from the device.
Should all three adhesive strips detach cleanly, proceed to step 24; however, if the adhesive tears away from the battery and remains inaccessible, carefully apply a small amount of isopropyl alcohol with a concentration exceeding 90% beneath the battery's edge, specifically targeting the location of the detached adhesive strip(s).
Allow approximately sixty seconds for the isopropyl alcohol to soften the adhesive securing the battery, then carefully separate the battery from the device casing using the spudger's flat edge.
To prevent damage, avoid using excessive force when removing the battery. Should the battery remain stuck, add a small amount of additional alcohol to dissolve more of the adhesive. Ensure the pry tool does not bend, break, or penetrate the battery casing during the process.
Avoid applying force to the logic board to prevent irreversible harm to your iPhone. Exercise caution when prying near the battery's upper edge, specifically in the area close to the volume up button and mute switch, as this region houses the audio controls cable—a component affixed to the rear case directly below the battery—and damage to it may occur.
Should the adhesive not release, proceed to step 23.
Carefully detach the remaining adhesive securing the battery to the device's base by gently lifting the battery adhesive tab located along the lower edge.
Carefully separate the battery from the rear case by lifting it vertically while the adhesive strip remains positioned between the two components, facilitating its removal.
To prevent the battery from being ejected from the iPhone during the final step, maintain firm pressure on it as the last adhesive strip is removed.
Gently draw the adhesive strip outward until it completely detaches from the device.
Should all three adhesive strips detach cleanly, proceed to step 24; however, if the adhesive tears away from the battery and remains inaccessible, carefully apply a small amount of isopropyl alcohol with a concentration exceeding 90% beneath the battery's edge, specifically targeting the location of the detached adhesive strip(s).
Allow approximately sixty seconds for the isopropyl alcohol to soften the adhesive securing the battery, then carefully separate the battery from the device casing using the spudger's flat edge.
To prevent damage, avoid using excessive force when removing the battery. Should the battery remain stuck, add a small amount of additional alcohol to dissolve more of the adhesive. Ensure the pry tool does not bend, break, or penetrate the battery casing during the process.
Avoid applying force to the logic board to prevent irreversible harm to your iPhone. Exercise caution when prying near the battery's upper edge, specifically in the area close to the volume up button and mute switch, as this region houses the audio controls cable—a component affixed to the rear case directly below the battery—and damage to it may occur.
Should the adhesive not release, proceed to step 23.
Step 23 | Alternative methods to unstick the battery from the case

Using the 5mm hex key, carefully tighten the four M4x8 screws securing the fan assembly to the heatsink, ensuring a torque of 4.0 in-lbs is achieved to prevent damage.
To free a battery adhered to the back cover, apply heat using an iOpener or a hair dryer, focusing on the area immediately behind the battery.
Carefully separate the battery from the device housing by employing a plastic pry tool.
Exposure to excessive heat presents a fire hazard due to the lithium-ion battery's potential for ignition.
To release the battery from the back cover, dental floss can be employed as a separating tool; for greater leverage, a guitar string, specifically a 0.009 inch E string from a 12-string guitar set, is a more robust option.
Using floss or string, gently work it between the battery and its housing, moving back and forth like a saw to cut through the adhesive bond.
To free a battery adhered to the back cover, apply heat using an iOpener or a hair dryer, focusing on the area immediately behind the battery.
Carefully separate the battery from the device housing by employing a plastic pry tool.
Exposure to excessive heat presents a fire hazard due to the lithium-ion battery's potential for ignition.
To release the battery from the back cover, dental floss can be employed as a separating tool; for greater leverage, a guitar string, specifically a 0.009 inch E string from a 12-string guitar set, is a more robust option.
Using floss or string, gently work it between the battery and its housing, moving back and forth like a saw to cut through the adhesive bond.
Step 24

Carefully align the 4mm hex key to the setscrew on the motor shaft, then tighten it to a torque of 0.8 Nm using the torque wrench, ensuring the motor remains securely fastened and avoiding damage to the setscrew.
Disconnecting the iPhone's internal battery requires its complete removal.
Carefully slide the protective plastic covering off the new battery, ensuring you don't snag or damage the ribbon cable during removal.
To prevent damage, ensure any residual alcohol solution is completely removed by wiping with a clean cloth or permitting full evaporation before proceeding with the new battery installation.
To guarantee correct positioning within its compartment, briefly plug the battery connector back into the logic board's socket prior to securing the new battery.
Secure the battery in place, then sever its electrical connection before proceeding with the remaining assembly steps.
To secure a battery lacking factory-applied adhesive, follow the detailed instructions provided in this guide for adhesive strip replacement.
Following reassembly, execute a complete system reset to proactively avoid potential problems and streamline any subsequent diagnostic procedures.
Disconnecting the iPhone's internal battery requires its complete removal.
Carefully slide the protective plastic covering off the new battery, ensuring you don't snag or damage the ribbon cable during removal.
To prevent damage, ensure any residual alcohol solution is completely removed by wiping with a clean cloth or permitting full evaporation before proceeding with the new battery installation.
To guarantee correct positioning within its compartment, briefly plug the battery connector back into the logic board's socket prior to securing the new battery.
Secure the battery in place, then sever its electrical connection before proceeding with the remaining assembly steps.
To secure a battery lacking factory-applied adhesive, follow the detailed instructions provided in this guide for adhesive strip replacement.
Following reassembly, execute a complete system reset to proactively avoid potential problems and streamline any subsequent diagnostic procedures.