iPhone 17 Screen Replacement
Step 1 | Before you begin


To optimize battery health, permit the battery's charge level to descend to a minimum of 25%.A lithium-ion battery that is fully charged presents a possible safety risk.Disconnect all connected cables from the device.
Simultaneously depress the power button and one of the volume buttons, then utilize the swipe gesture to initiate the power-off sequence.
This procedure is necessary to ensure safe operation and prevent potential damage during the repair process.
Step 2 | Tape over any cracks


To prevent injury and simplify the subsequent separation of components, apply multiple layers of adhesive packing tape across the fractured screen or rear glass surface.
Ensure a sufficiently sized, uninterrupted section exists close to the lower perimeter, allowing for secure adhesion of a suction cup.
Step 3 | Remove the pentalobe screws


Employ a P2 pentalobe driver for the task of detaching the screws.The screws securing the charging port are of a length measuring 7.7 millimeters.Two screws are located on each side of the charging port, requiring removal.A specialized P2 pentalobe driver is essential for manipulating these fasteners.To access the charging port, the two screws positioned laterally must be unscrewed using the appropriate driver.
Step 4 | Mark your opening picks


Excessive insertion of a pick can potentially harm the device; therefore, it's crucial to implement a marking procedure to mitigate this risk.
- Using a measuring tool, determine a distance of3 millimetersfrom the pick's leading edge and apply a permanent marker to create a visible indicator.
- For enhanced precision, consider marking the pick's other corners with varying measurement values.
- As an alternative method, affix a coin to the pick's shaft, positioning it3 millimetersaway from the tip to serve as a depth gauge.
Step 5 | Heat the bottom edge
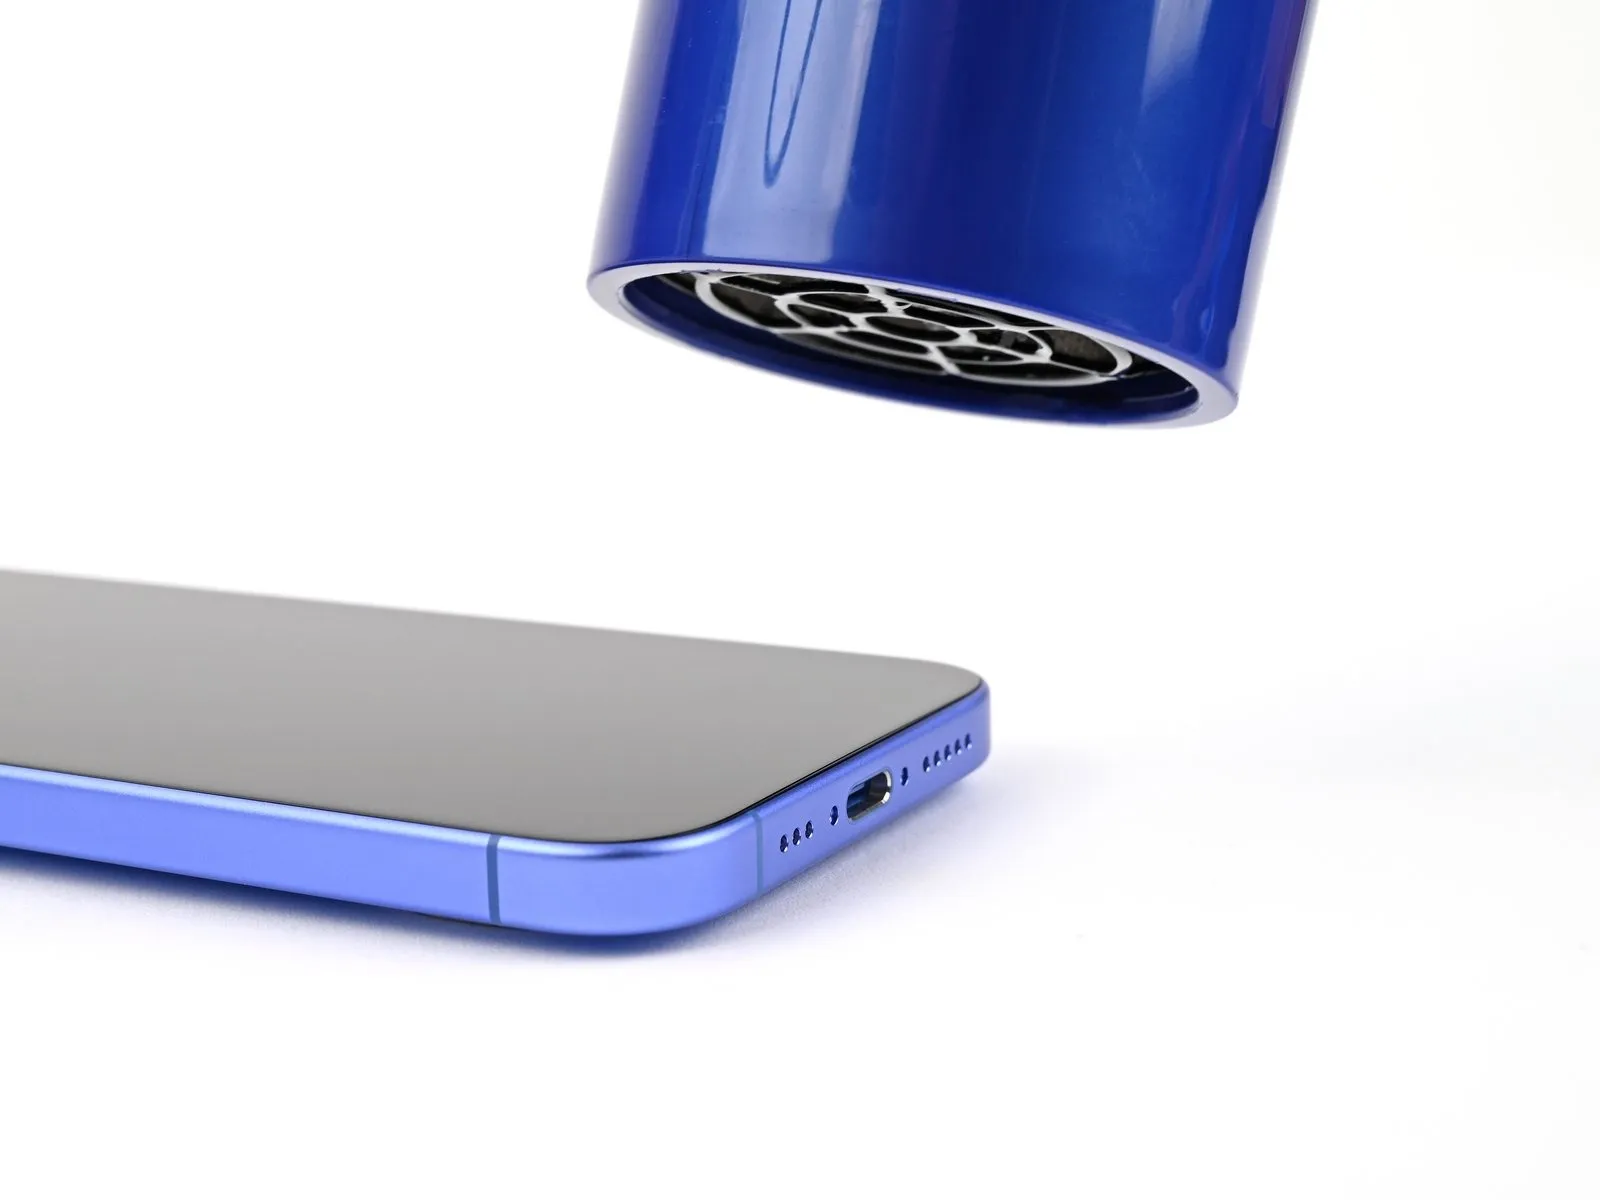
Employ a hair dryer or heat gun to warm the screen's lower border until surface temperature is perceptible by touch.Alternatively, an iOpener can be utilized to heat the rear glass panel.Adherence to the subsequent instructions is crucial for correct iOpener application and heating.The application of heat should extend across the entire lower edge of the display.Ensure the temperature reaches a level where the surface feels warm to the hand.Proper heating facilitates separation of the screen from the device's adhesive.
Careful adherence to these procedures minimizes the risk of damaging the rear glass during the heating process.
Step 6 | Insert an opening pick
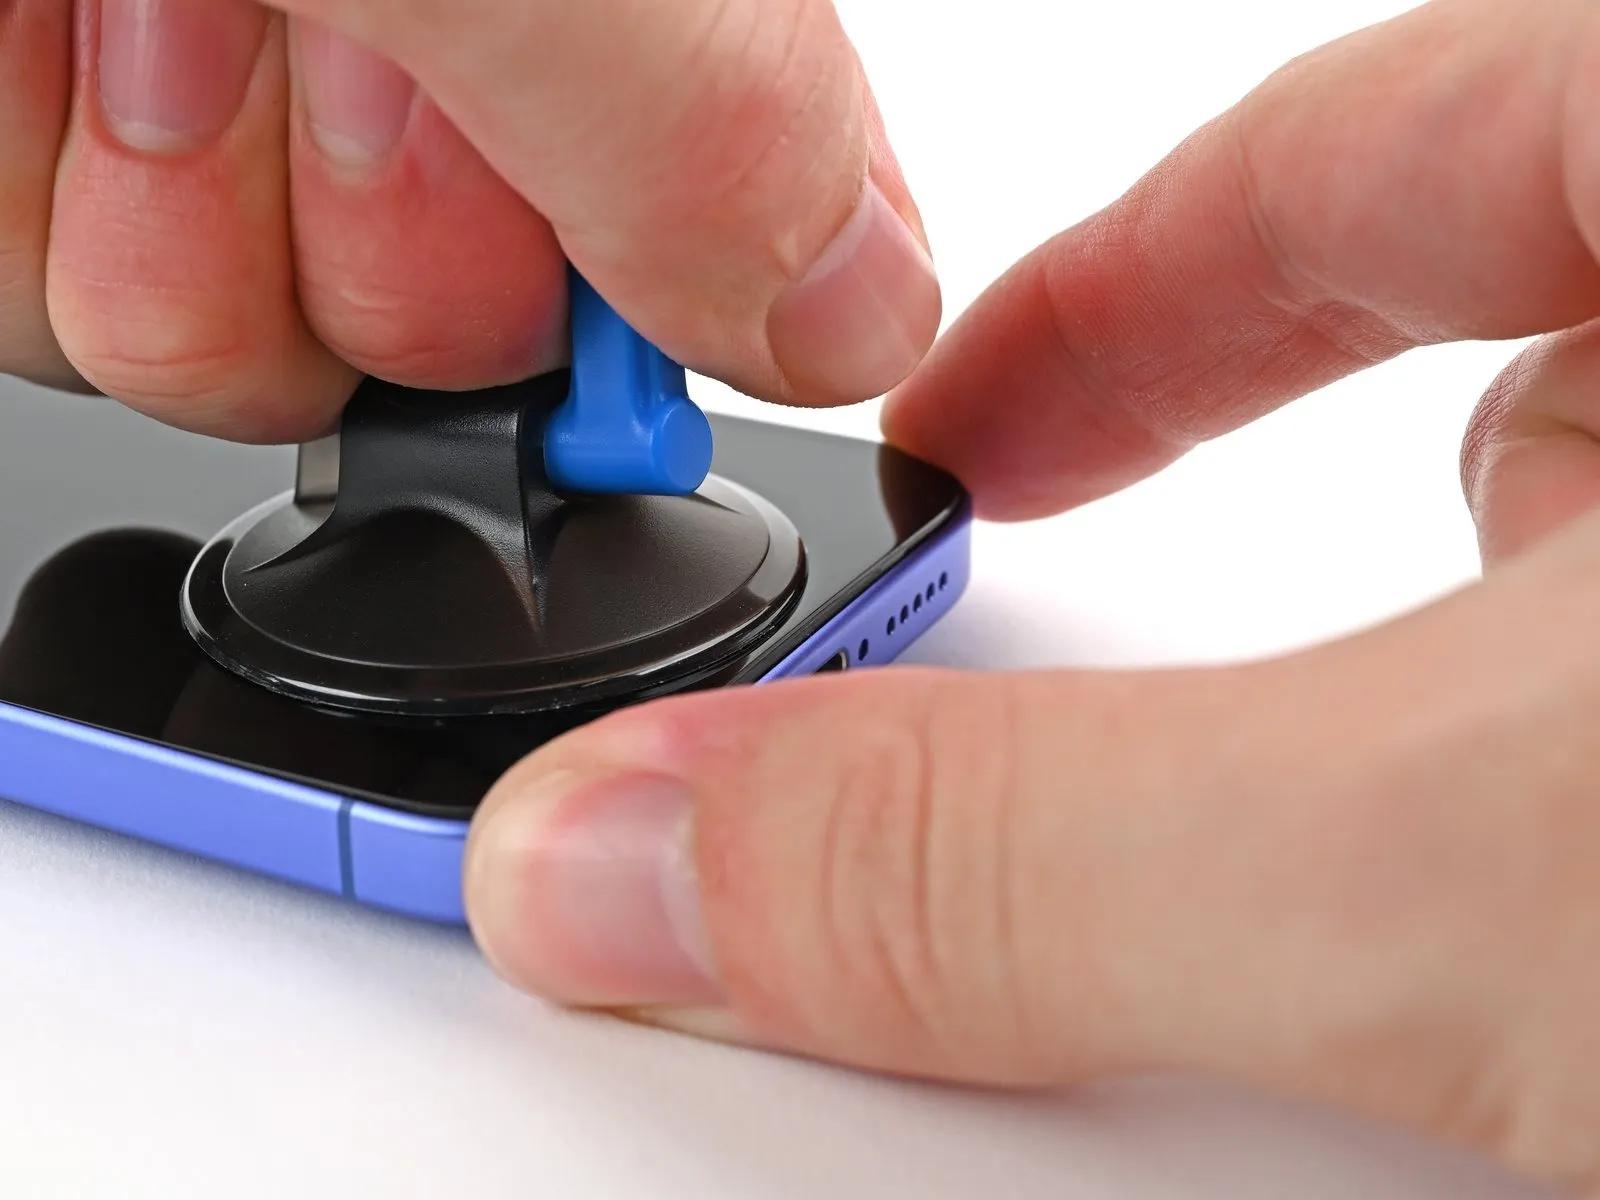
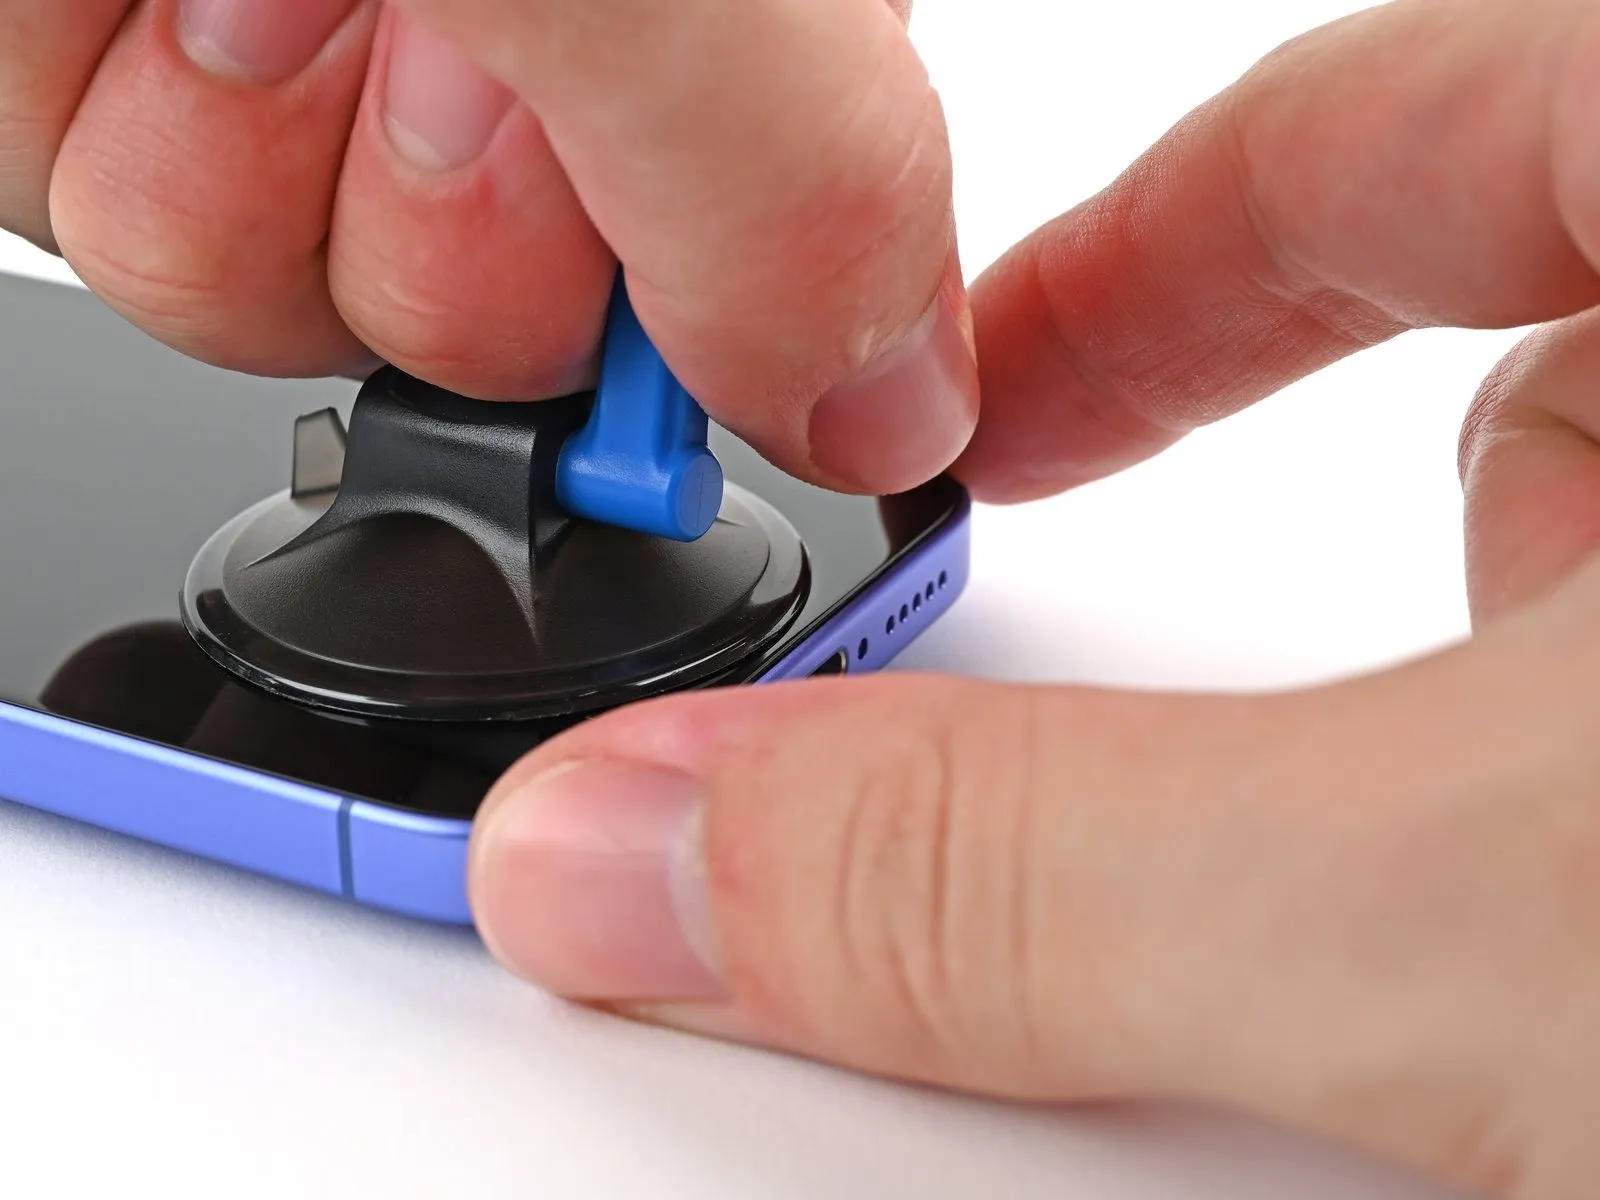
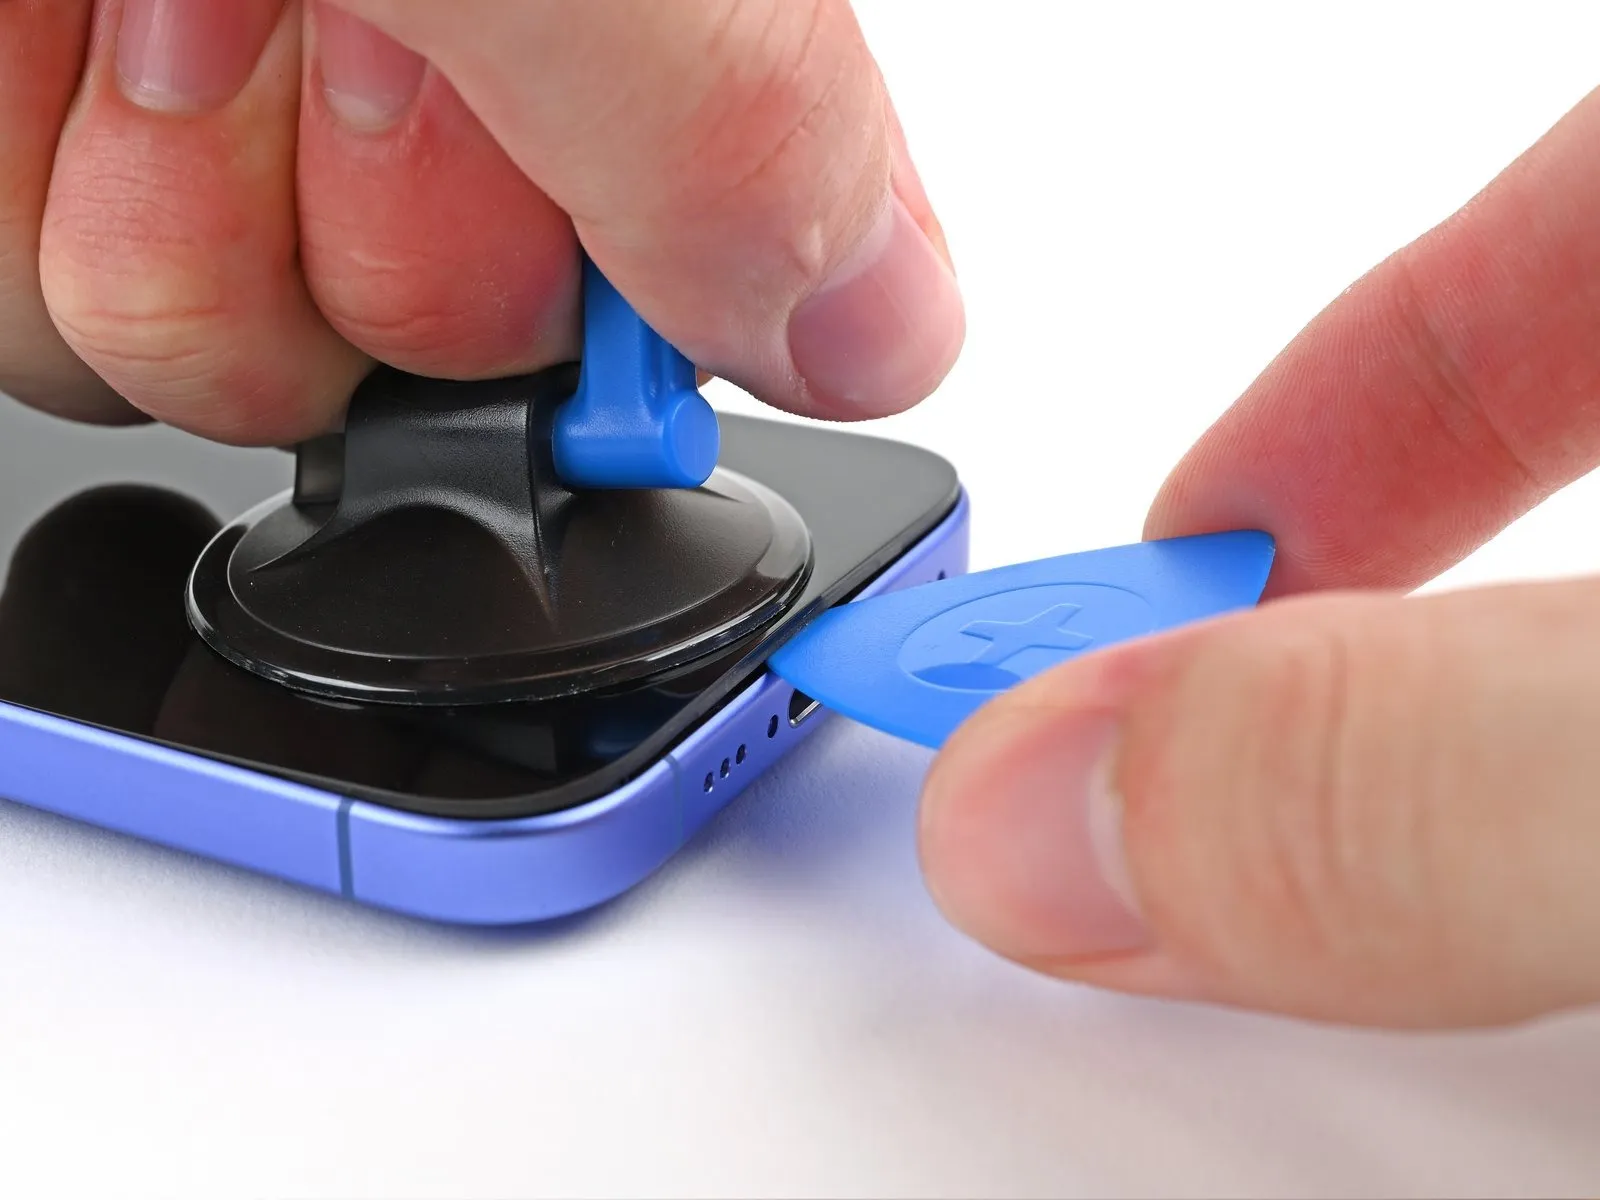
- Securely attach a suction cup to the lower border of the display assembly.
- Maintaining structural integrity of the chassis with manual support, exert a consistent and powerful upward traction on the suction cup to establish separation between the display and its surrounding frame.
- Carefully introduce the pointed end of a prying tool into the newly formed space.
Step 7 | Screen information
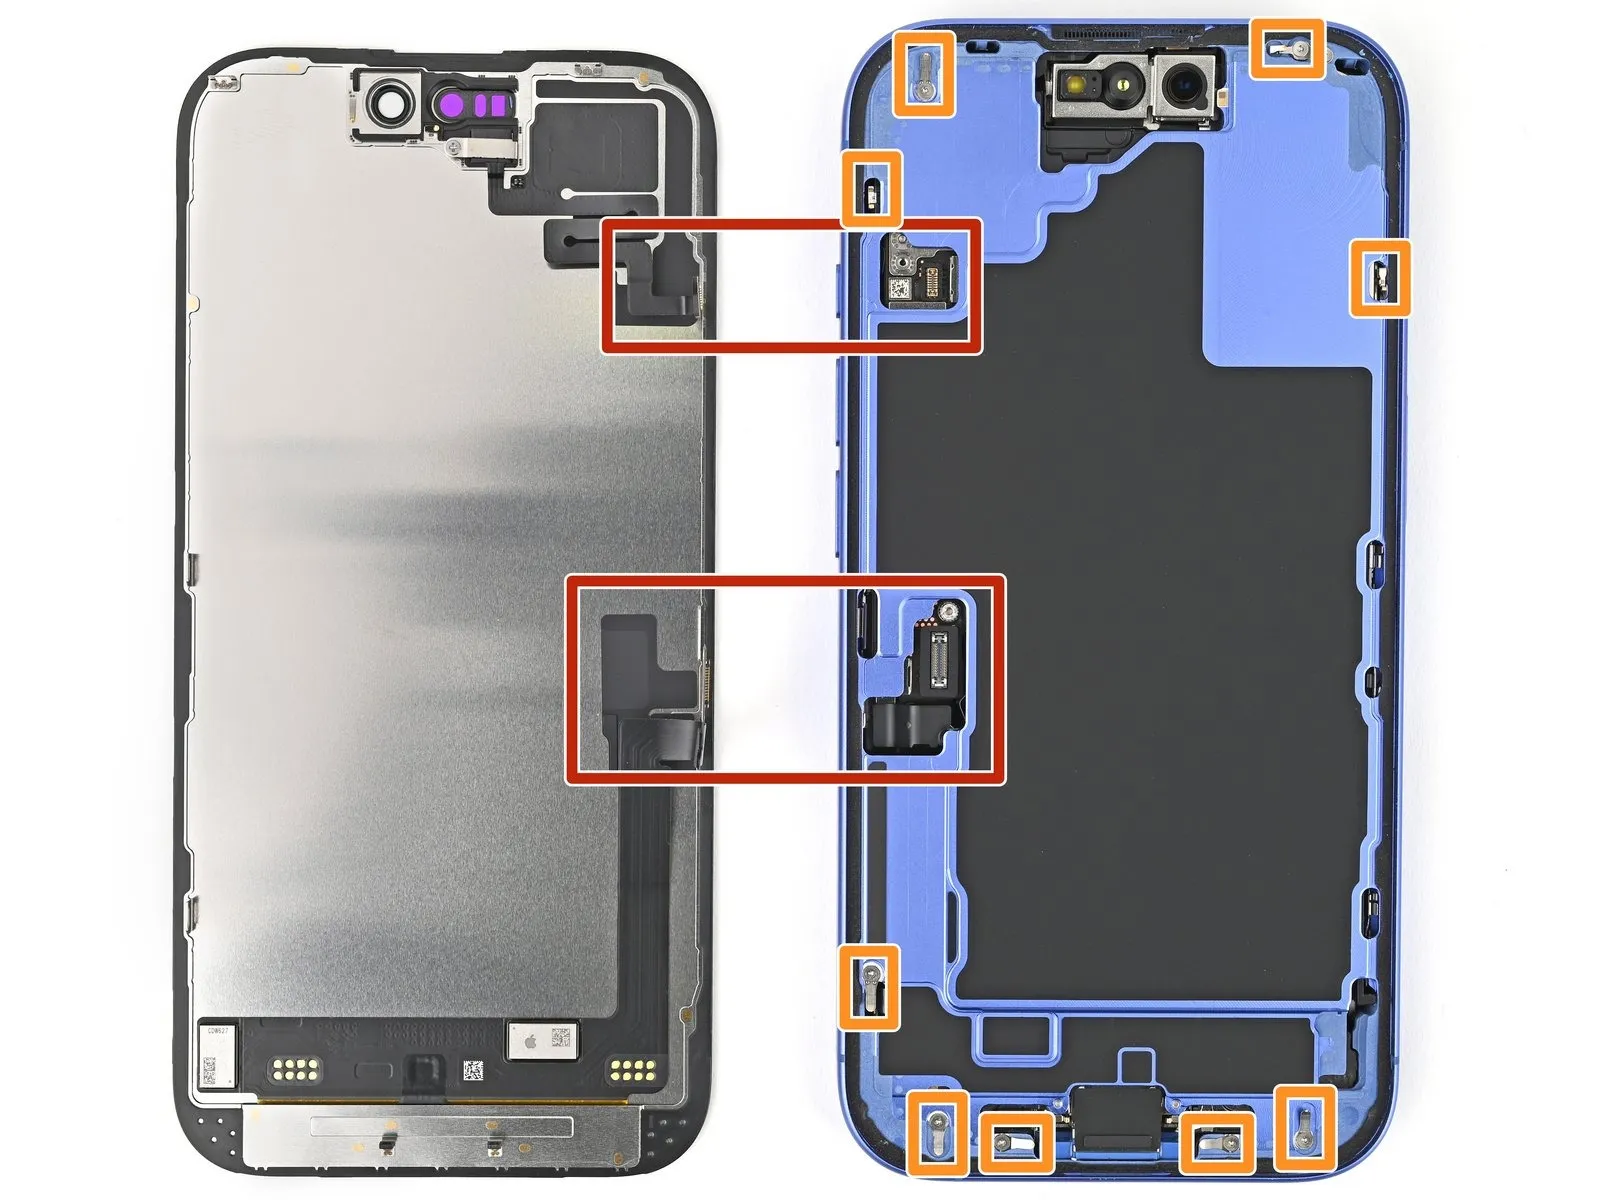
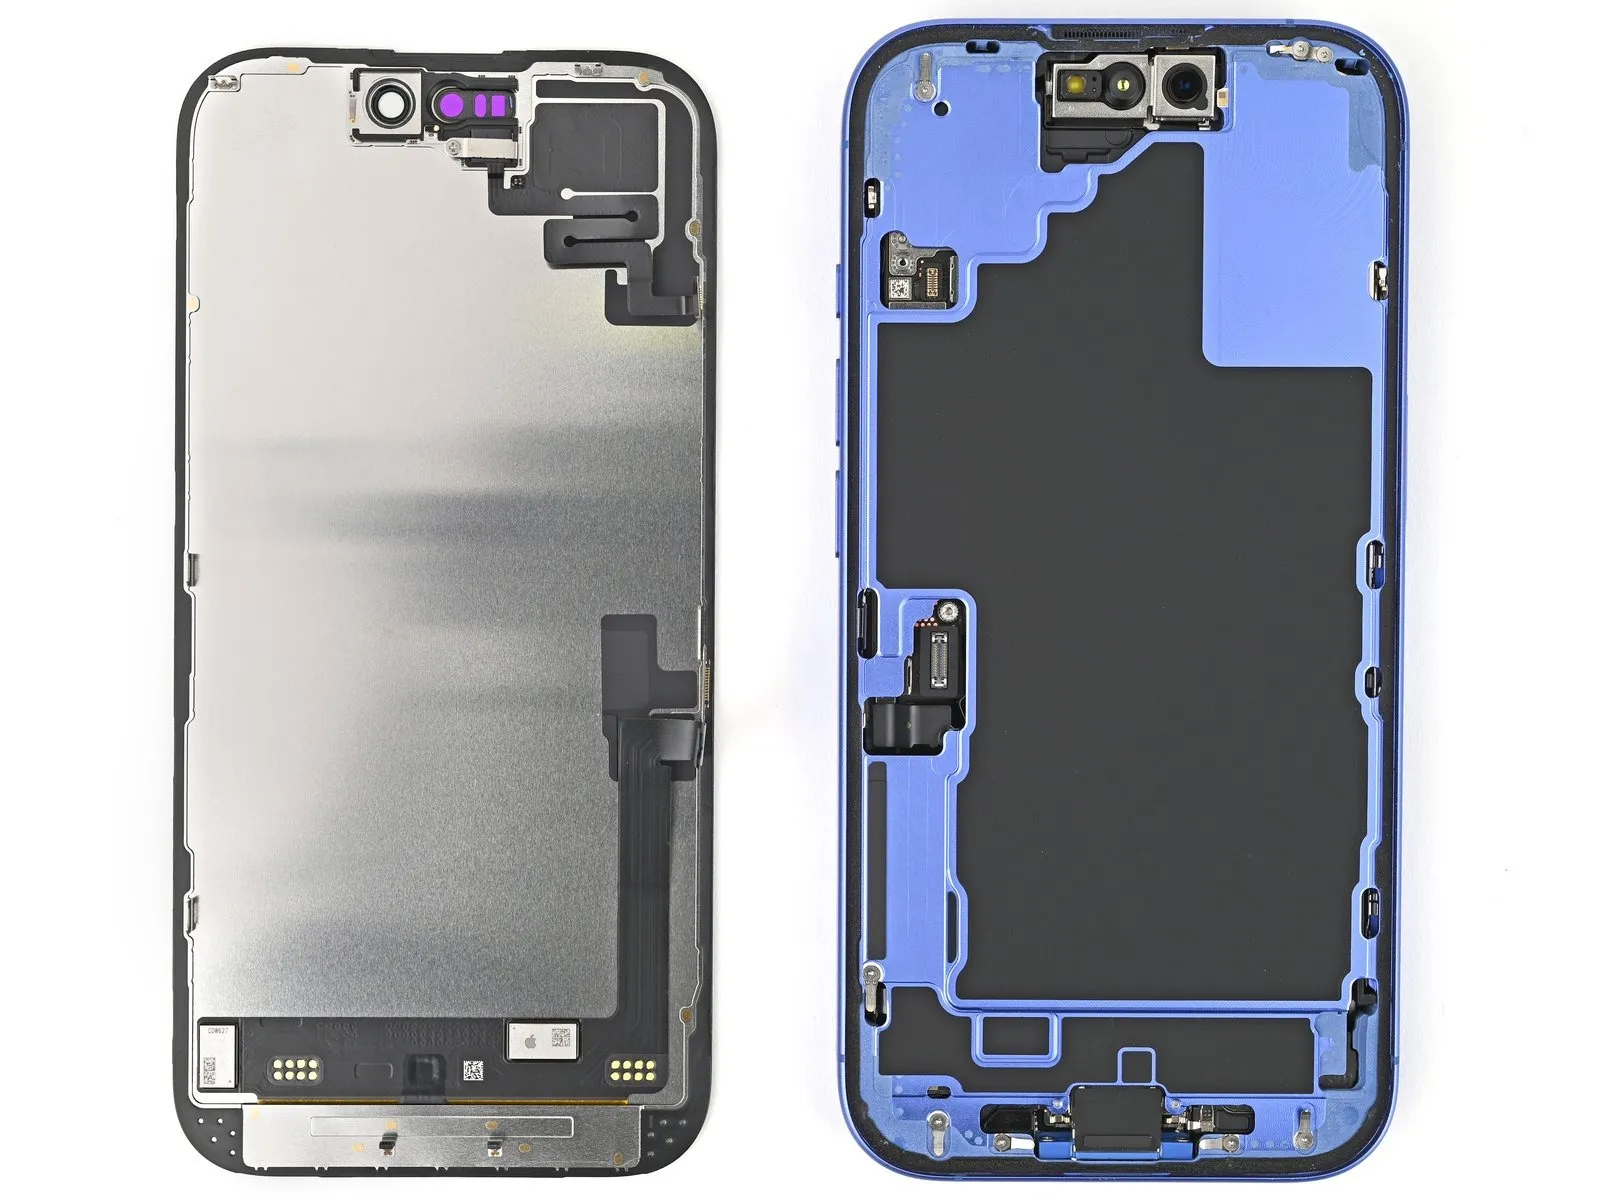
Carefully sever the adhesive holding the display assembly in place during the subsequent procedure, ensuring your tool does not penetrate beyond a depth of 3 millimeters.Potential harm to sensitive internal components can occur if the separation tool is inserted too far.Two flexible ribbon cables, essential for display functionality, are vulnerable to damage; one is situated directly above the Action button, while the other is located approximately midway between the volume down button and the device's base.
- A series of small, easily-disrupted spring contacts are positioned around the phone's outer edge, requiring meticulous care.
- Exercise caution to prevent injury to these components while releasing the screen.
Step 8 | Heat the right edge
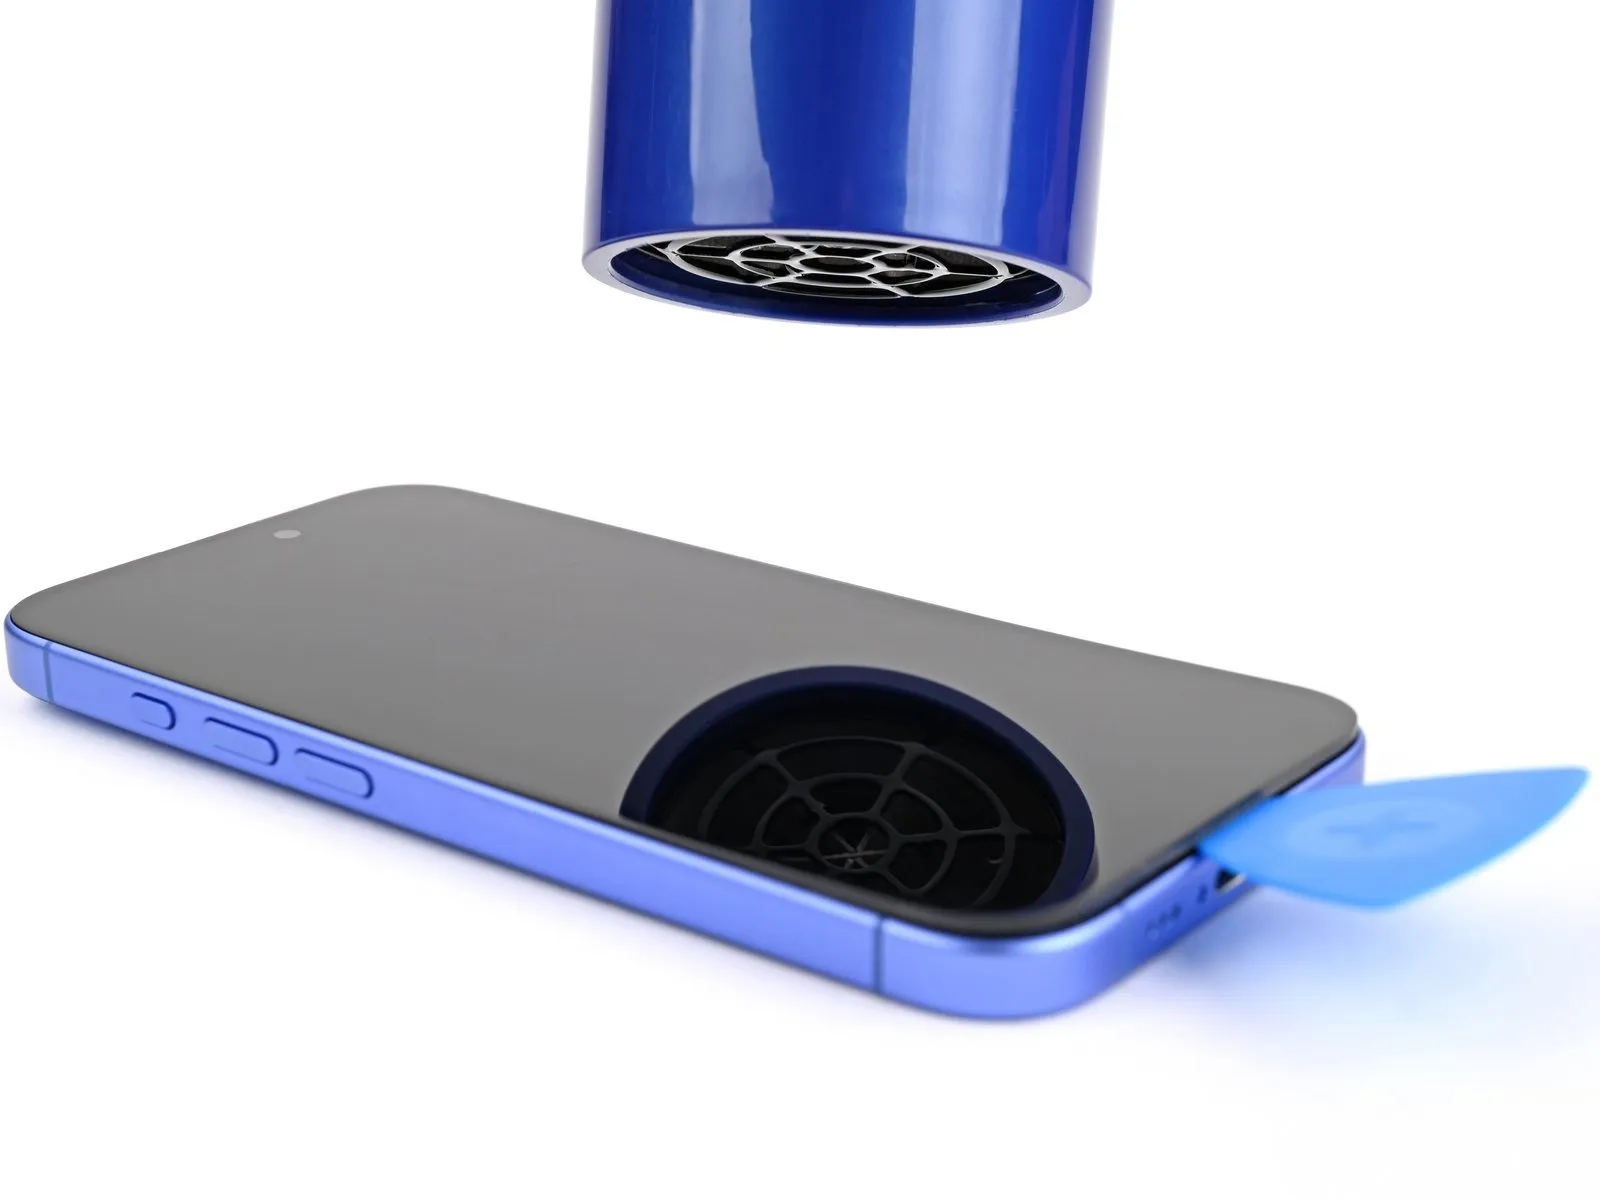
Employing either a hair dryer or a heat gun, apply warmth to the screen's right-hand border.Continue heating the screen's right edge until the surface reaches a temperature that is perceptible upon contact.The application of heat facilitates the separation of components.Ensure the heat source is directed precisely at the designated edge of the screen.Maintain a safe distance to prevent damage from excessive heat.The target temperature is achieved when the surface feels warm to the touch, indicating adhesive softening.
Step 9 | Separate the right adhesive
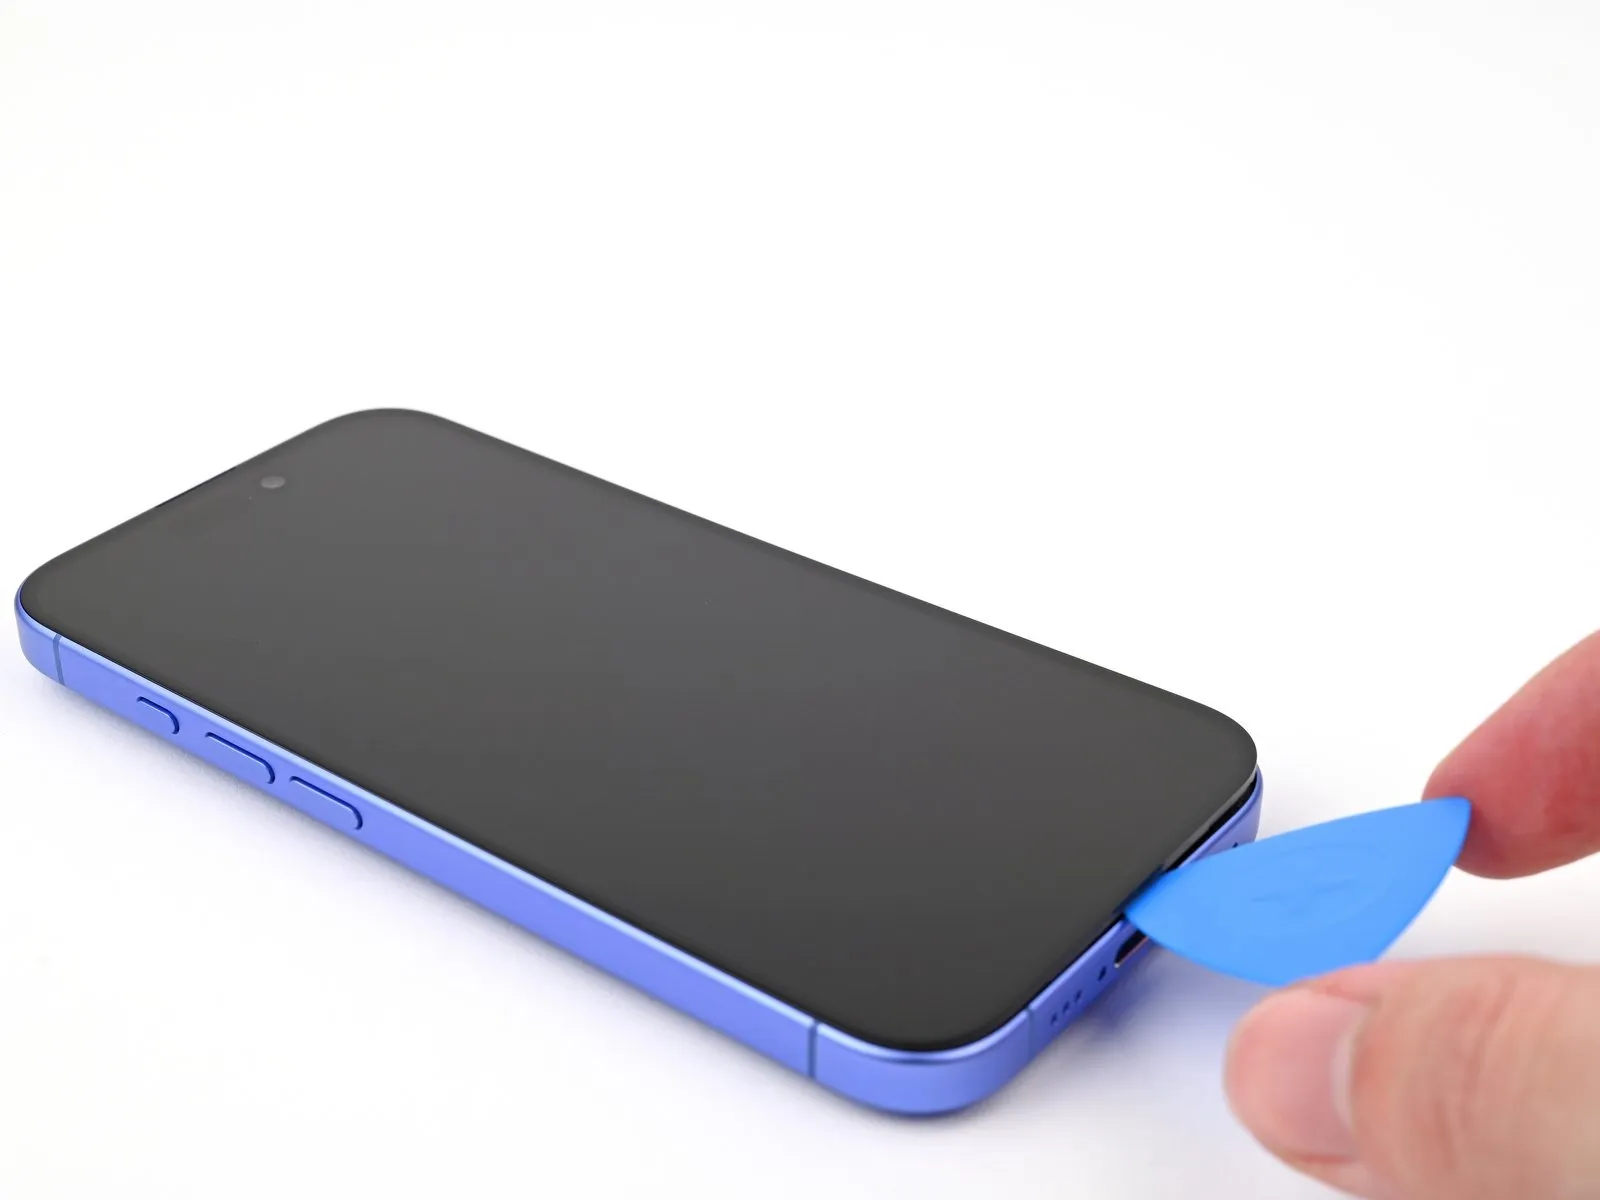
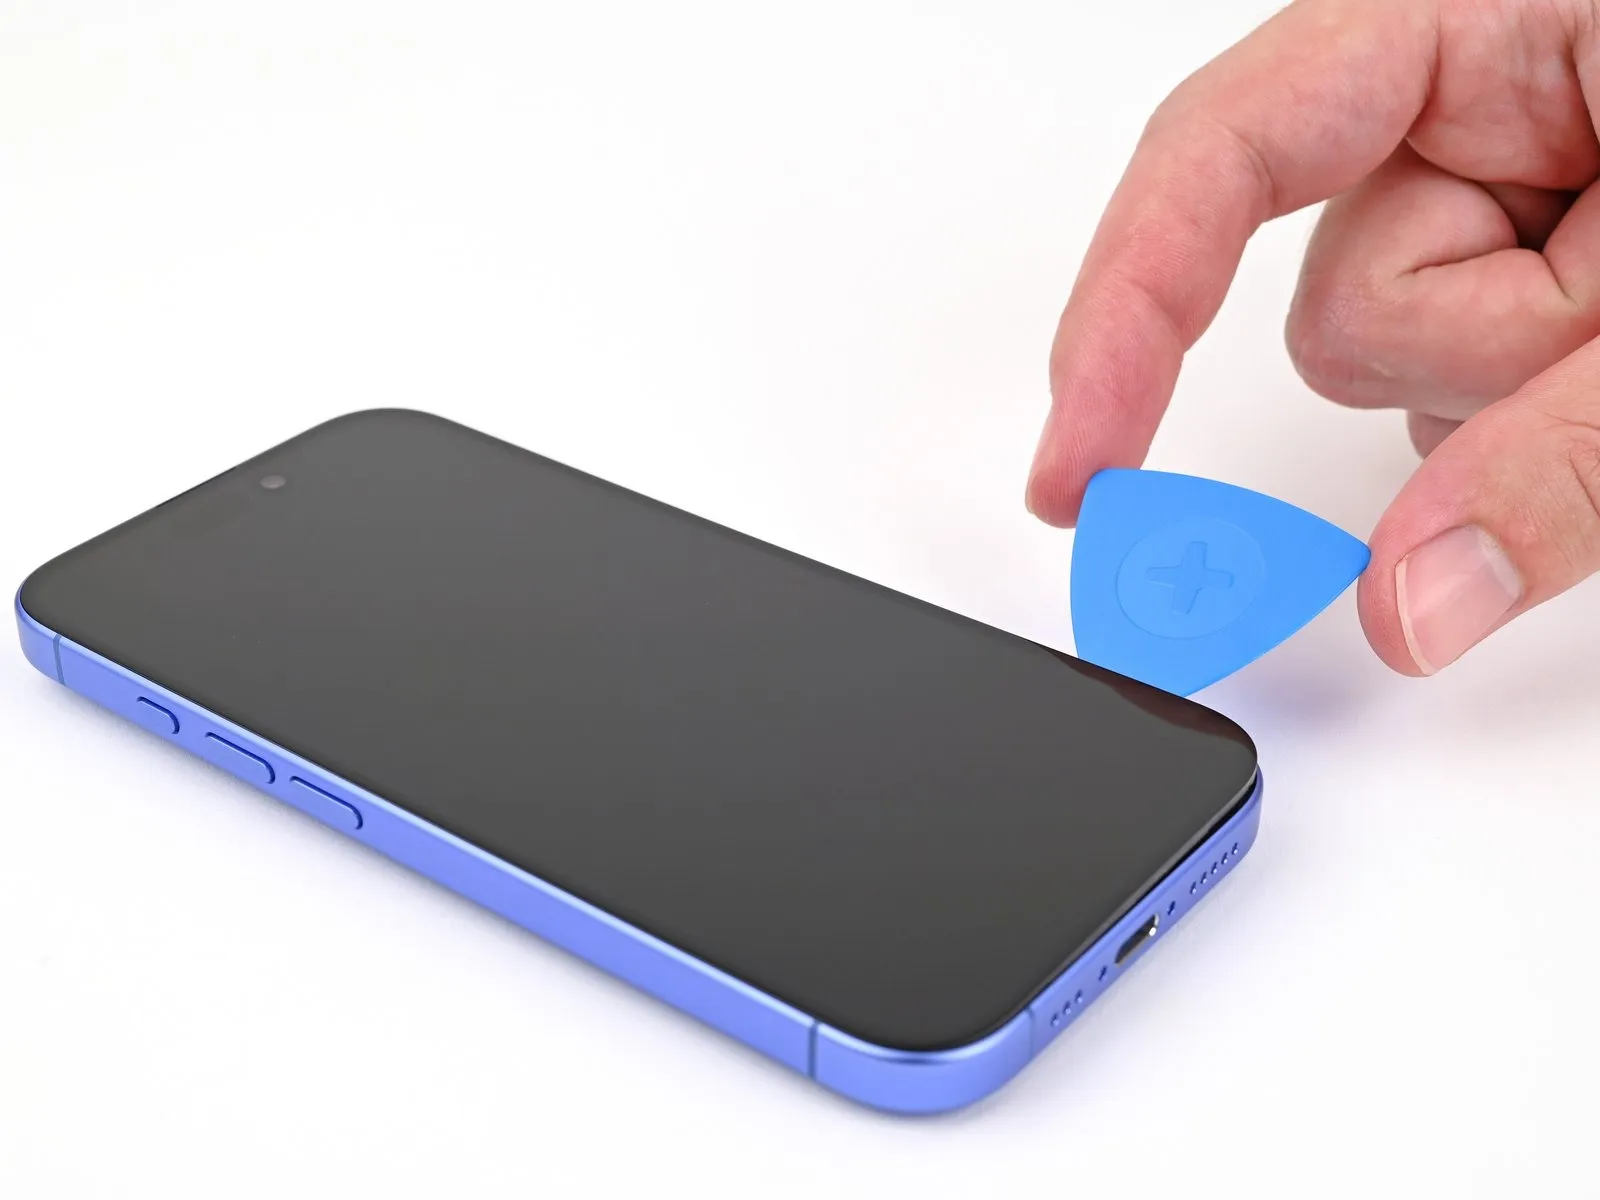
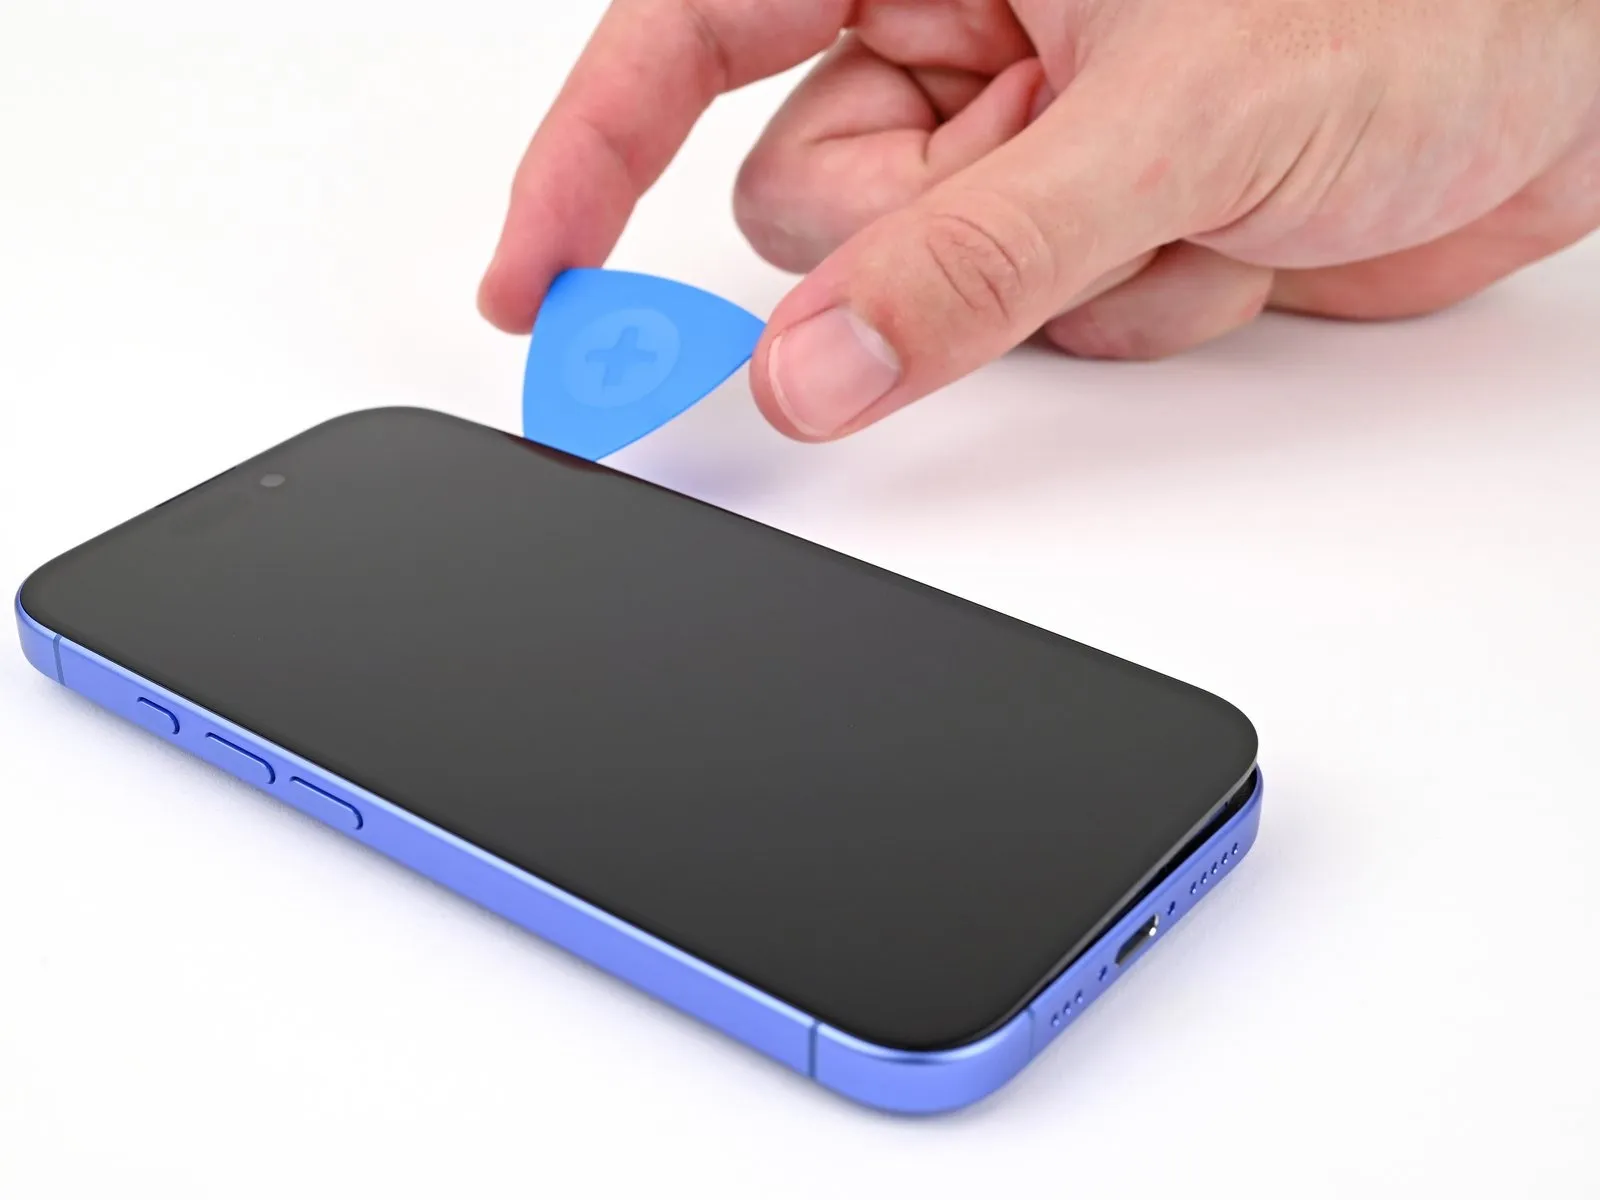
- Ensure the repair tool's insertion depth remains limited to a maximum of 3 millimeters, preventing potential harm to the spring contact points.To detach the adhesive bond, maneuver a separating tool along the lower-right perimeter and upward along the right side of the display panel.The audible and tactile indication of a metal clip disengagement will occur during this separation process.
- Exceeding the specified depth of 3 mm poses a risk of damage to the delicate spring contacts.
- Carefully slide the separation tool to facilitate adhesive release and the subsequent detachment of the metal clip.
Step 10 | Heat the top edge
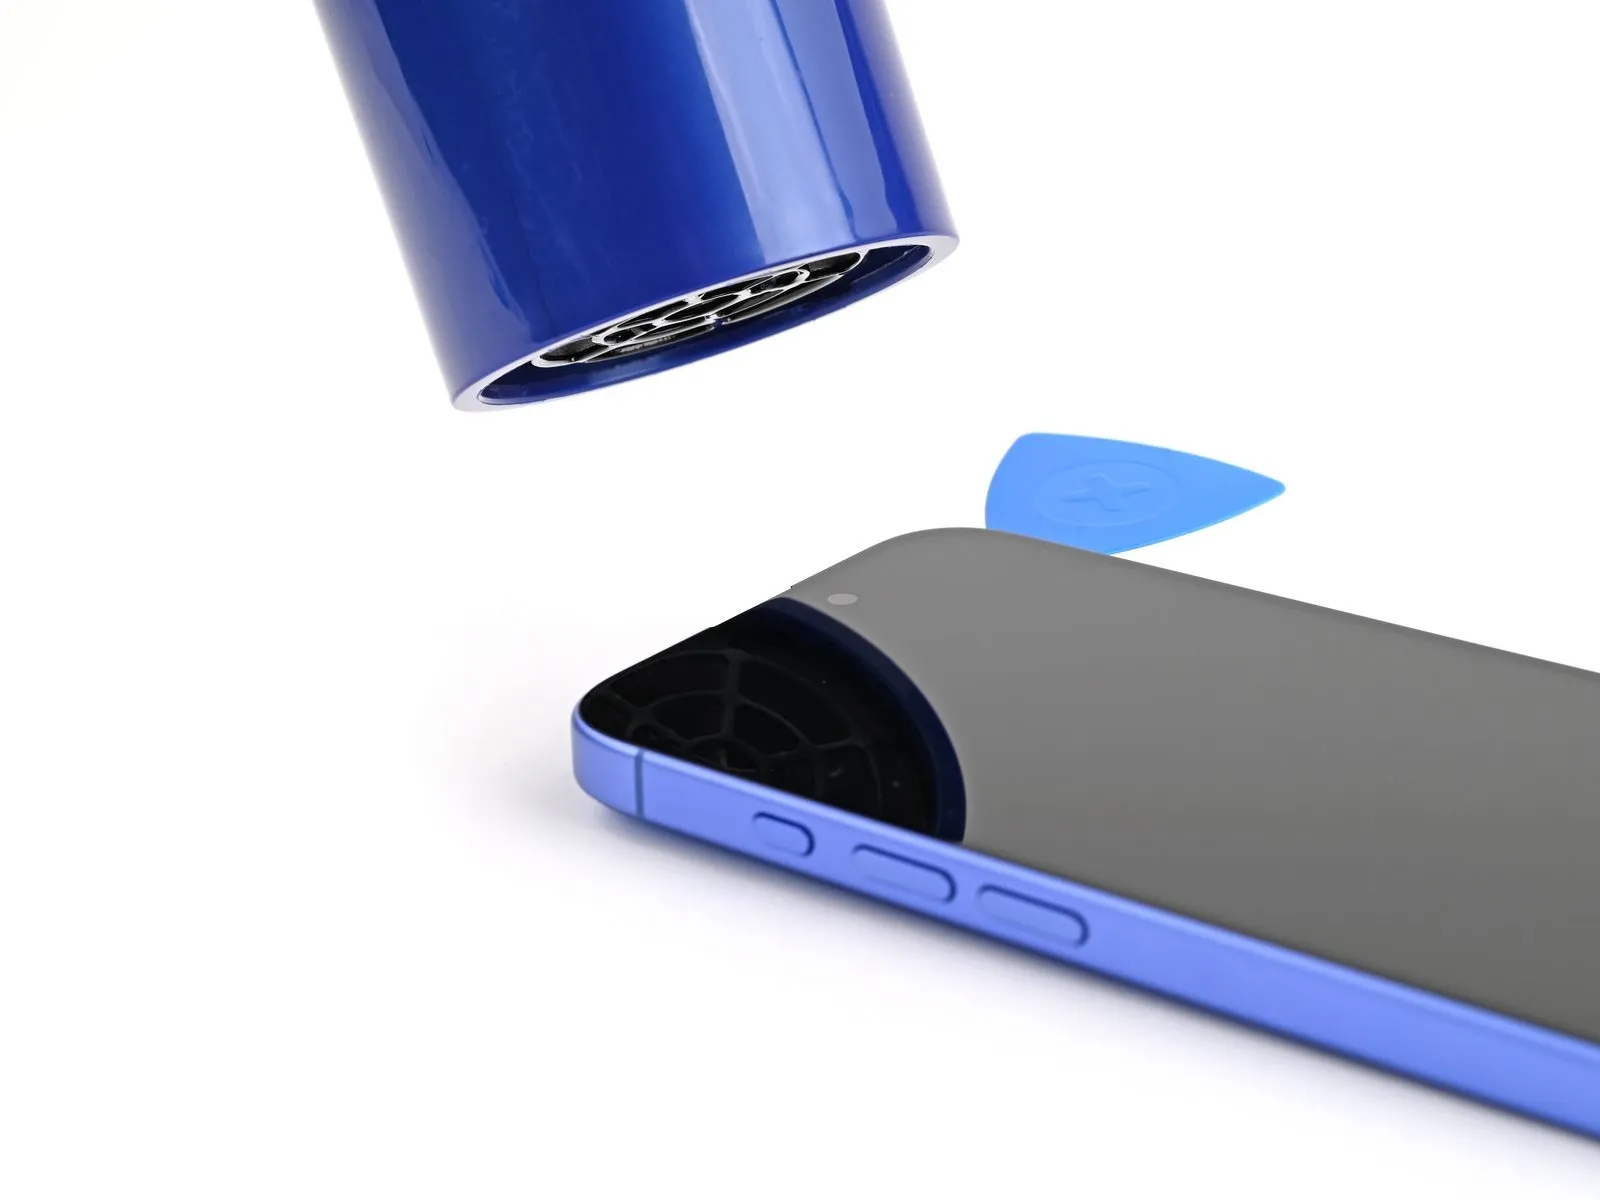
Apply warmth to the screen's upper border utilizing a hair dryer or heat gun, ensuring the surface reaches a temperature that is perceptible upon contact.
Step 11 | Separate the top adhesive
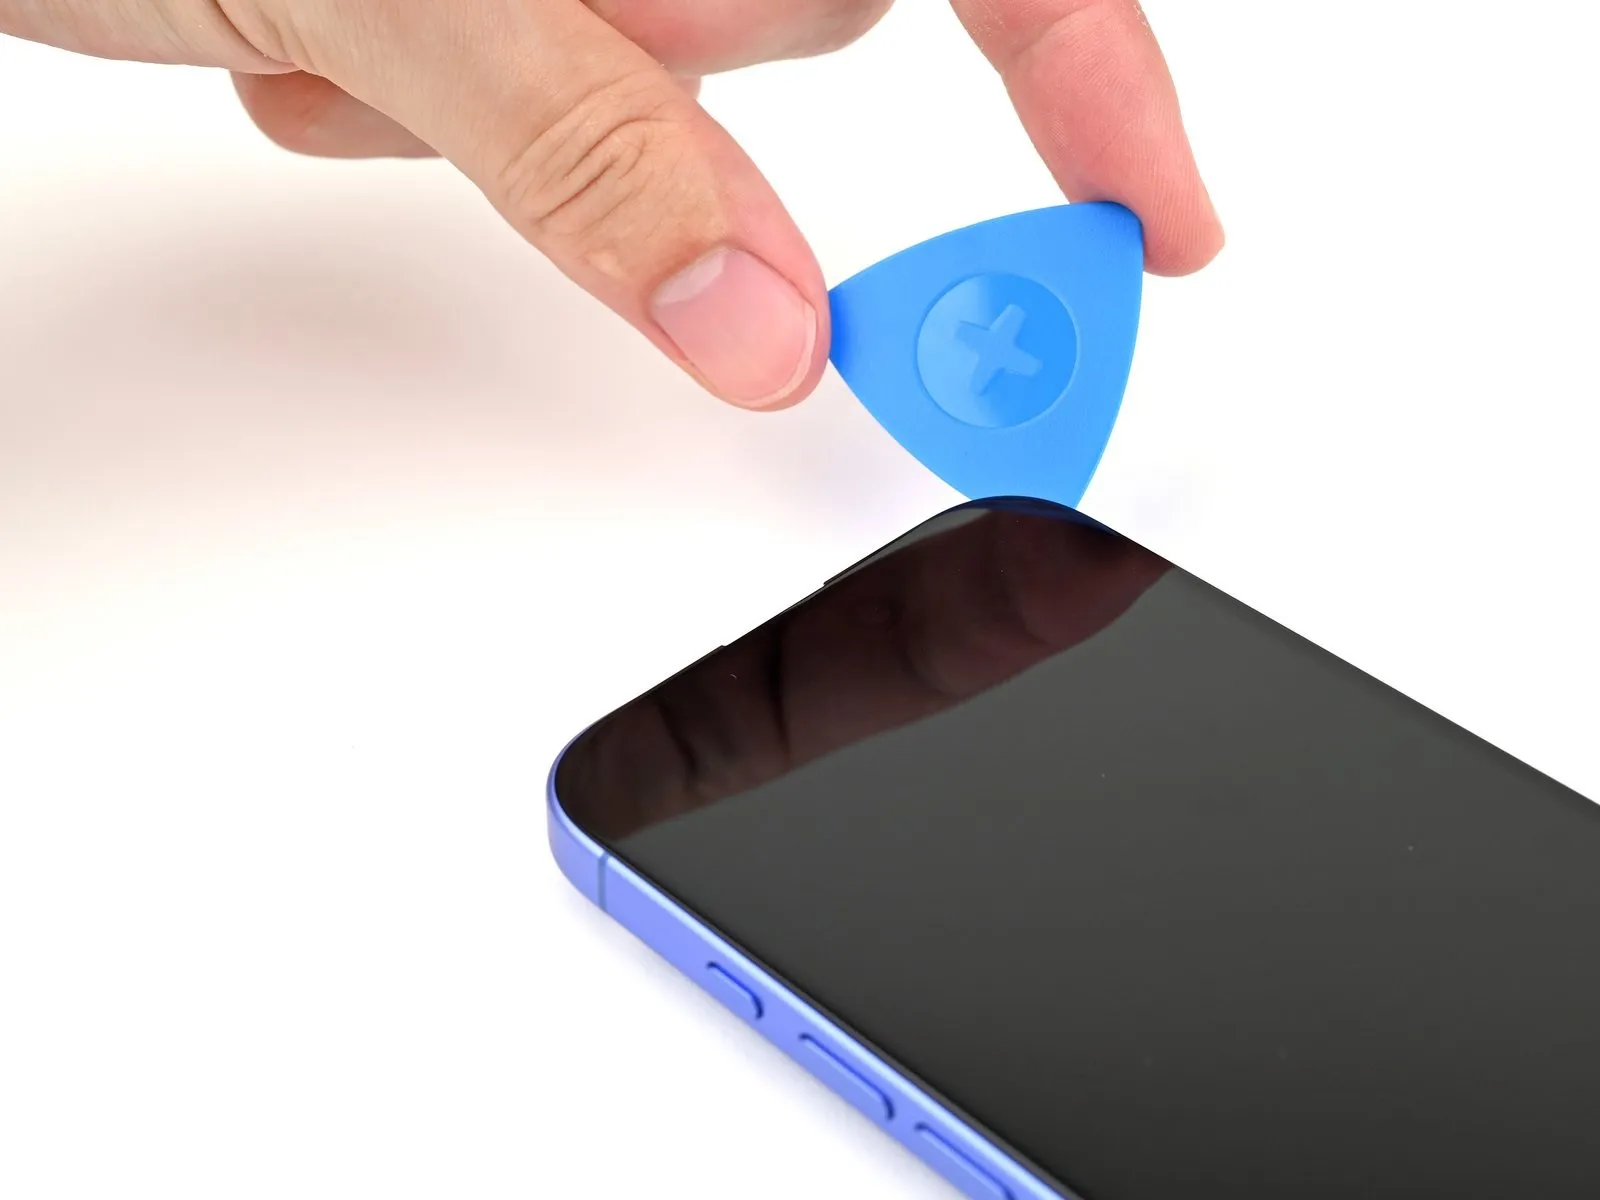
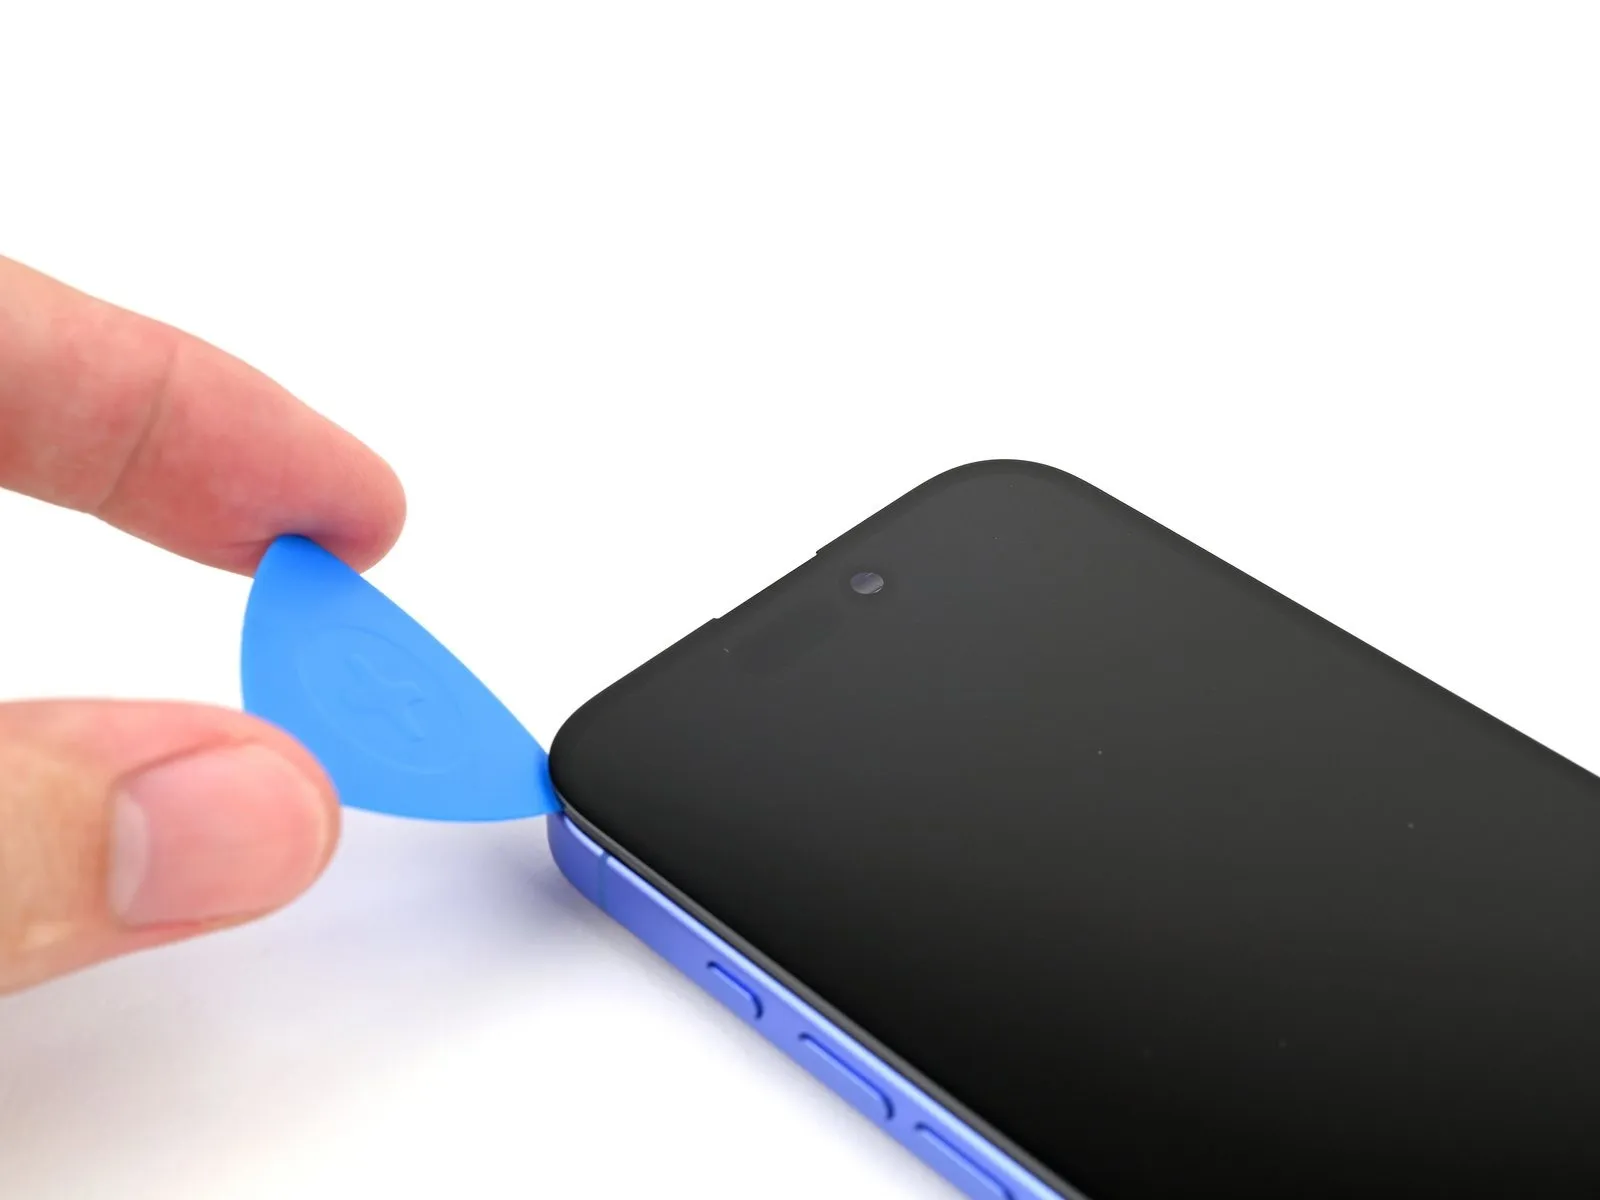
- To prevent potential harm to the spring contacts, ensure the insertion depth of your tool remains no greater than 3 millimeters.The spring contact elements are susceptible to damage if the tool is inserted excessively.Proceed by maneuvering your pick along the upper-right corner and subsequently across the top perimeter to sever the adhesive bond.
- This adhesive separation will facilitate the disengagement of the two metal clips.
Step 12 | Heat the left edge
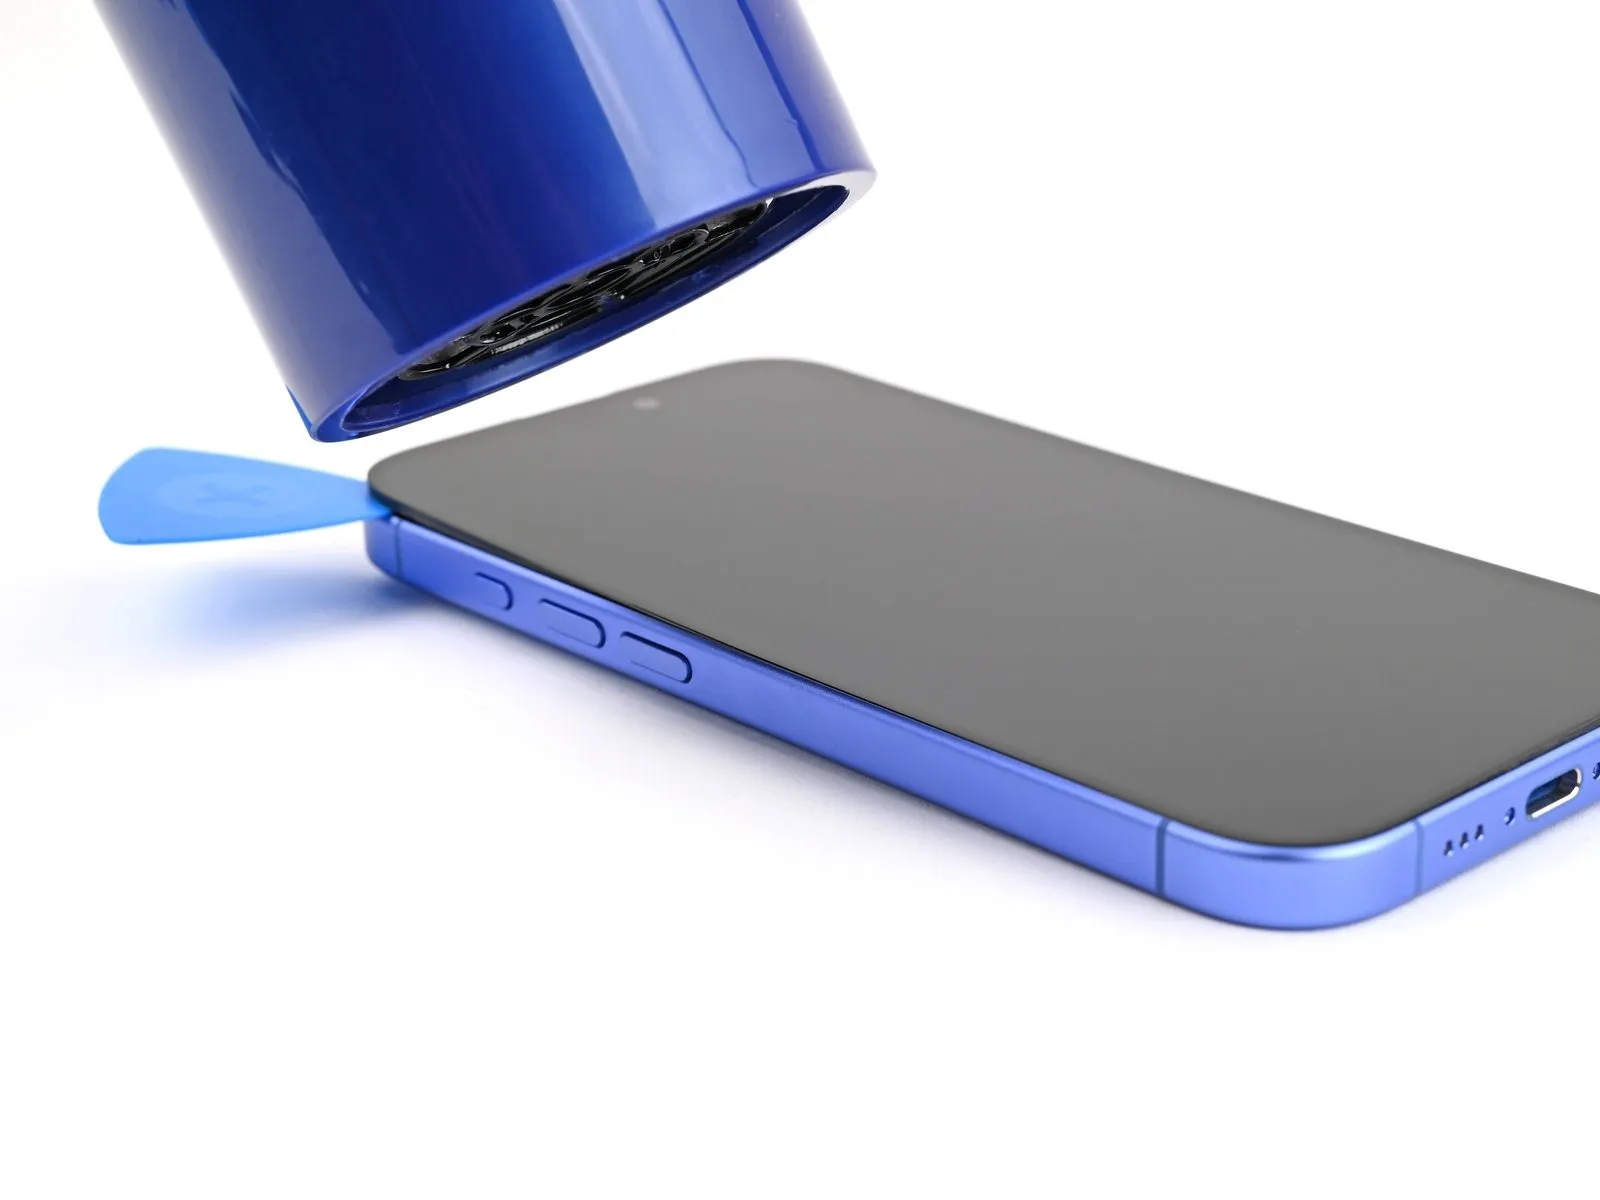
Apply warmth to the screen's left border utilizing a hair dryer or heat gun, continuing until the surface reaches a temperature that can be felt by touch.
Step 13 | Separate the left adhesive
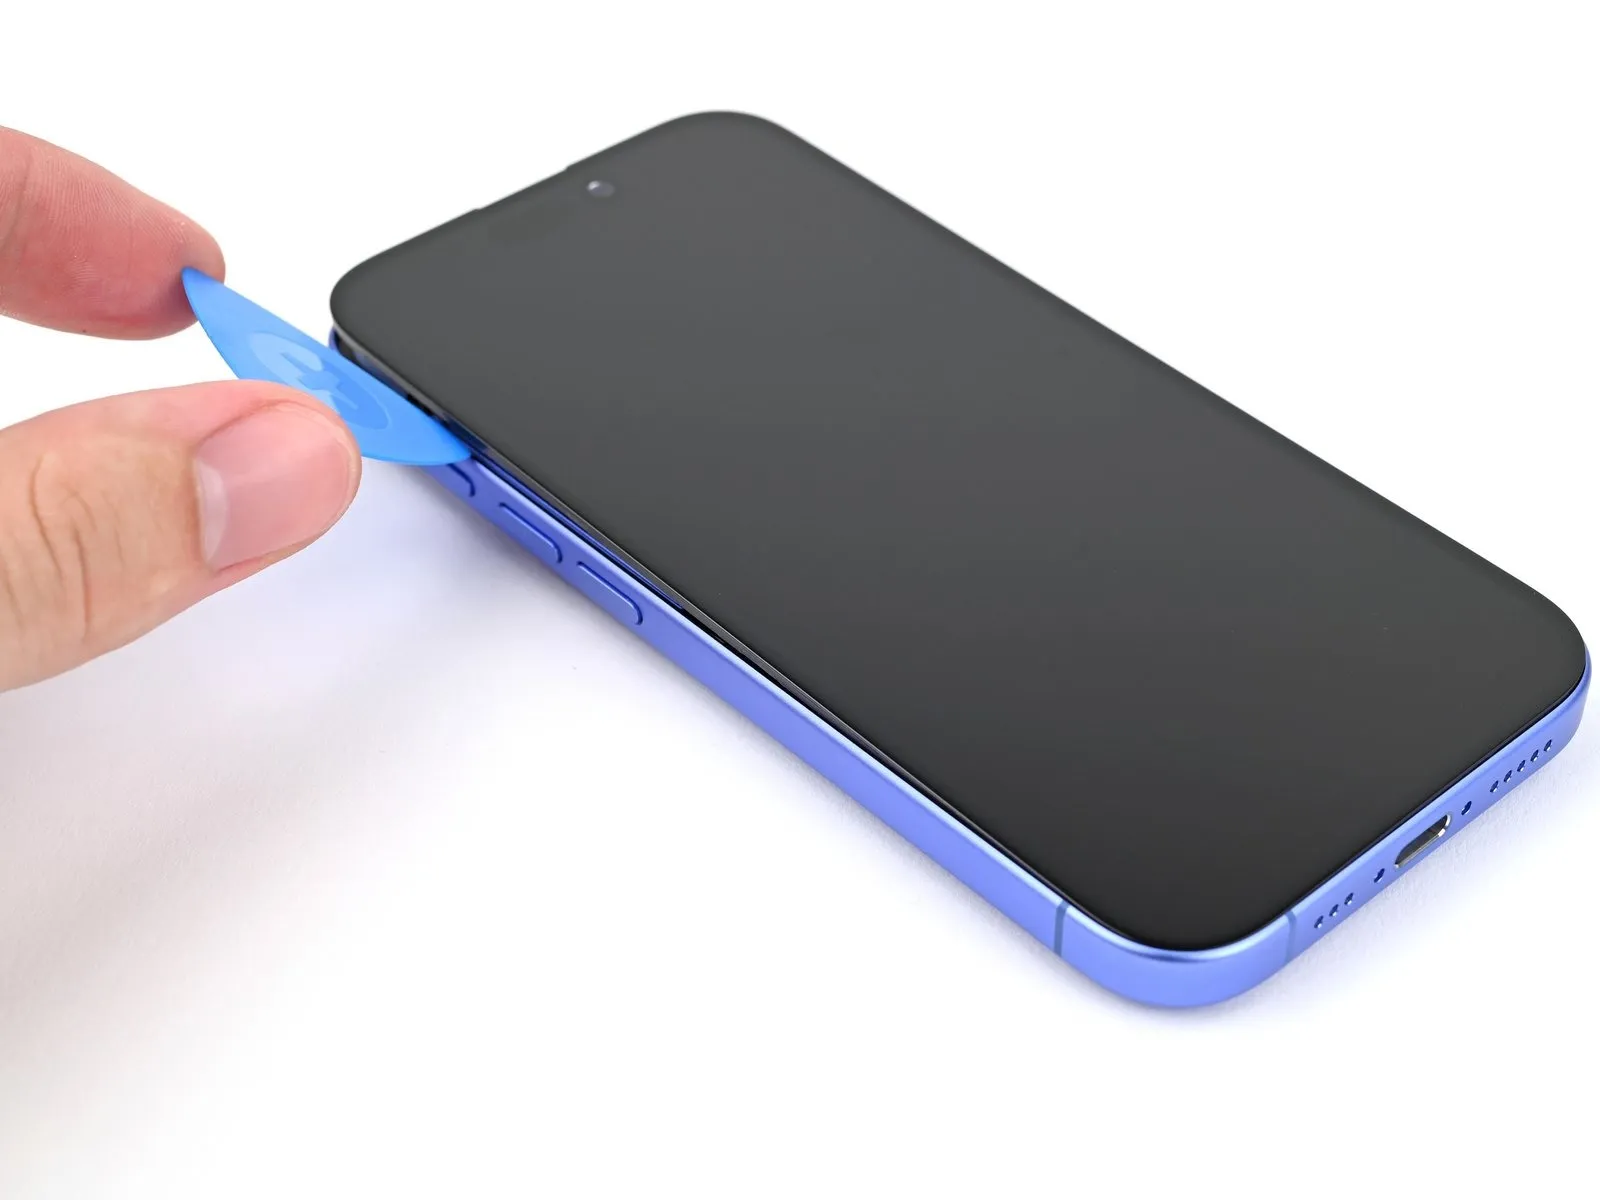
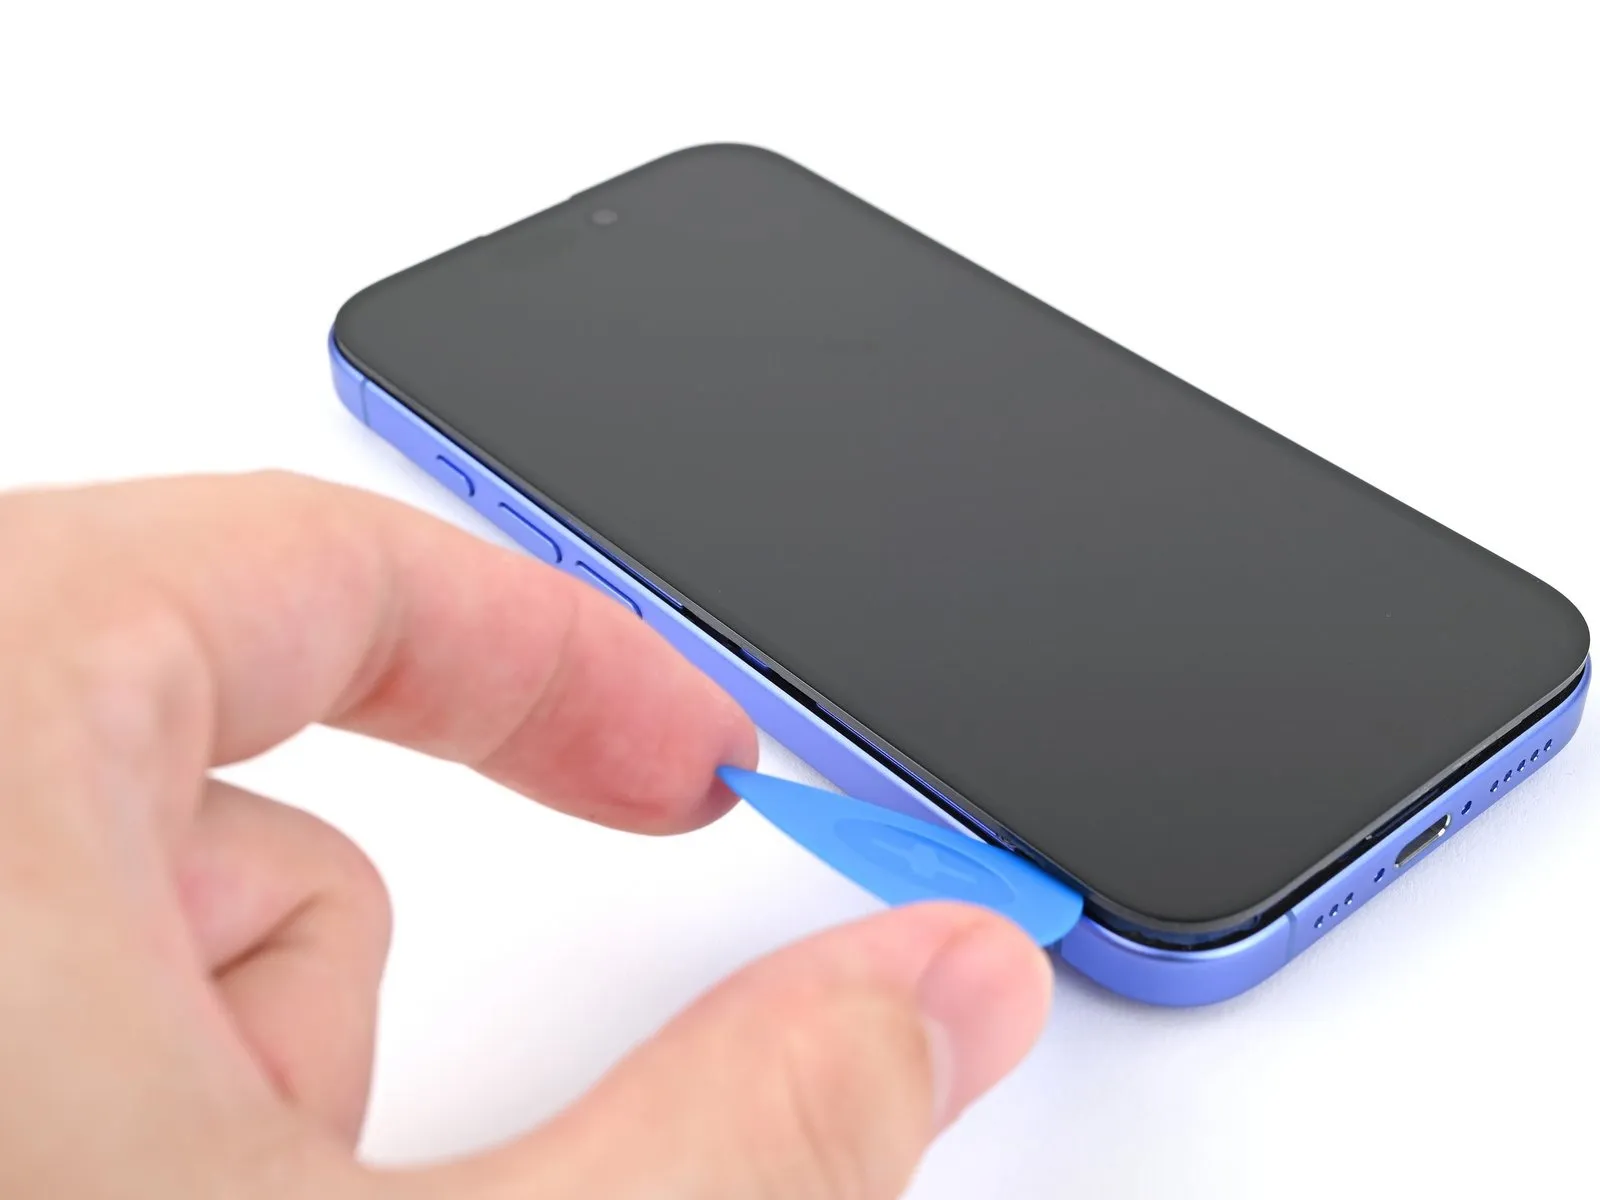
To prevent potential harm to the screen's internal wiring and electrical connectors, ensure the insertion depth of your tool remains limited to a maximum of 3 millimeters.The delicate screen cables and spring contacts are susceptible to damage if the tool is inserted beyond the specified 3 mm limit.Begin disengaging the adhesive bond by positioning a tool along the left vertical edge of the screen's perimeter.
- Moving the tool downwards along the left edge will sever the remaining adhesive layer and free the two remaining metal fasteners.
Step 14 | Prop up the screen
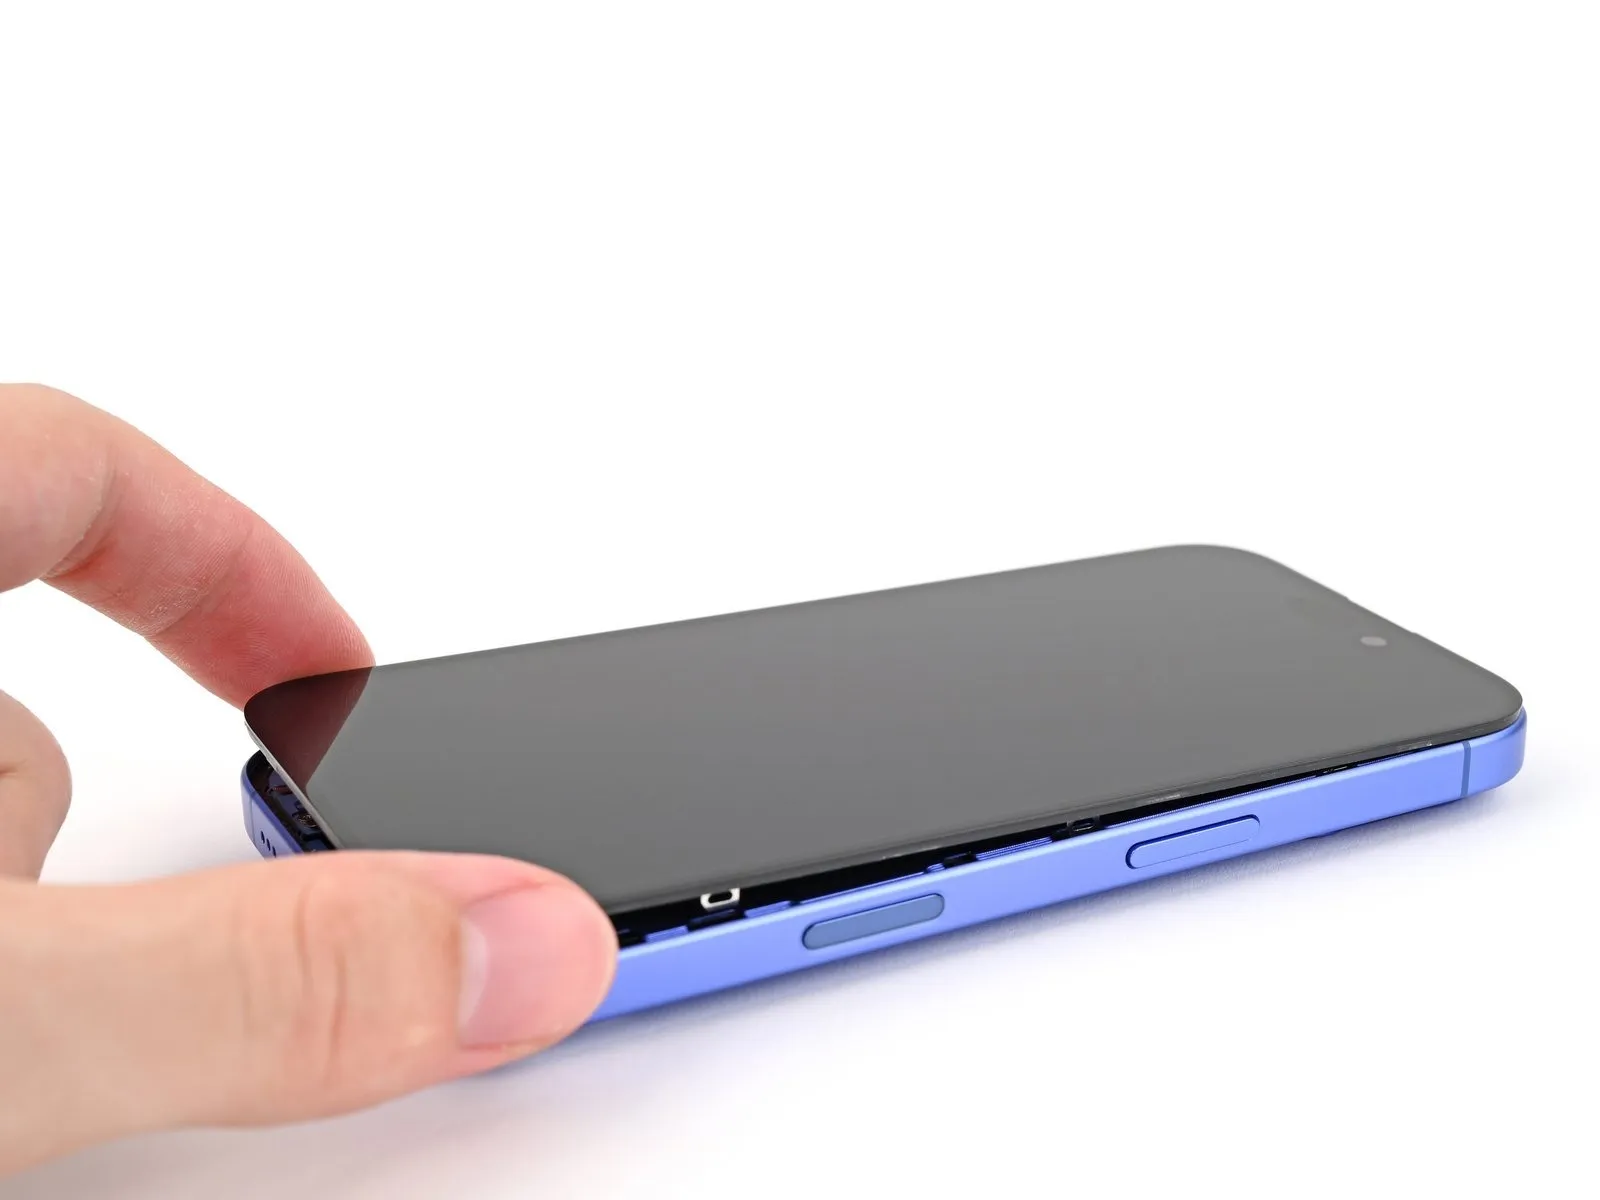
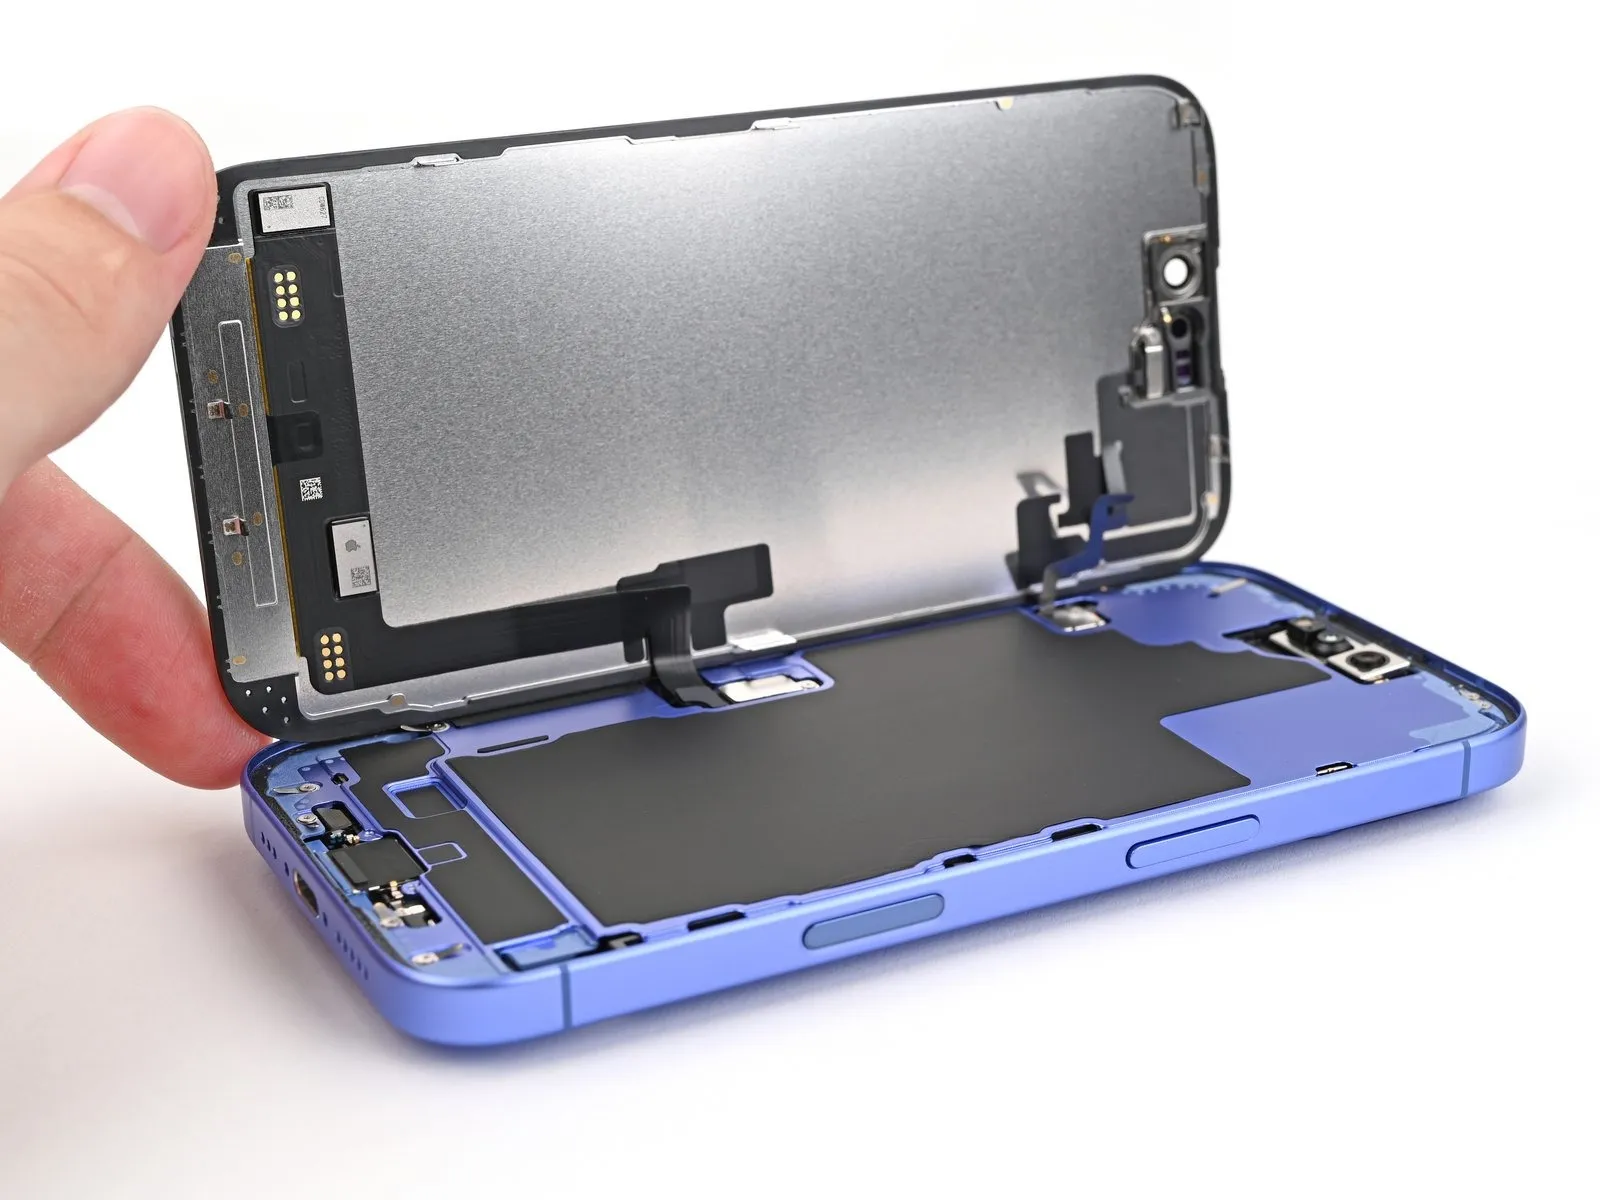
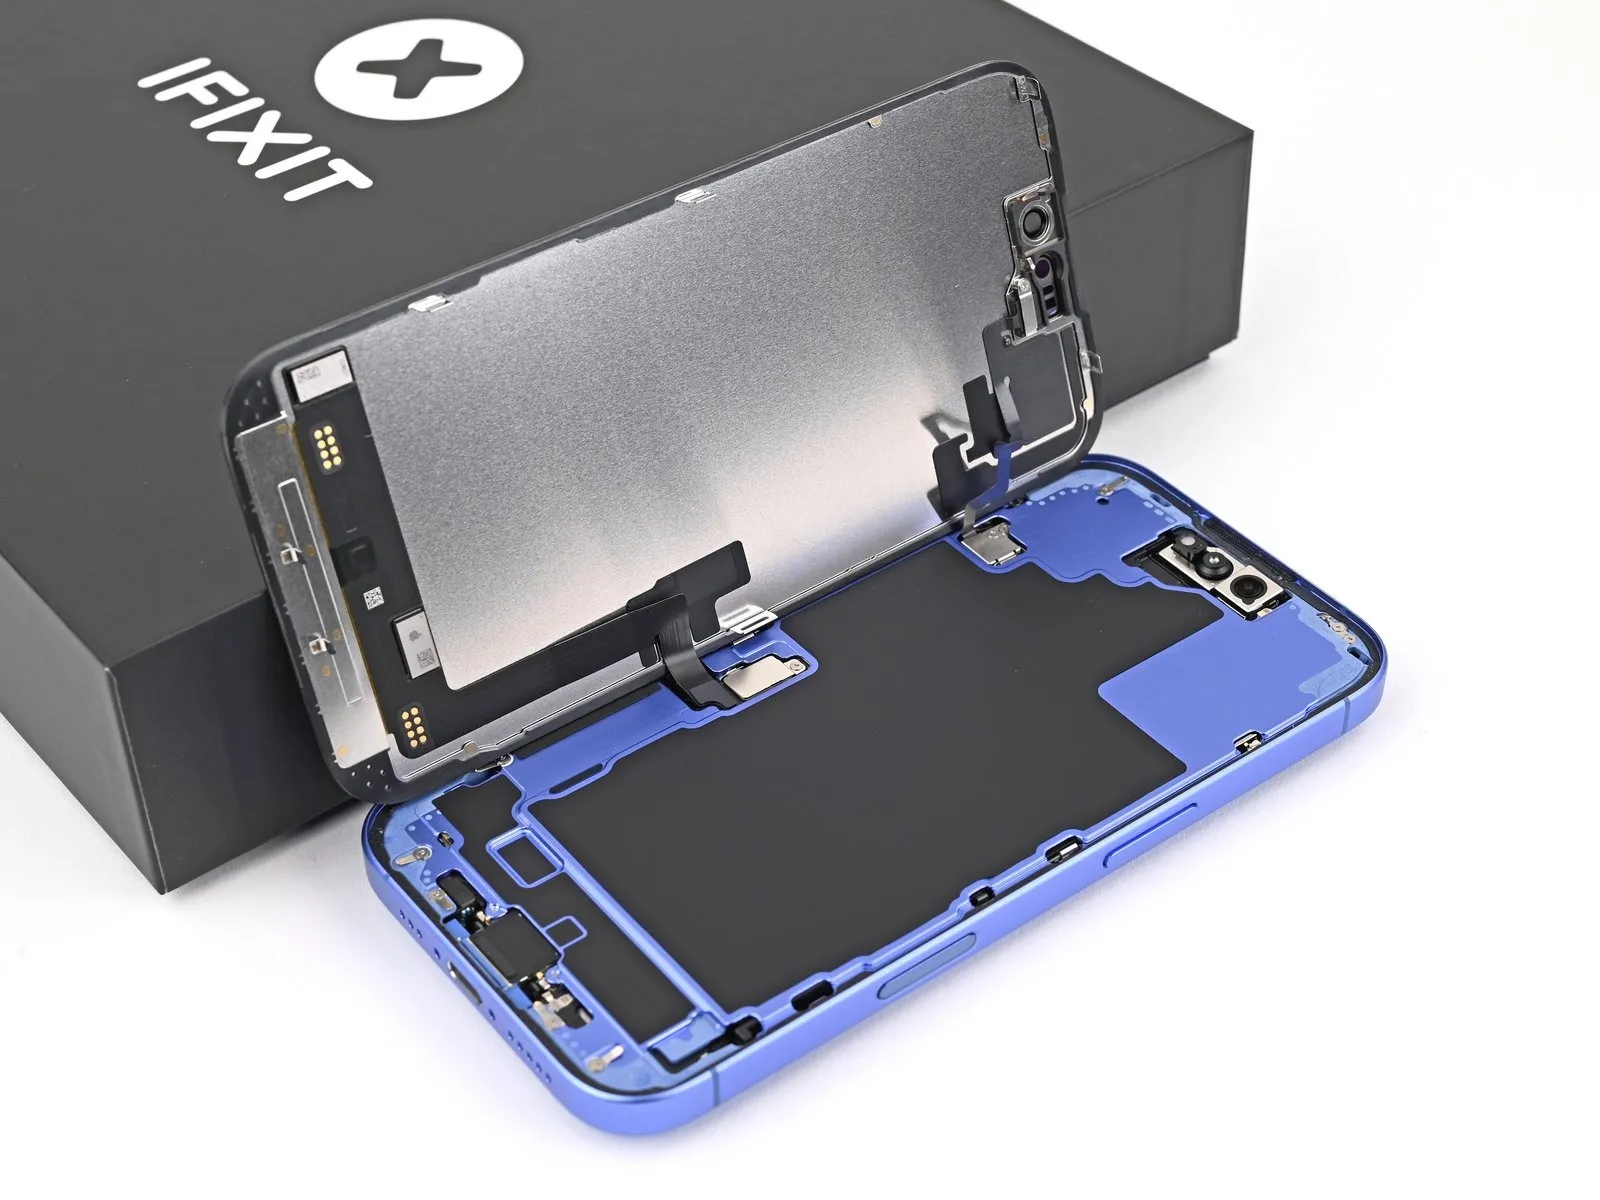
Ensure the display panel is completely detached from its surrounding frame; should any resistance be encountered, re-examine the edges using a prying tool to identify and release any remaining adhesive or secured fasteners.
- Carefully pivot the display assembly upwards, positioning it over the left side of the device's chassis, and maintain its stability with a rigid, uncontaminated support.
Step 15 | Remove the connector covers
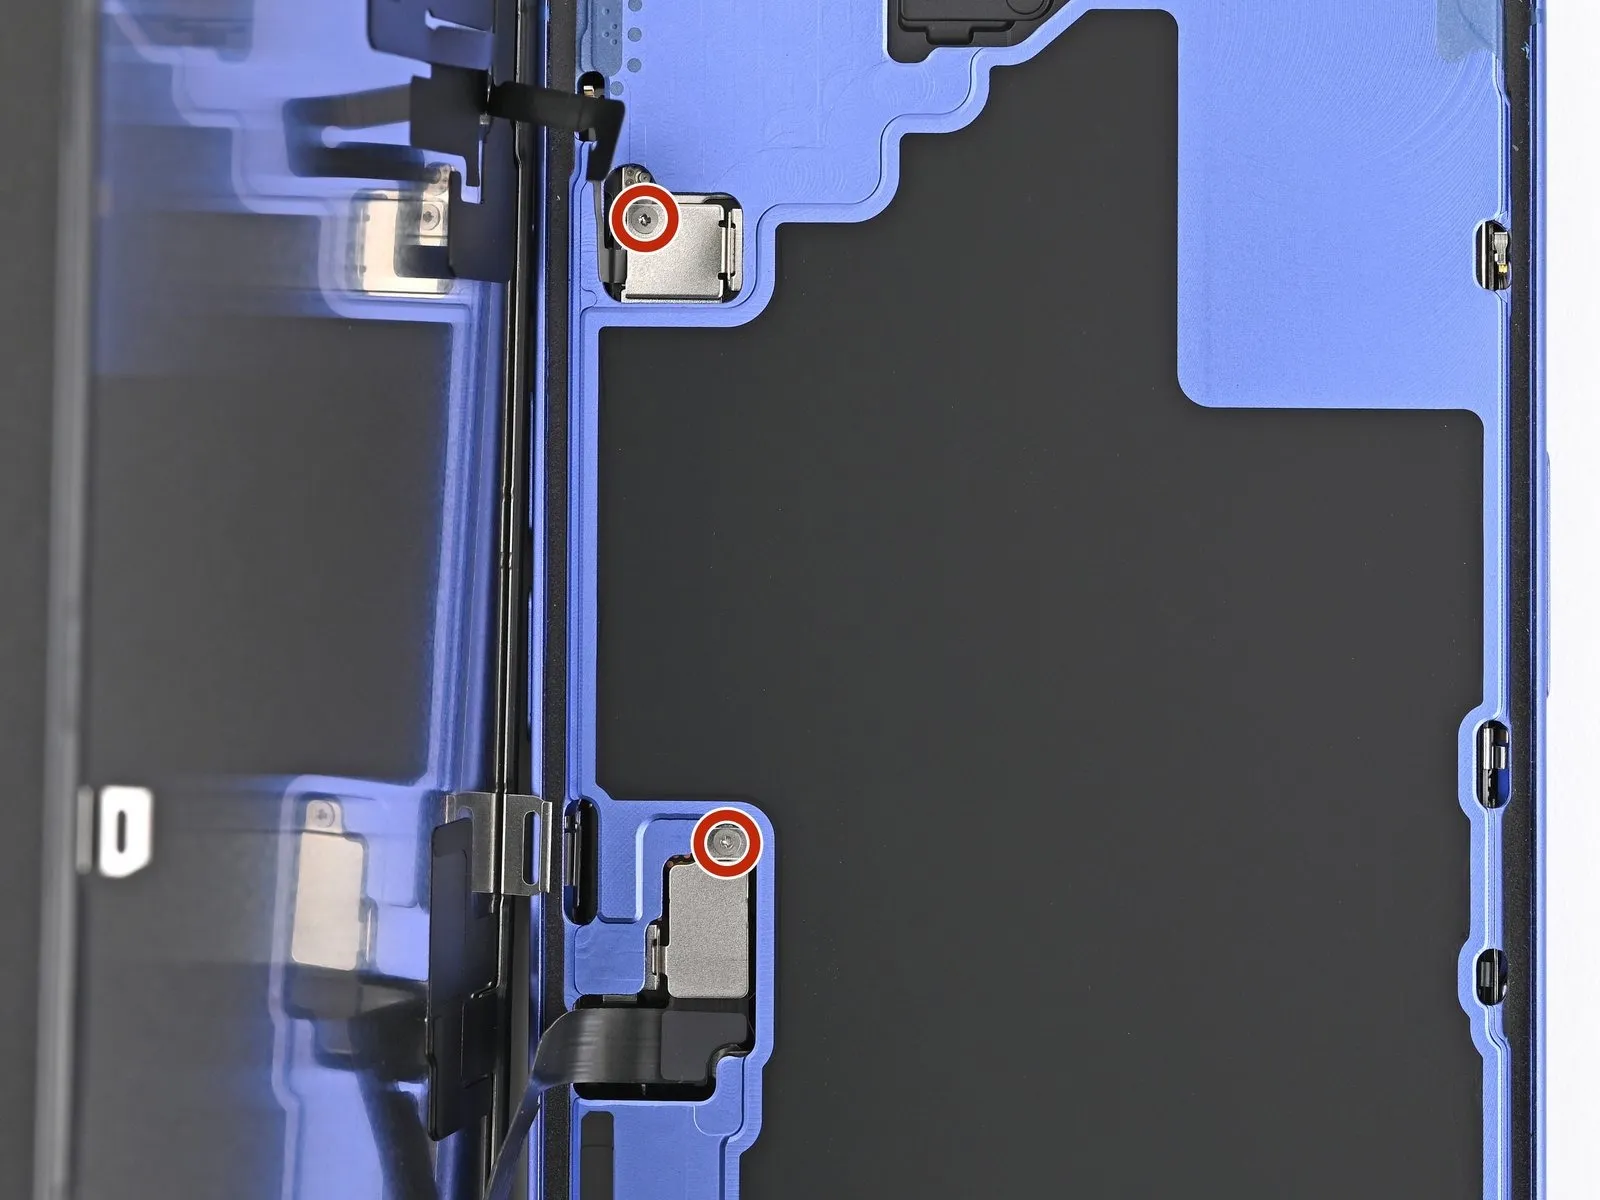
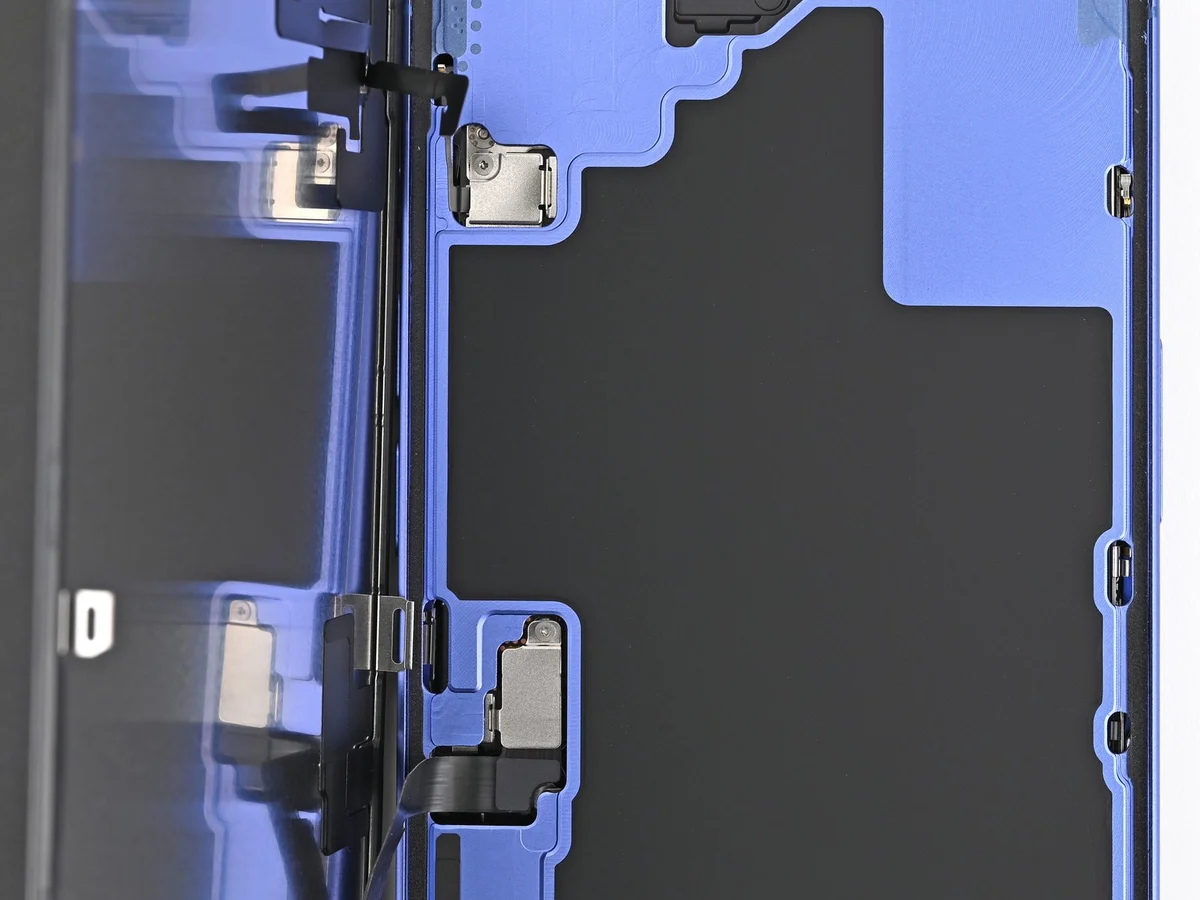
Employ a Y000 tri-point driver for the removal of the two screws, each measuring 0.9 mm in length, which fasten the front sensor and screen connector covers.The screws, with a length of 0.9 mm, secure the front sensor and screen connector covers and require a Y000 tri-point driver for their disassembly.To detach the front sensor and screen connector covers, utilize a Y000 tri-point driver to unscrew the two fasteners, each precisely 0.9 mm long.
Step 16
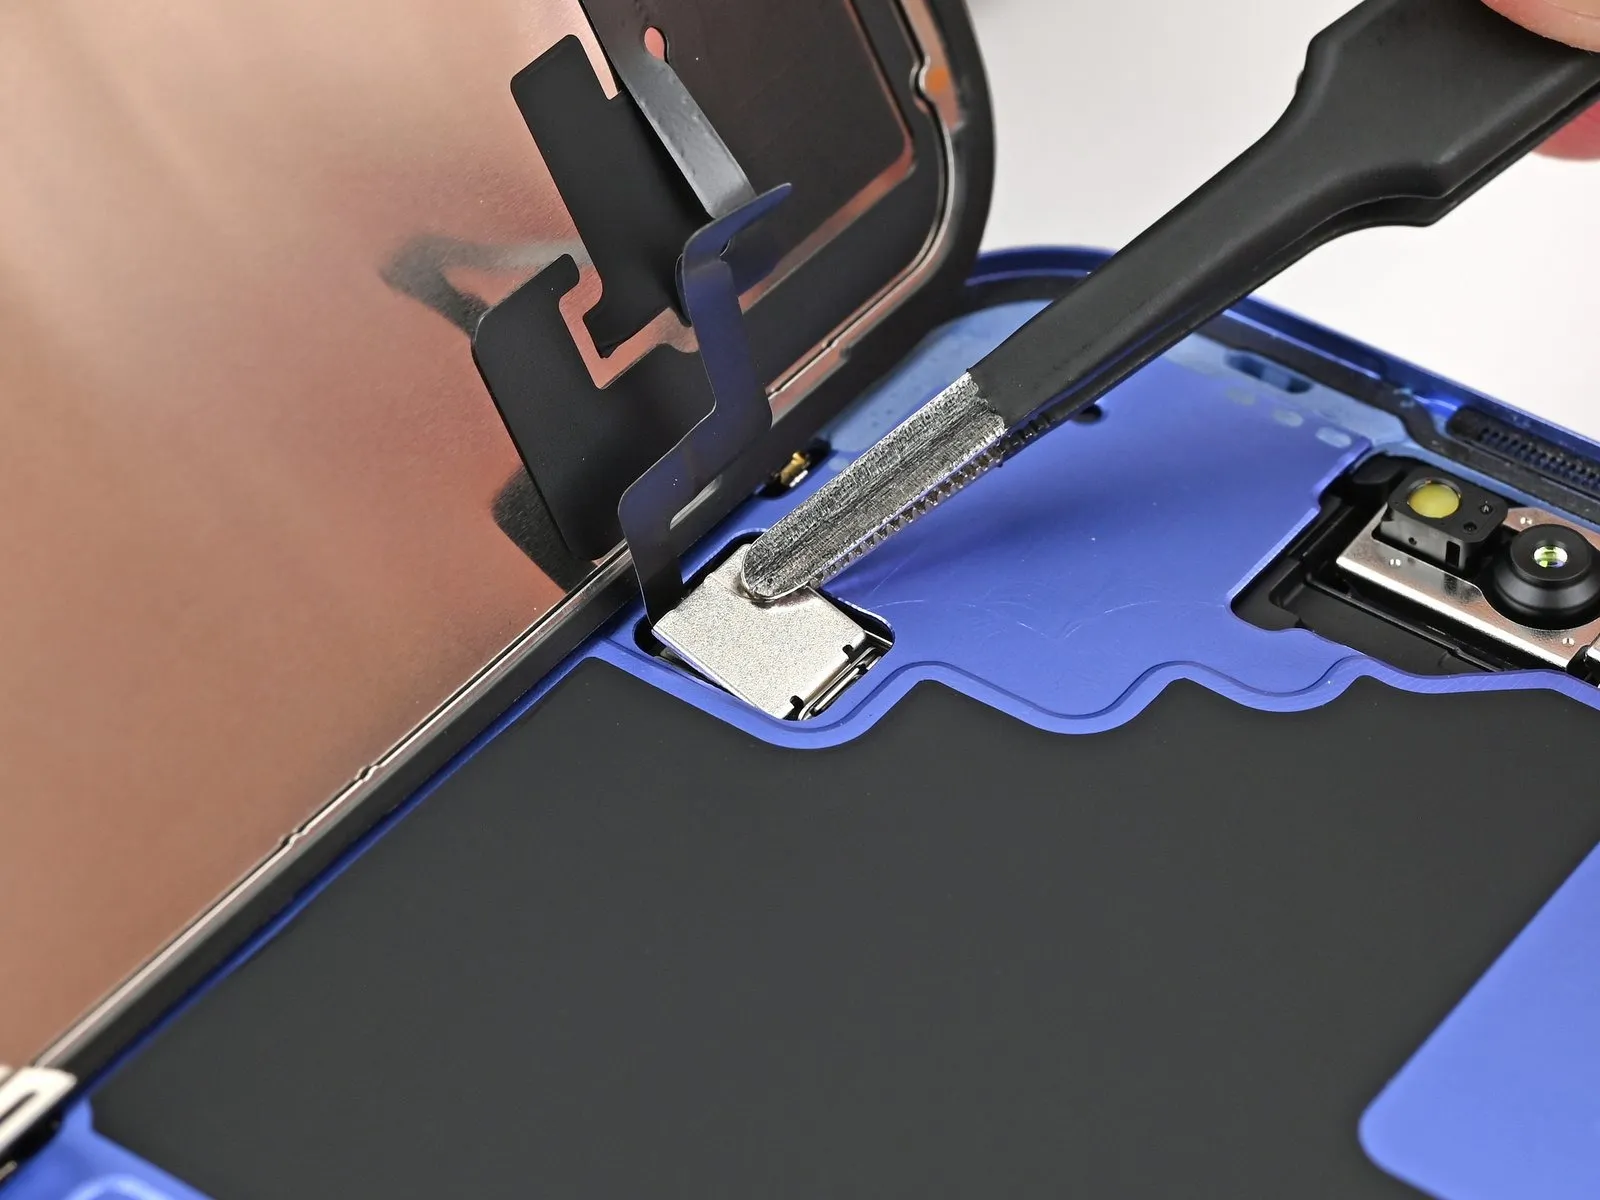
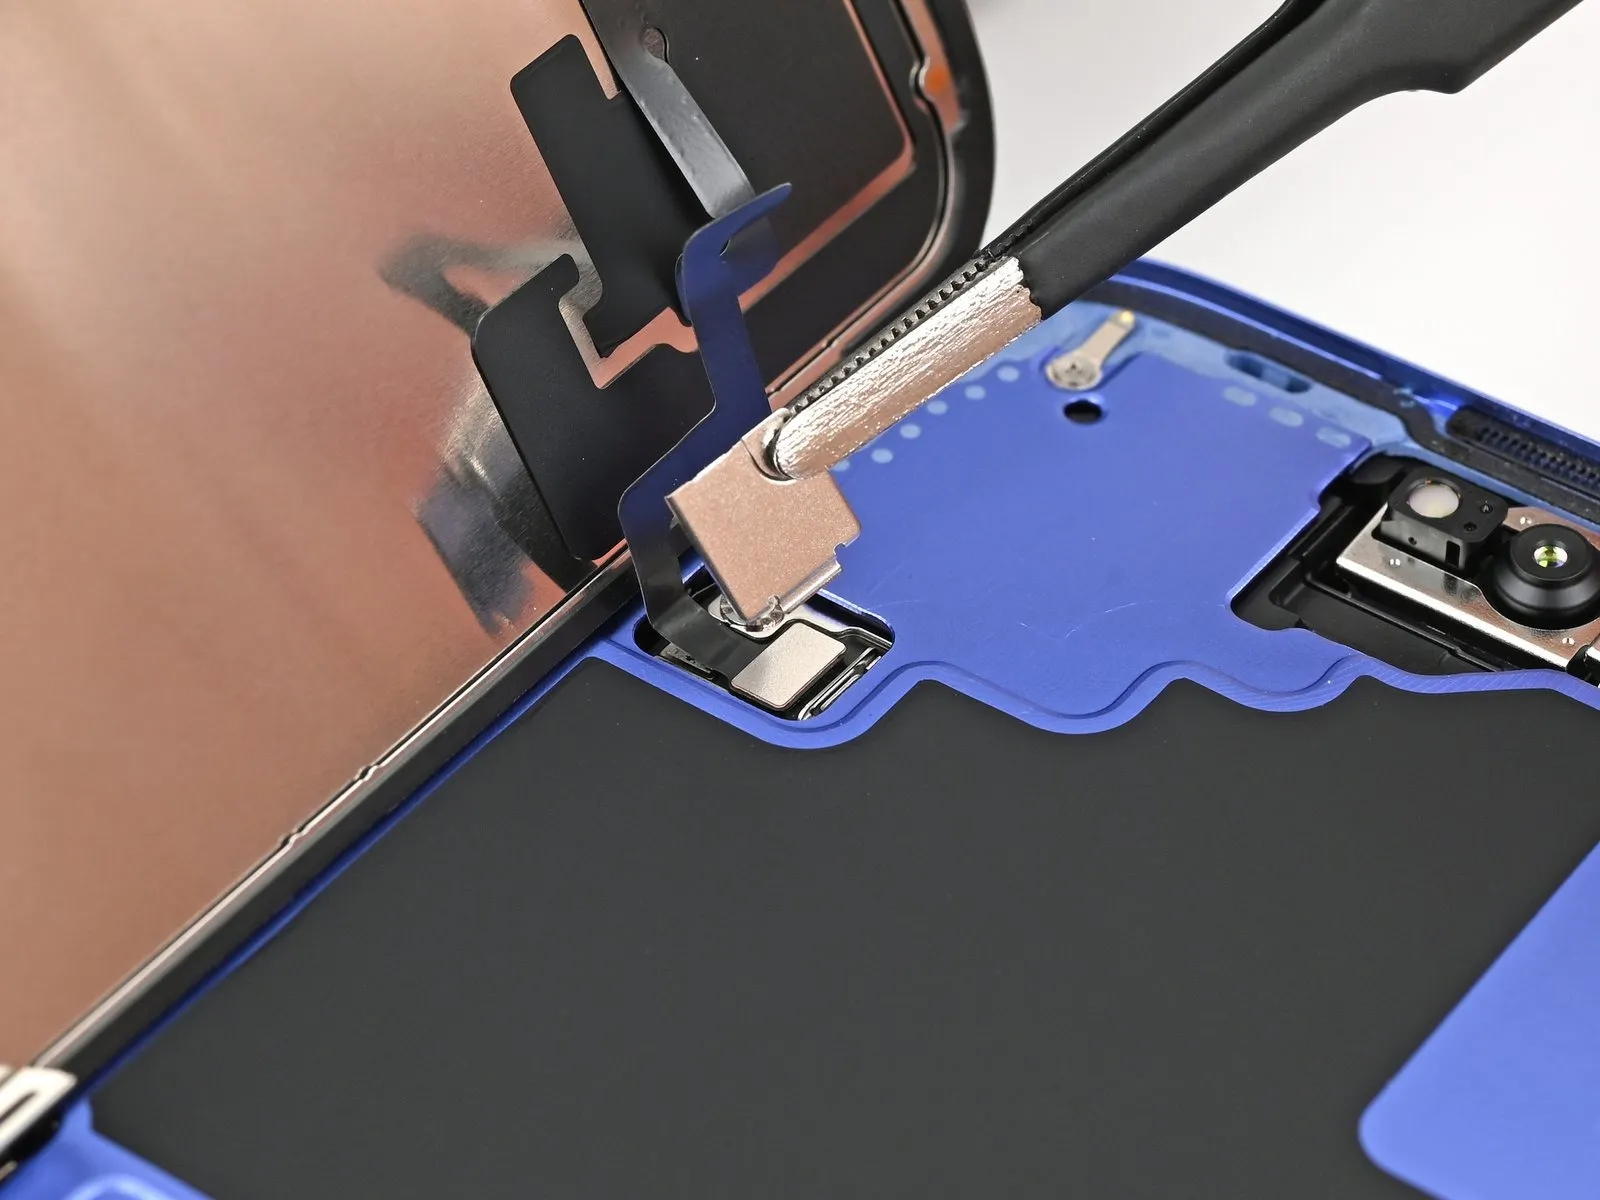
- Employ tweezers or your fingertips to raise the front sensor cover until it achieves a 90-degree position, subsequently disengaging it from the securing slot on the logic board.
- Carefully extract the cover from its slot, then detach it completely.
Step 17
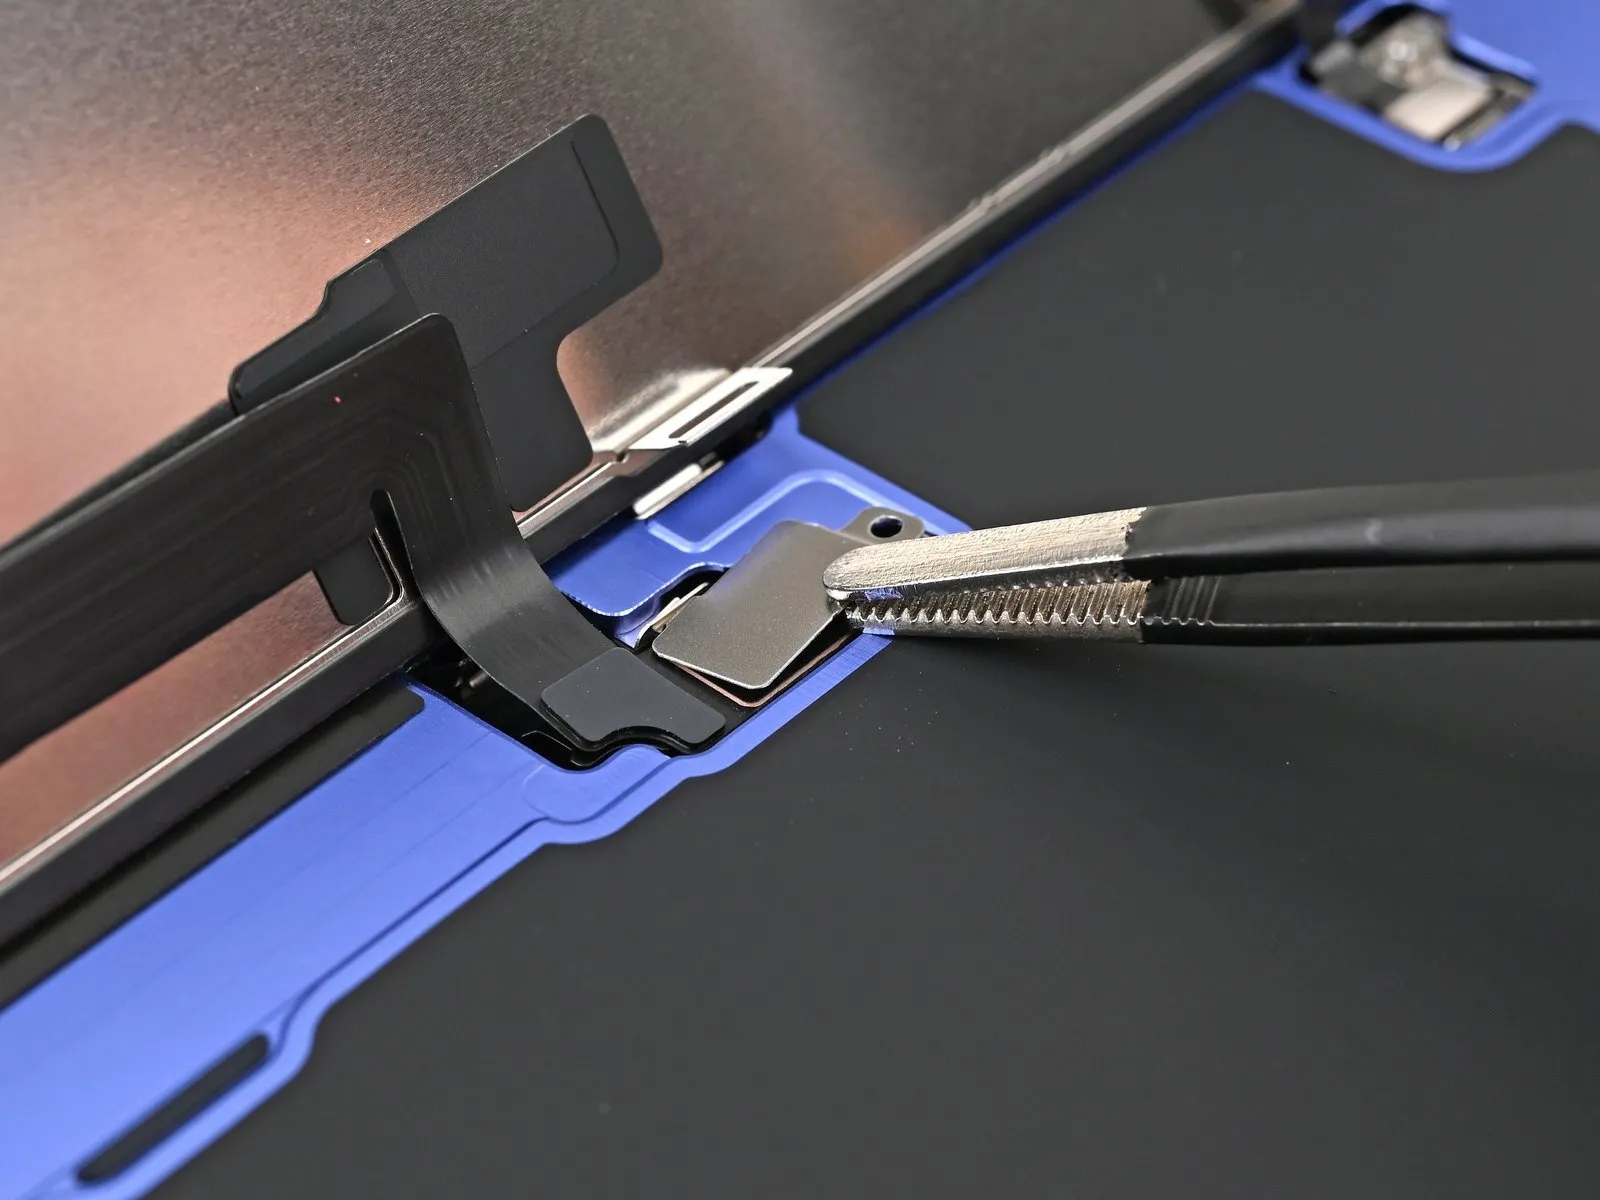
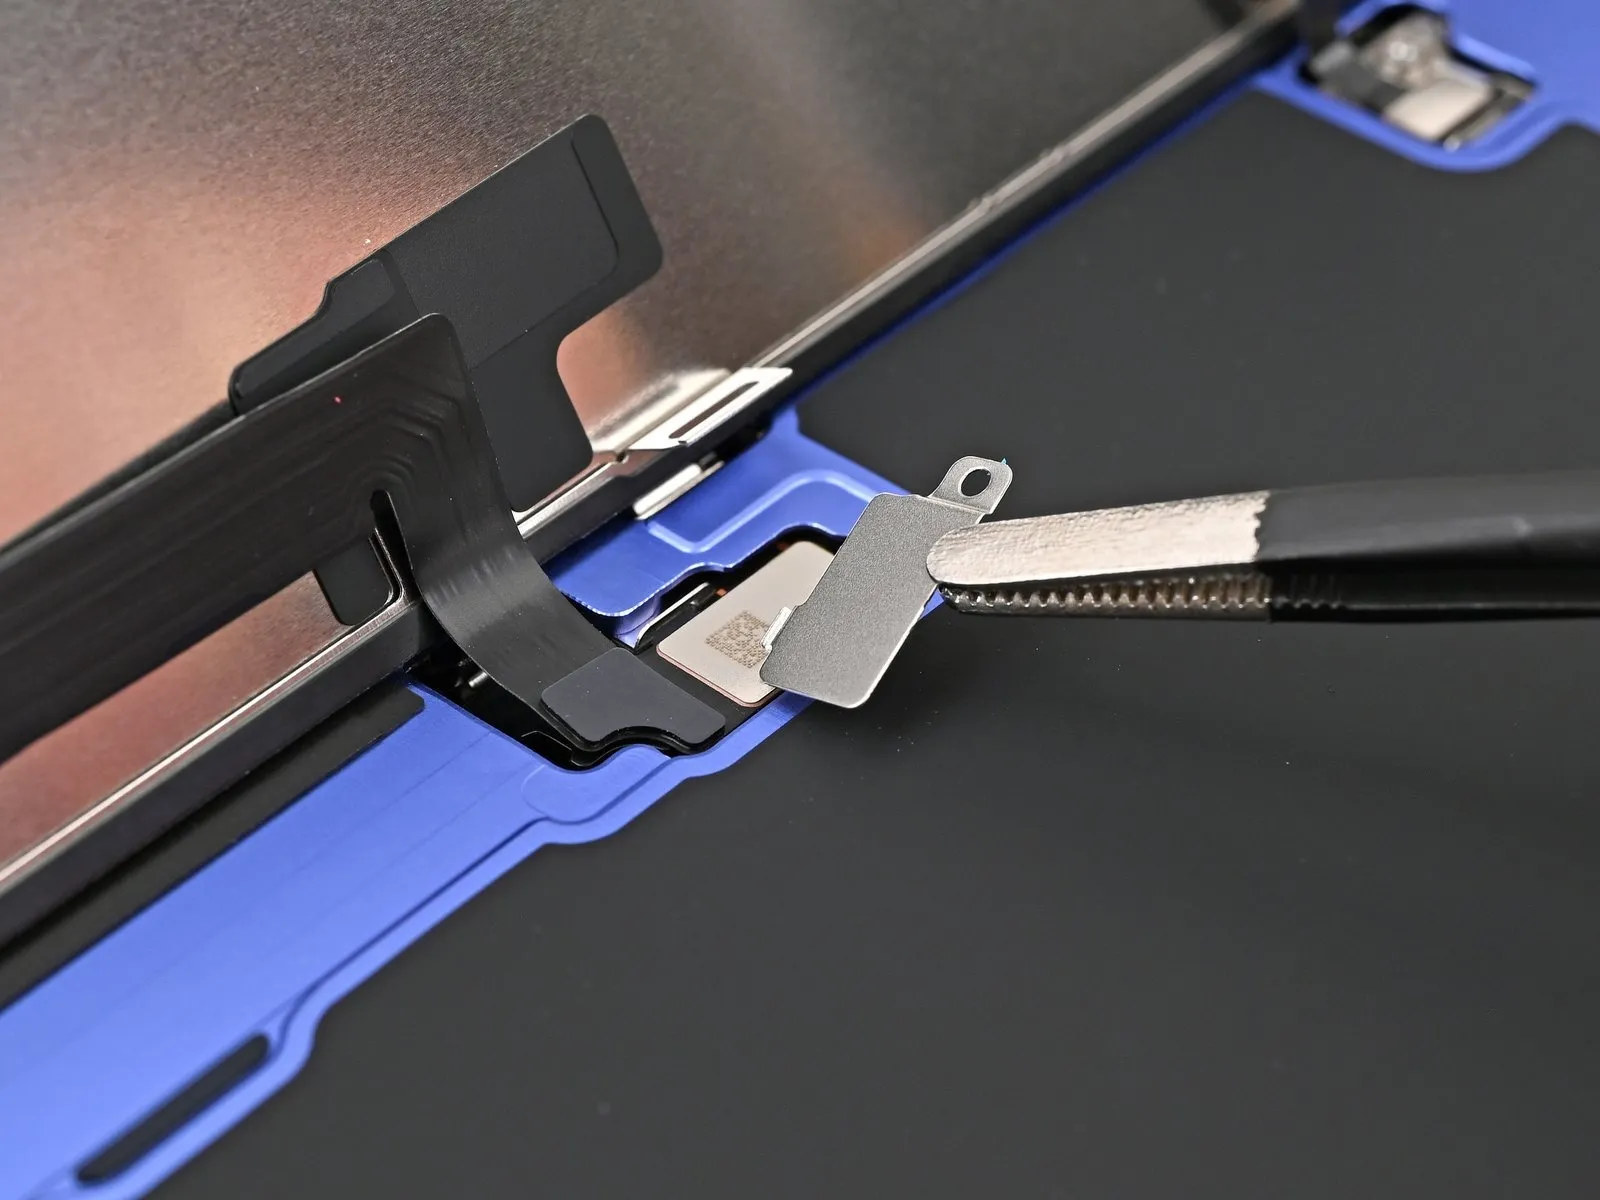
- Employing tweezers or manual dexterity, gently raise the screen connector cover, angling it slightly to disengage it from its corresponding position within the logic board.To fully separate the component, elevate the cover from its secured location.Complete the detachment process by physically removing the cover from the logic board’s slot.
- This action ensures the connector cover is entirely free from its mounting point.
Step 18 | Disconnect the screen
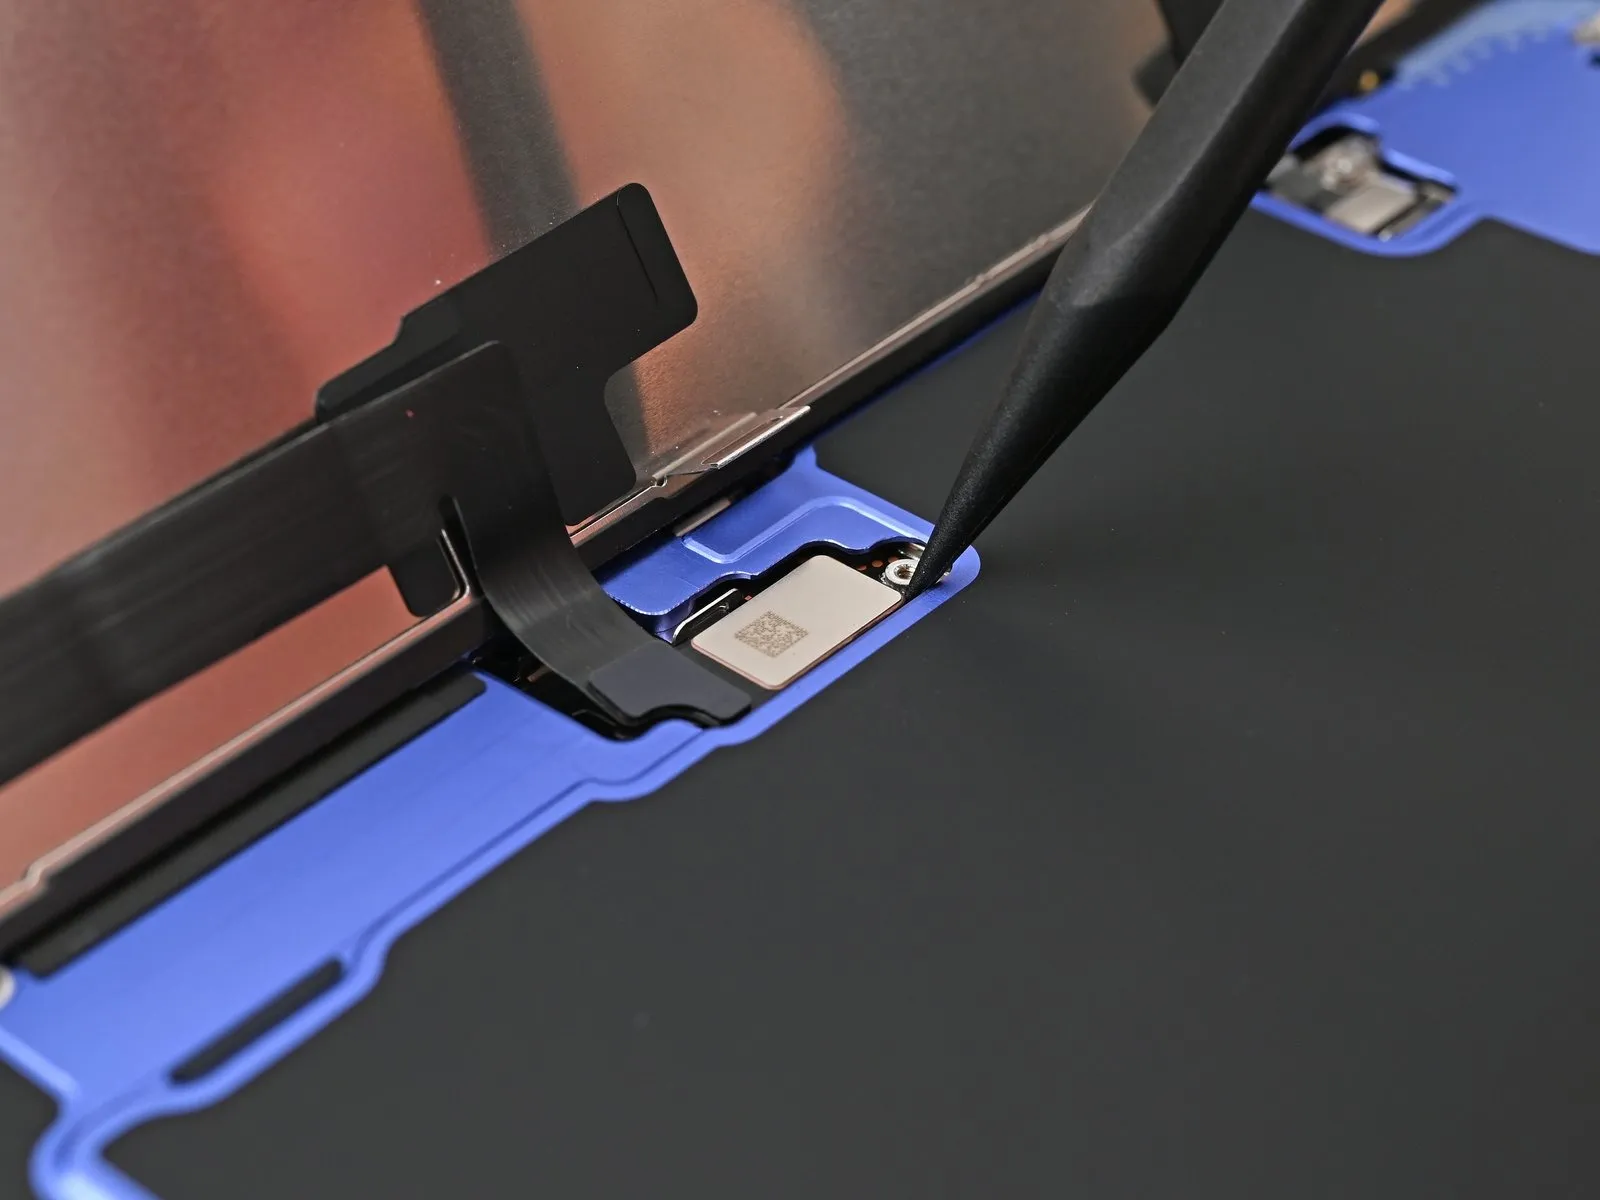
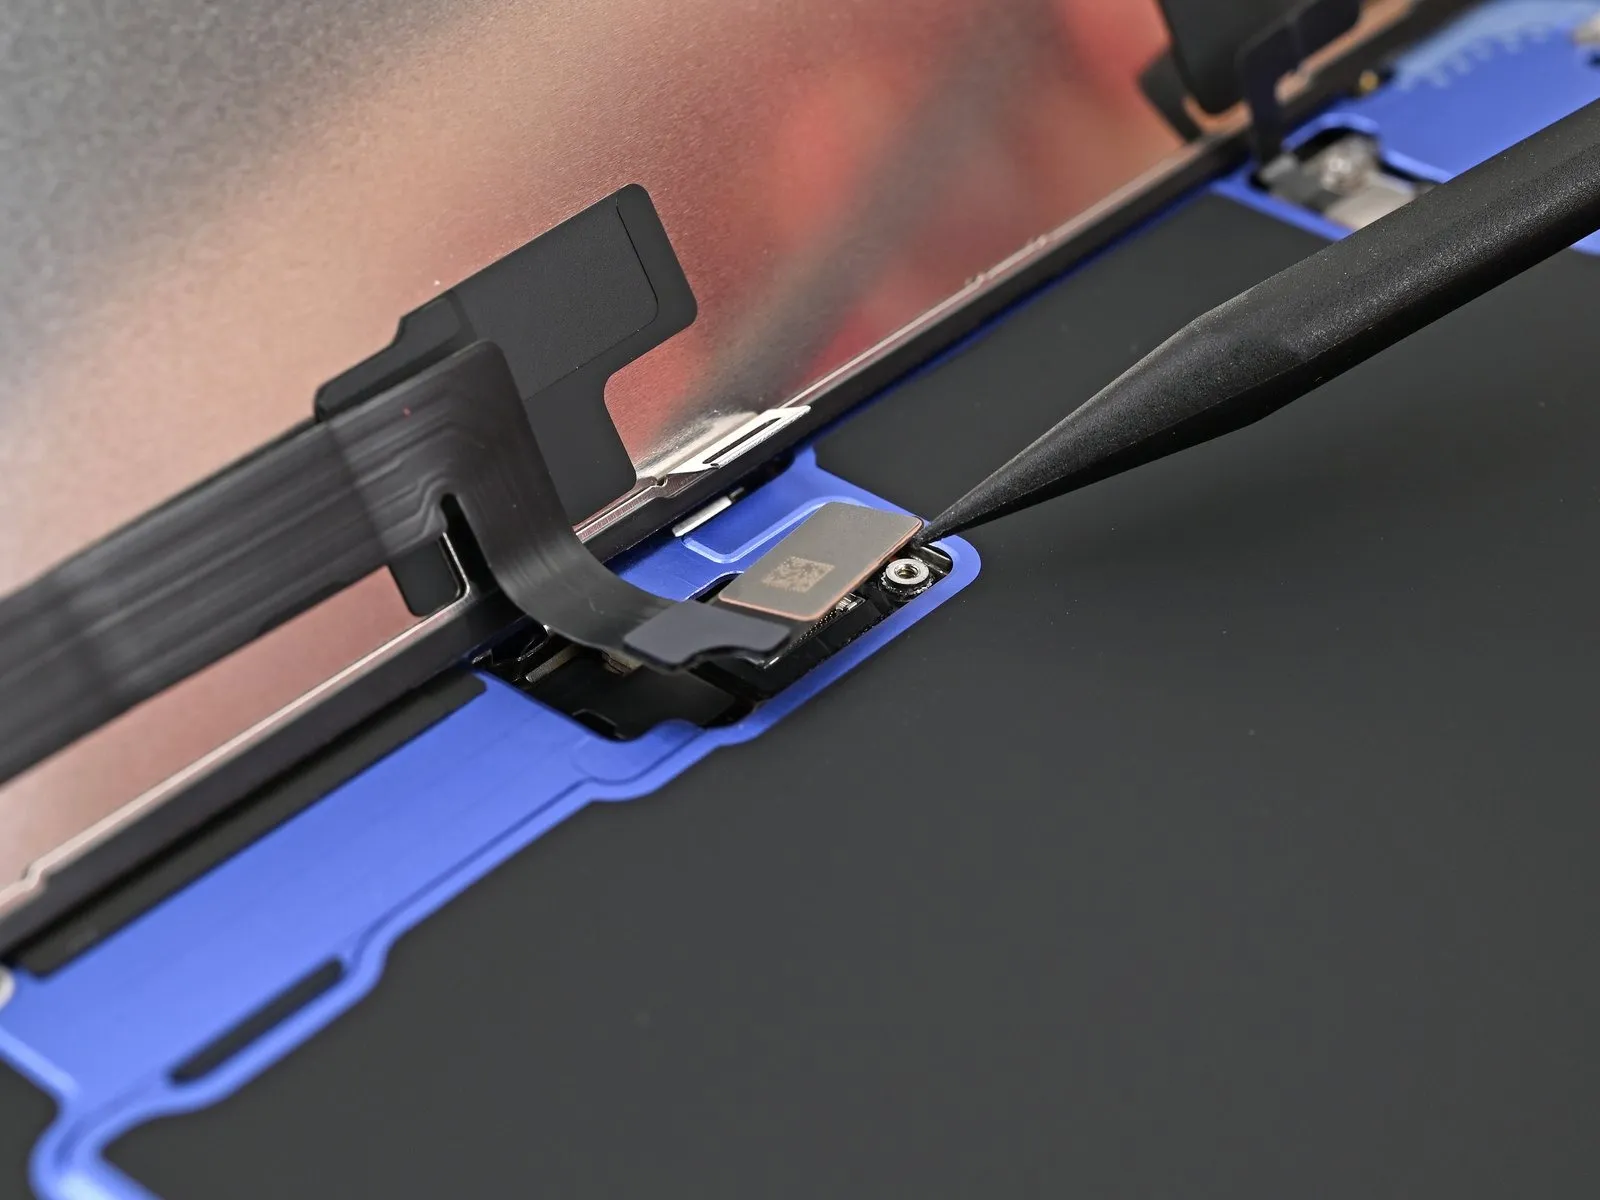
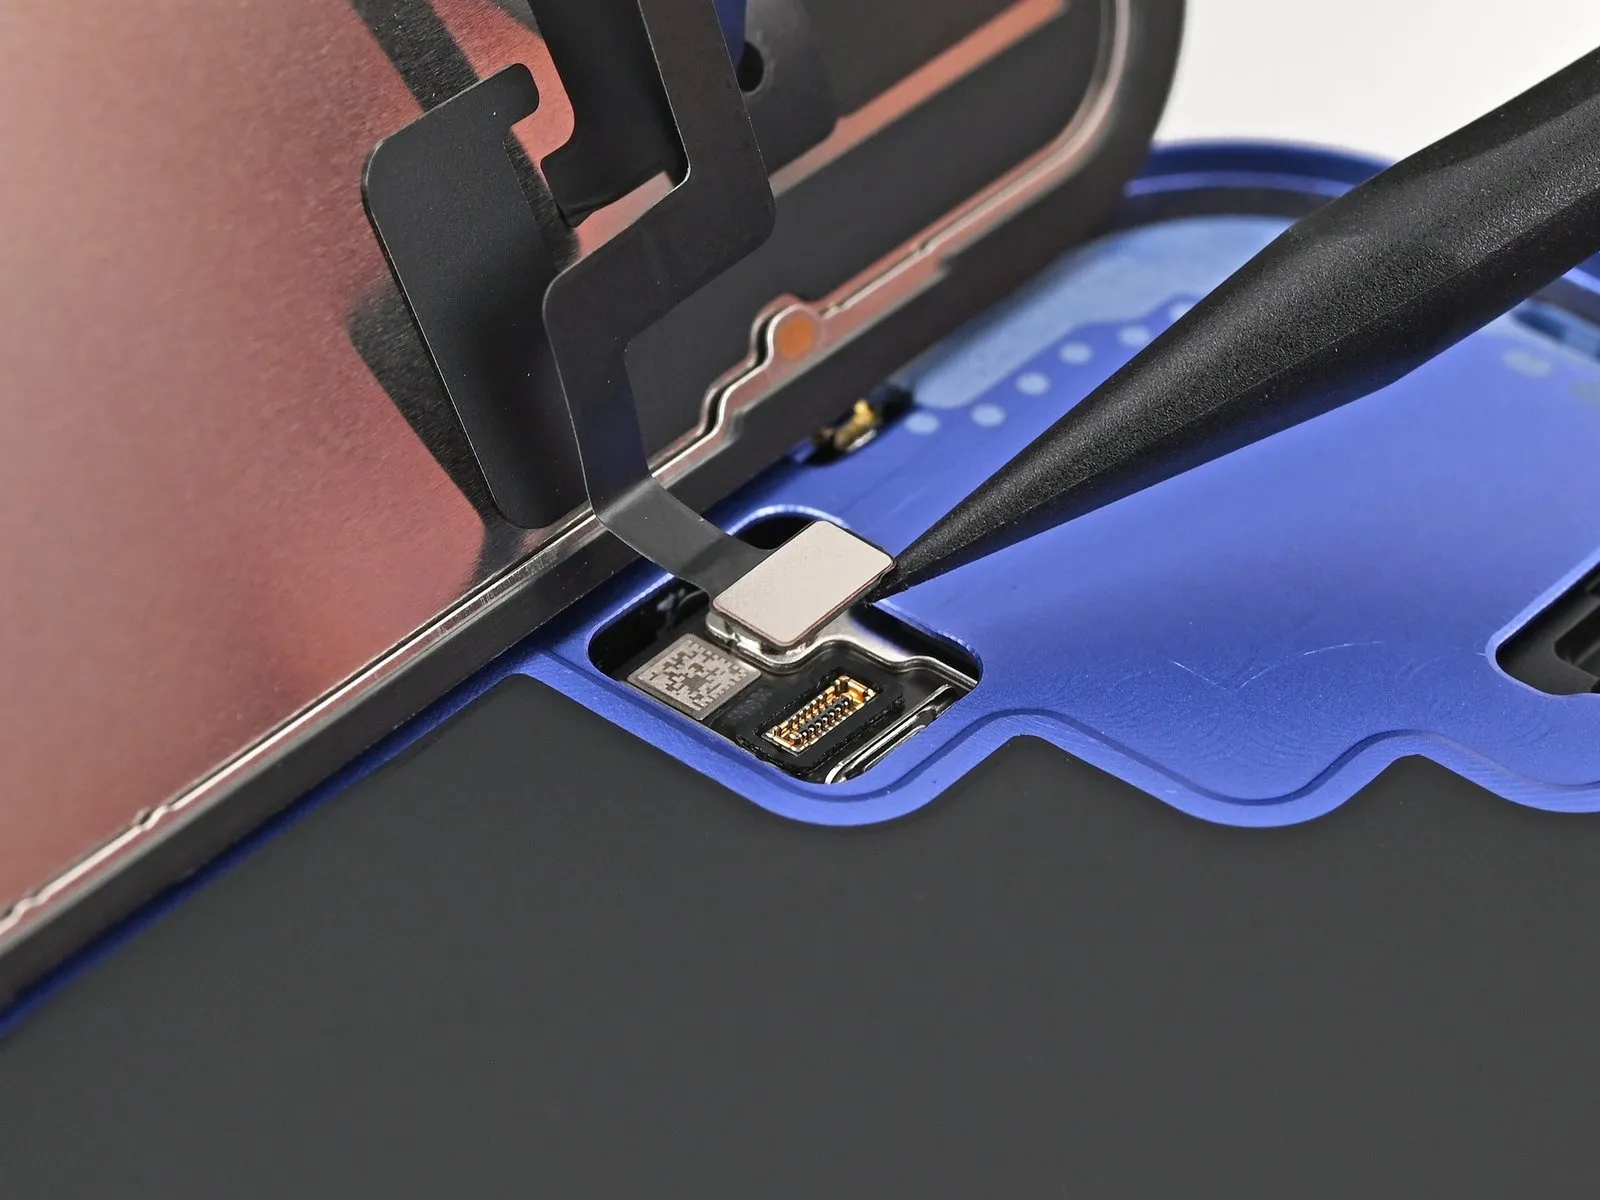
Employ the pointed end of a spudger to carefully lift and detach the screen press connector.The front sensor press connector should also be disconnected using the same prying technique with a spudger.This separation is achieved by applying gentle leverage with the spudger's tip.
Ensure complete disconnection of both connectors to prevent potential damage during subsequent steps.
Step 19 | Remove the screen
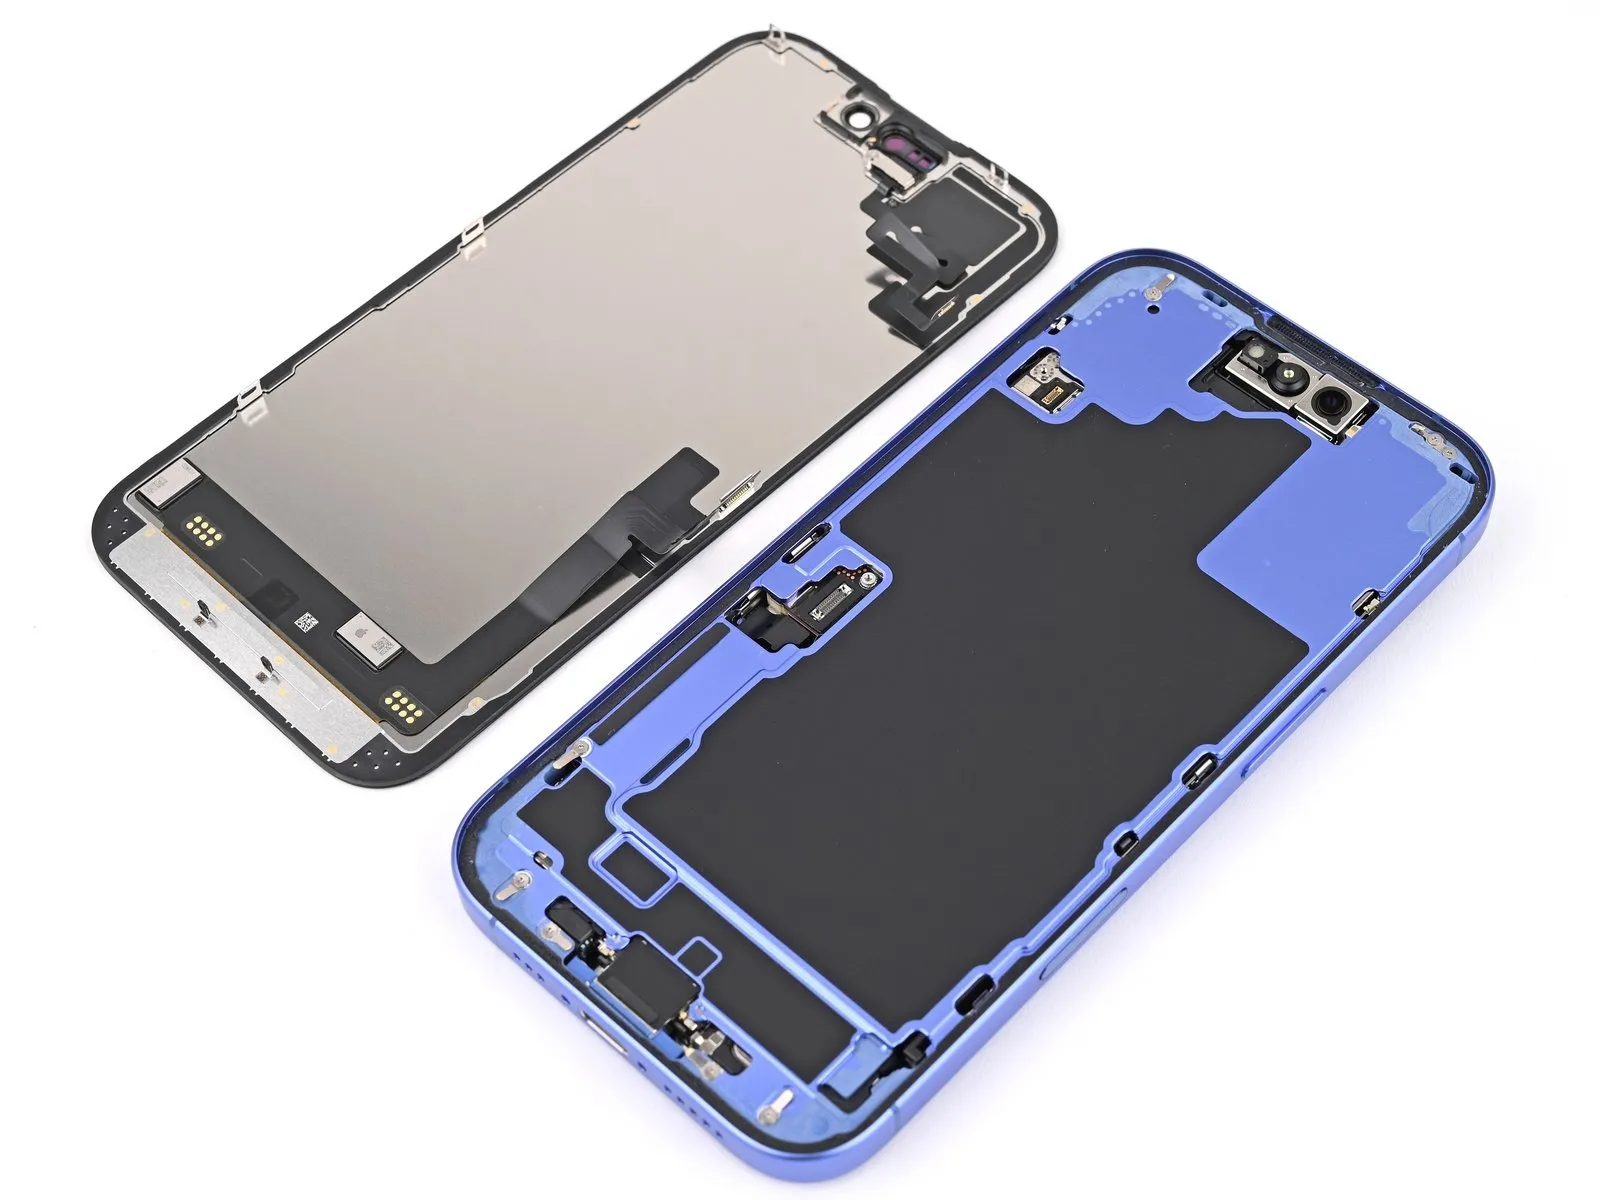
Carefully detach the display panel from its surrounding structural support.
Step 20 | Remove the ambient light sensor bracket
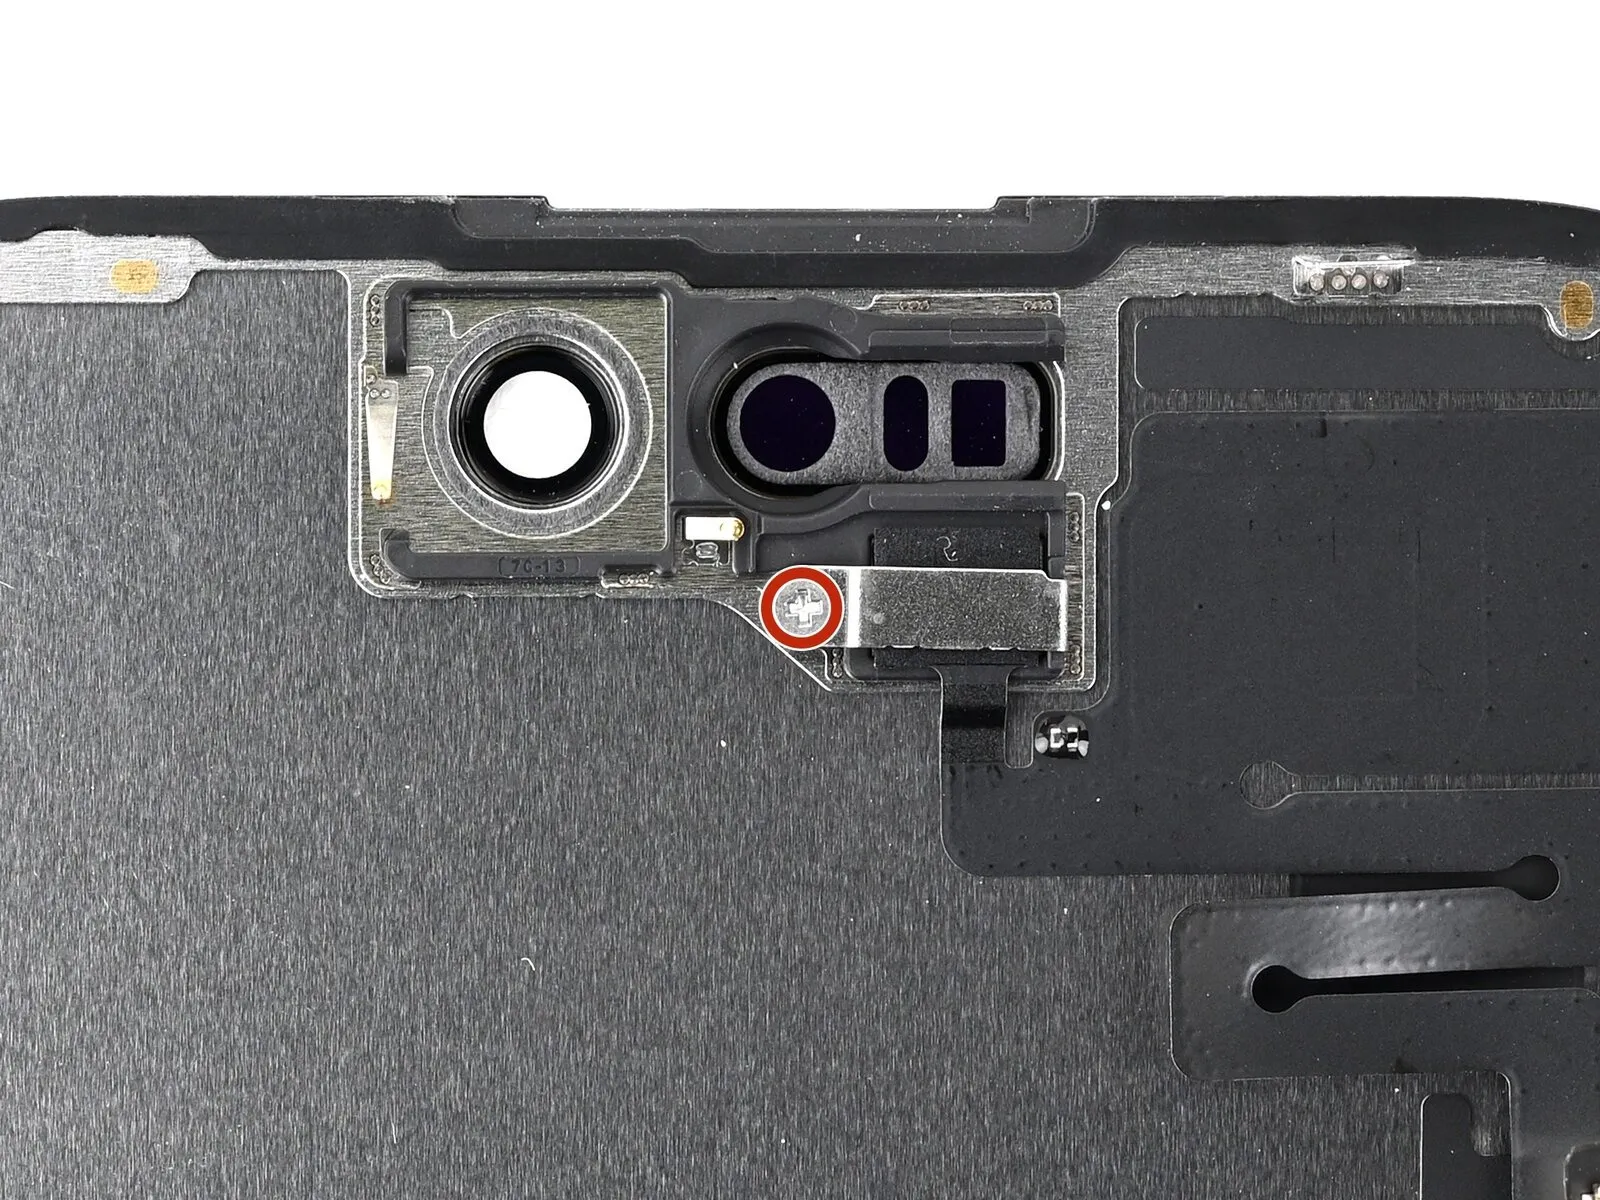
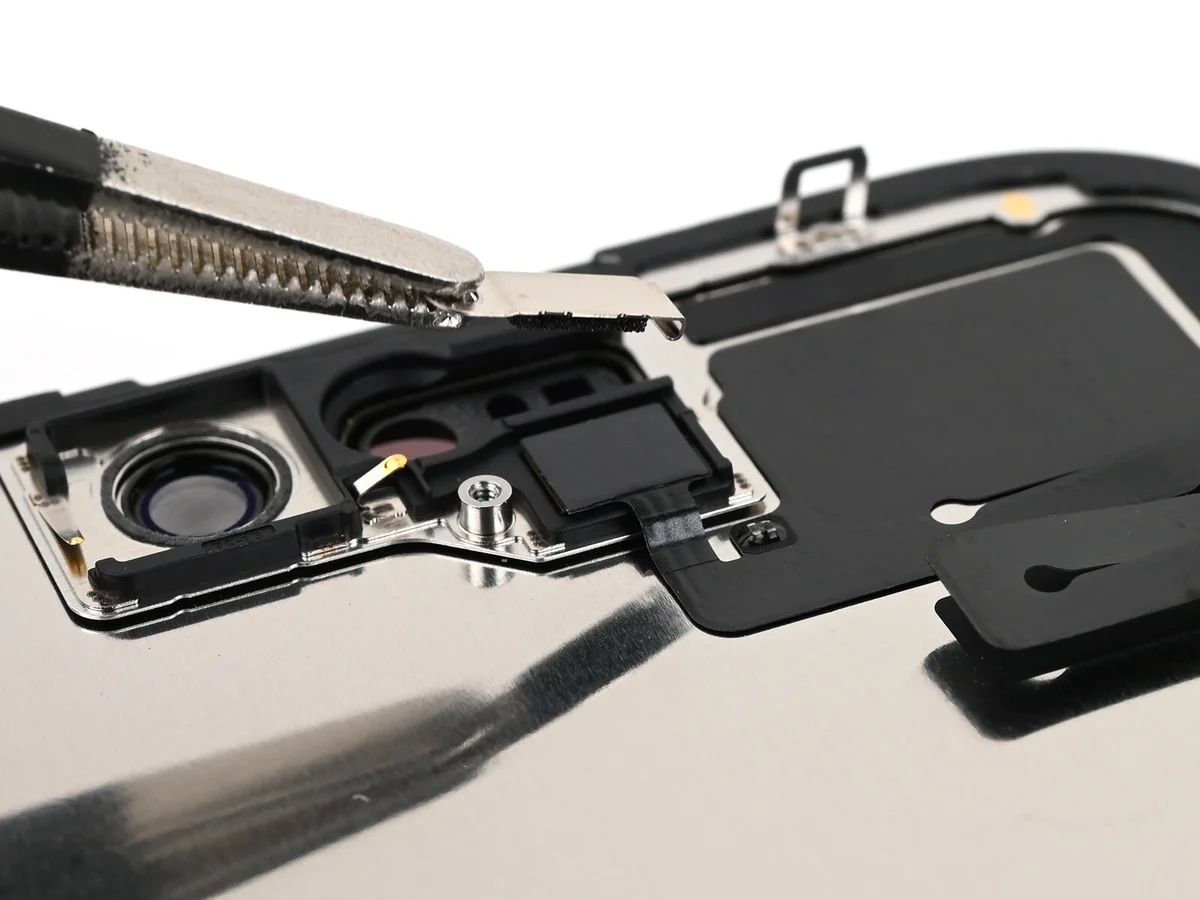
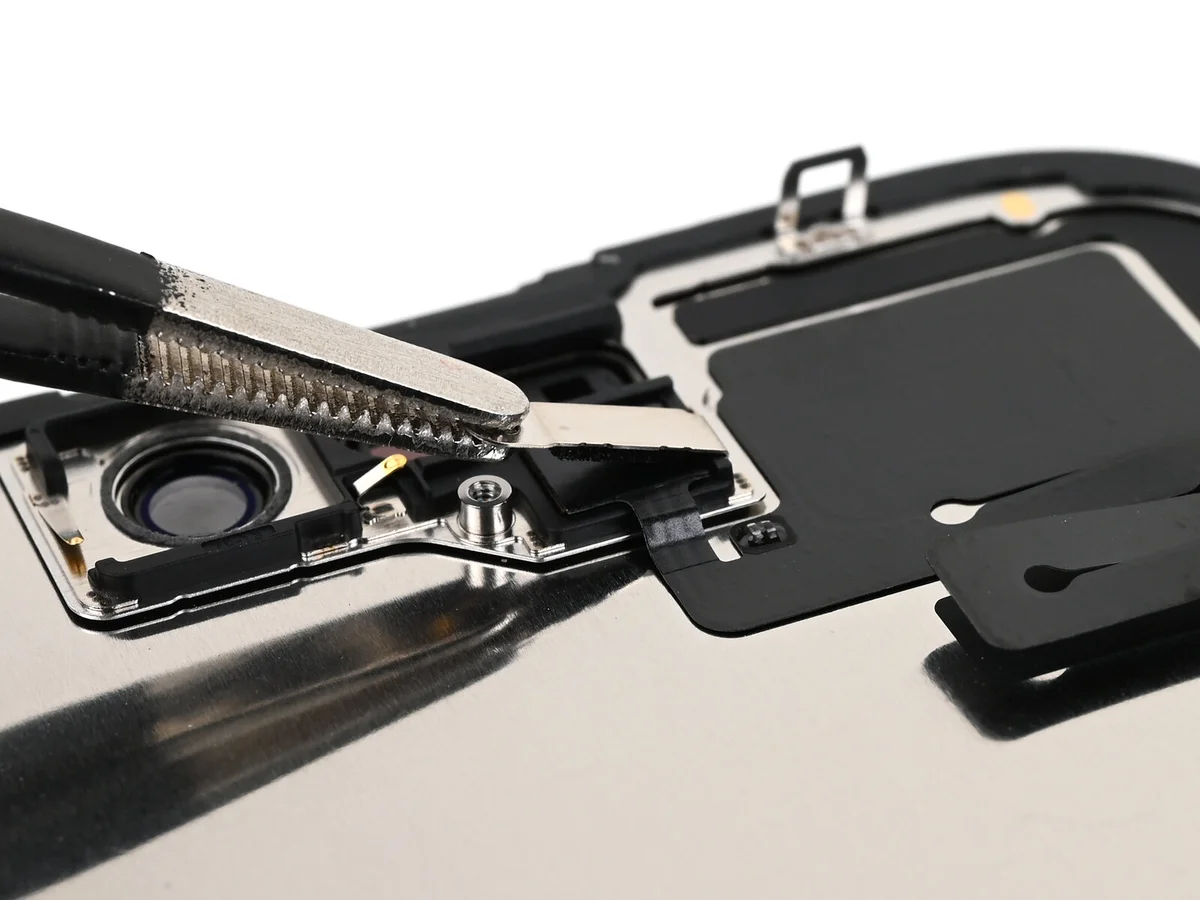
- Employ a Phillips screwdriver to detach the screw, measuring 1.3 millimeters in length, which holds the ambient light sensor bracket in place.The screw's purpose is to secure the ambient light sensor bracket; its removal requires a Phillips screwdriver.To dislodge the ambient light sensor bracket, carefully lift it away using tweezers or by hand.
- For manipulating the ambient light sensor bracket, tweezers or manual dexterity are suitable alternatives.The ambient light sensor bracket is held in position by a screw with a length of 1.3 mm, necessitating a Phillips screwdriver for its removal.A Phillips screwdriver is essential for unscrewing the 1.3 mm fastener that anchors the ambient light sensor bracket, allowing for its subsequent removal.
Step 21 | Pry up the ambient light sensor
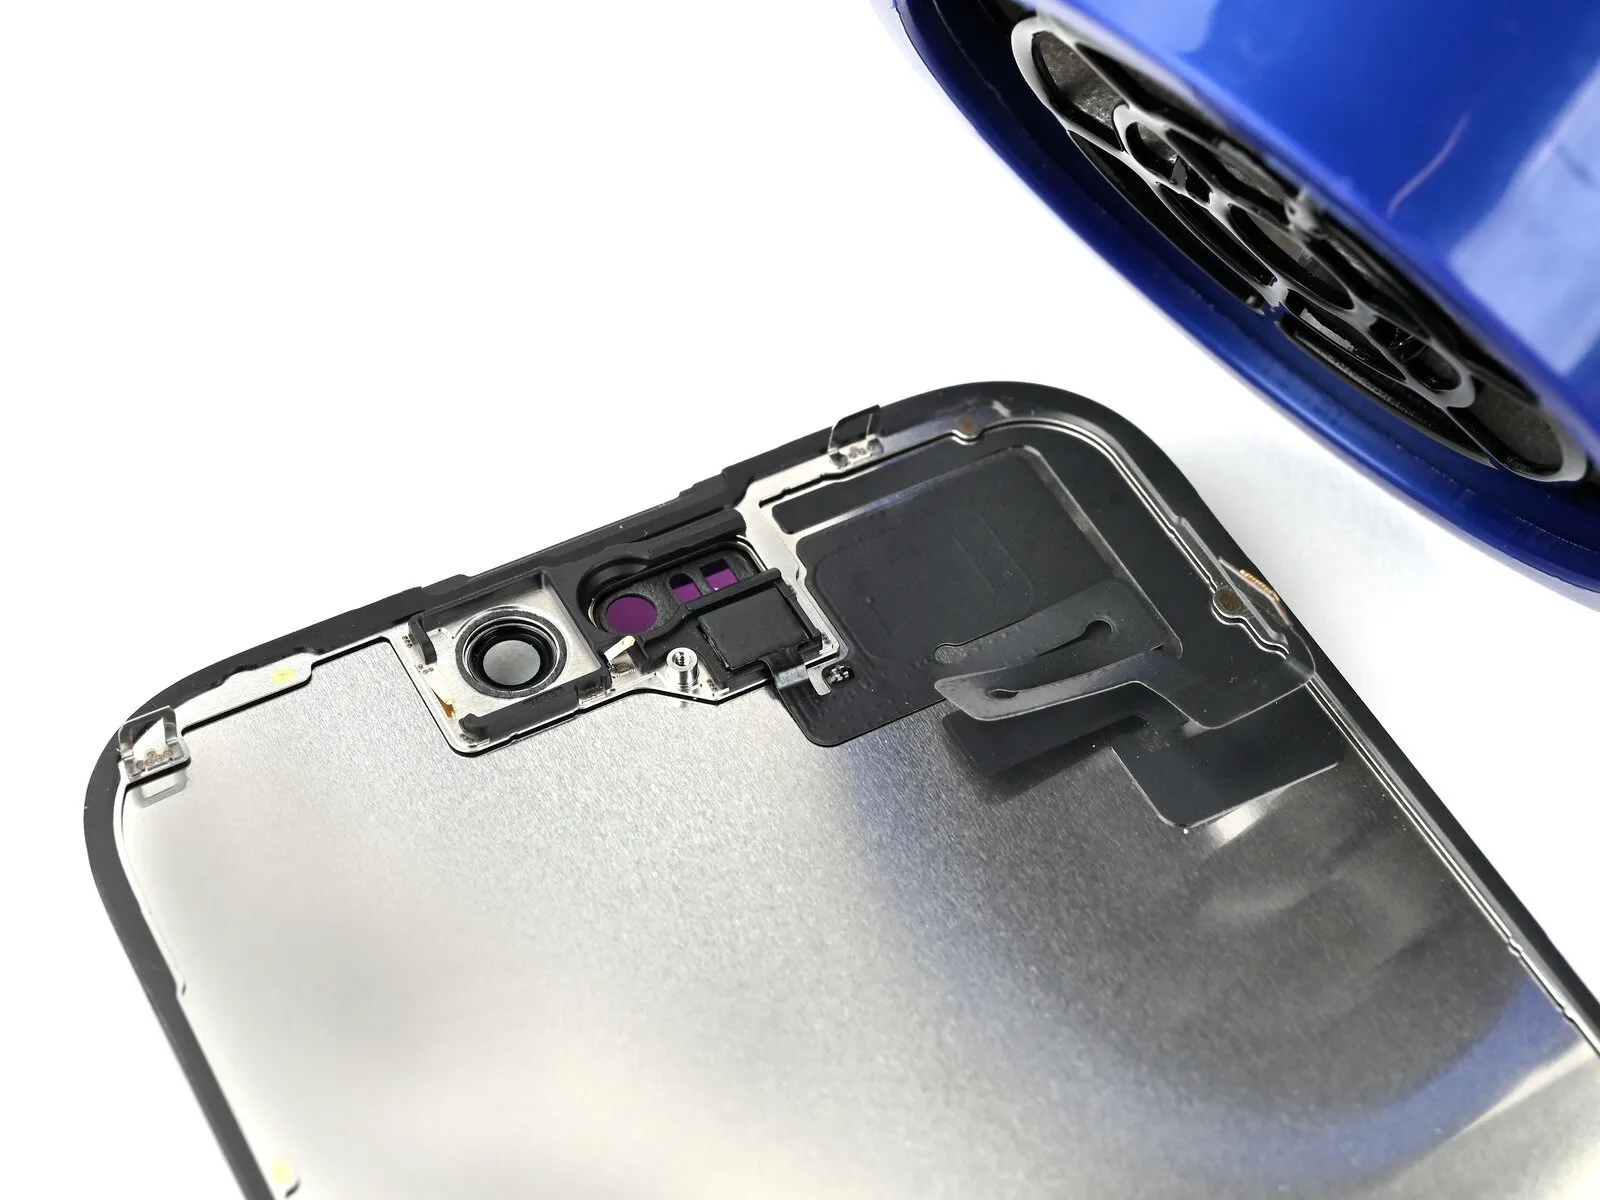
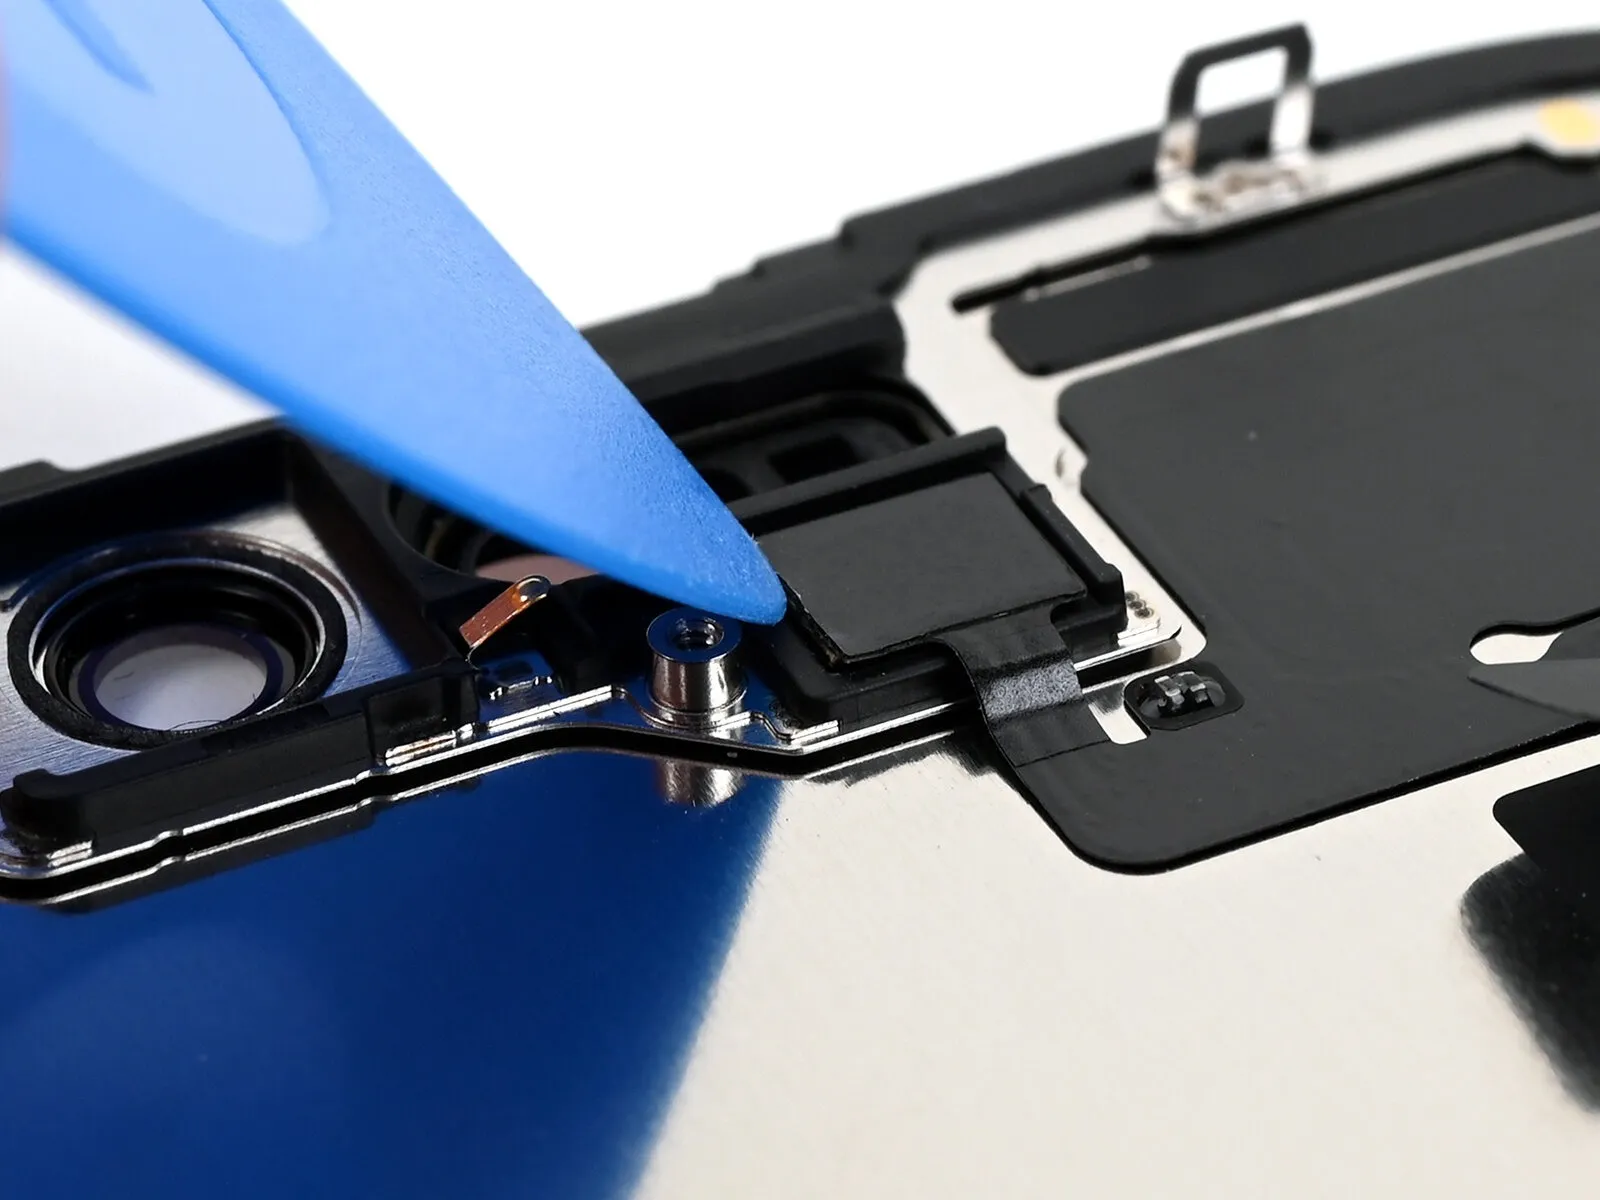
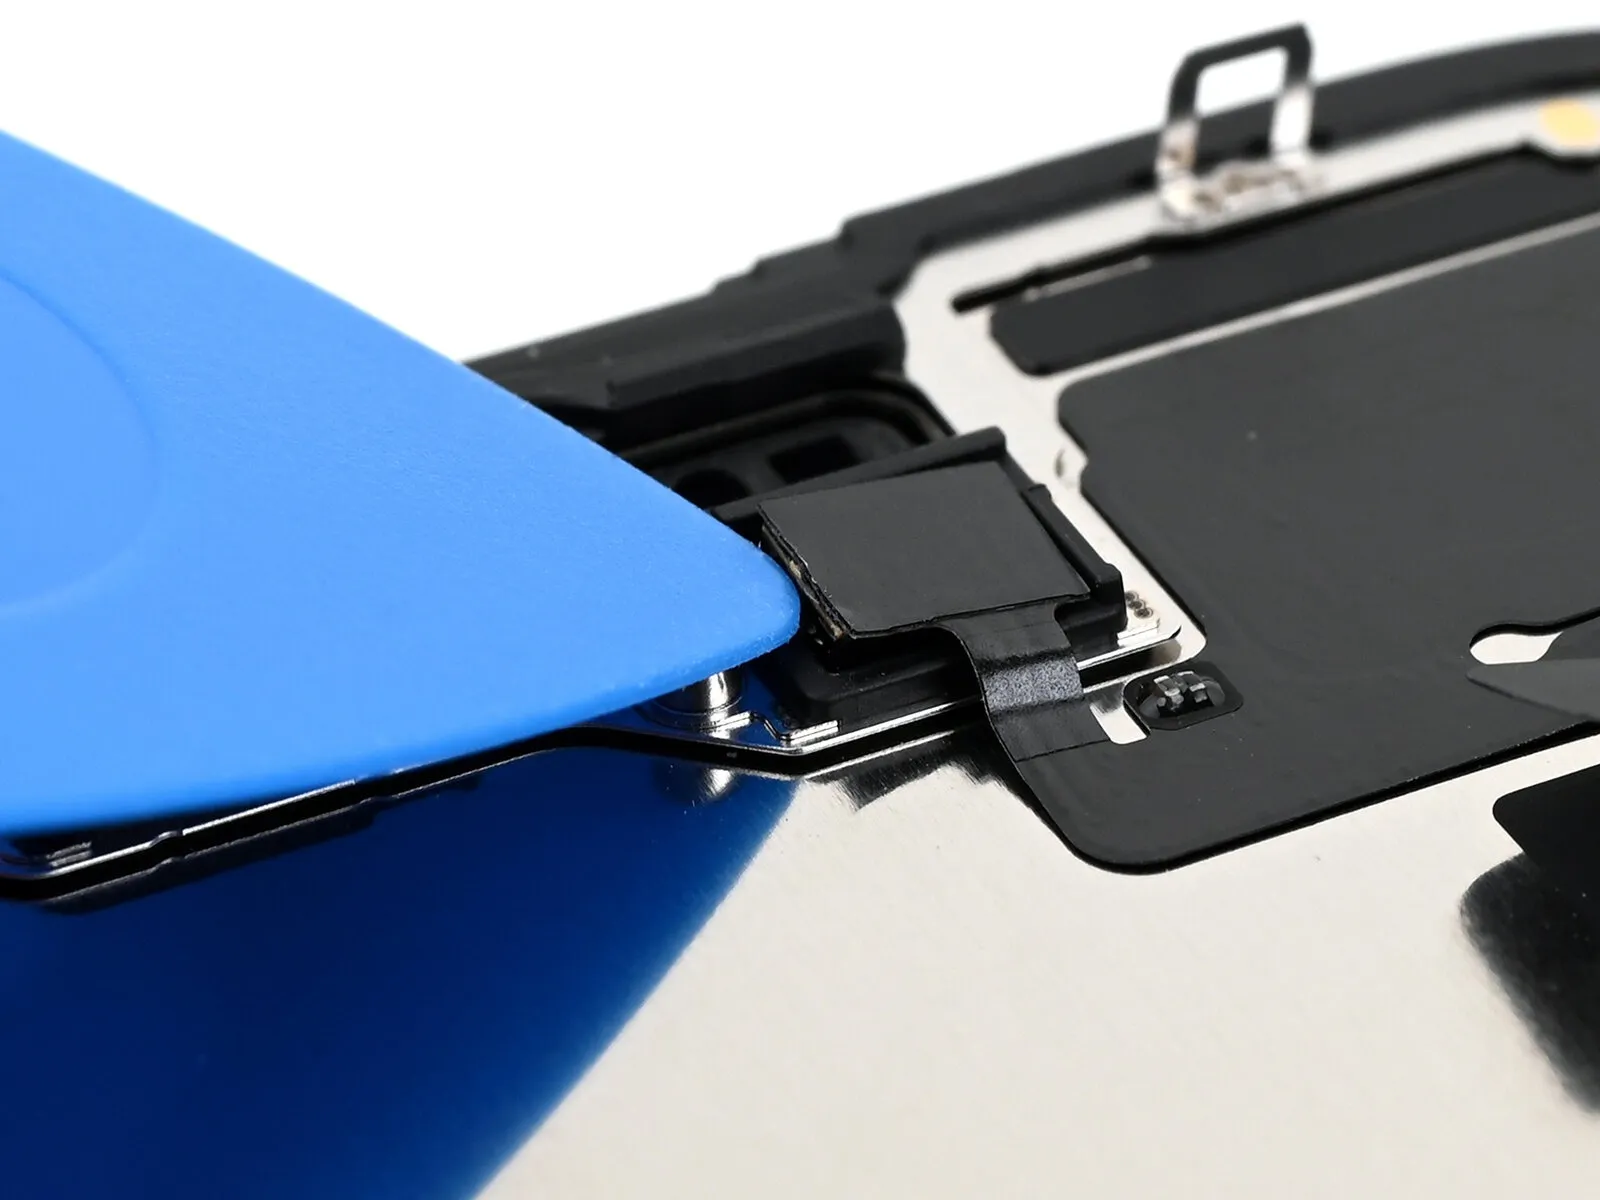
- Employ a hair dryer, heat gun, or iOpener with heat to reduce the adhesive bond securing the ambient light sensor and its associated cable.The application of heat facilitates separation by softening the adhesive material.Specifically, the adhesive located beneath the ambient light sensor and along the ambient light sensor cable needs to be softened.An opening pick is the appropriate tool for lifting the ambient light sensor.Carefully insert the opening pick to avoid damaging surrounding components.
- Prying with the opening pick will release the ambient light sensor from its affixed position.
Step 22 | Reposition the ambient light sensor cable
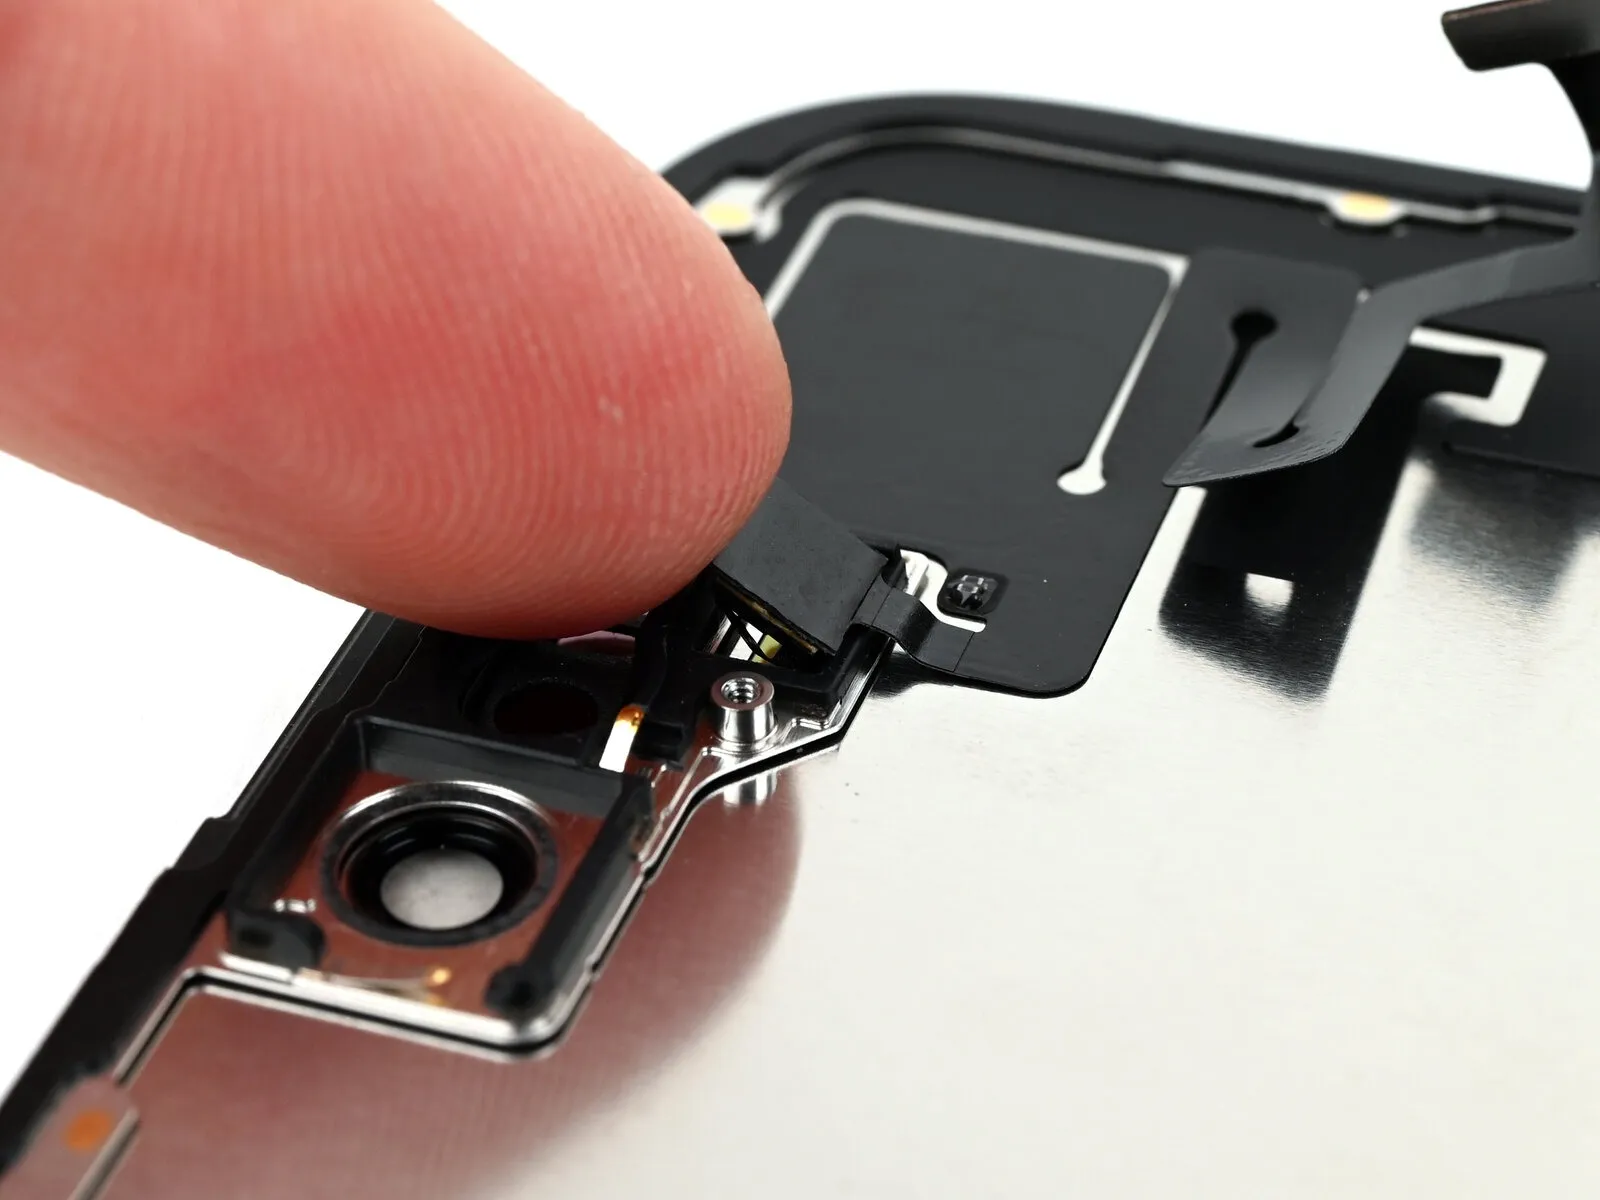
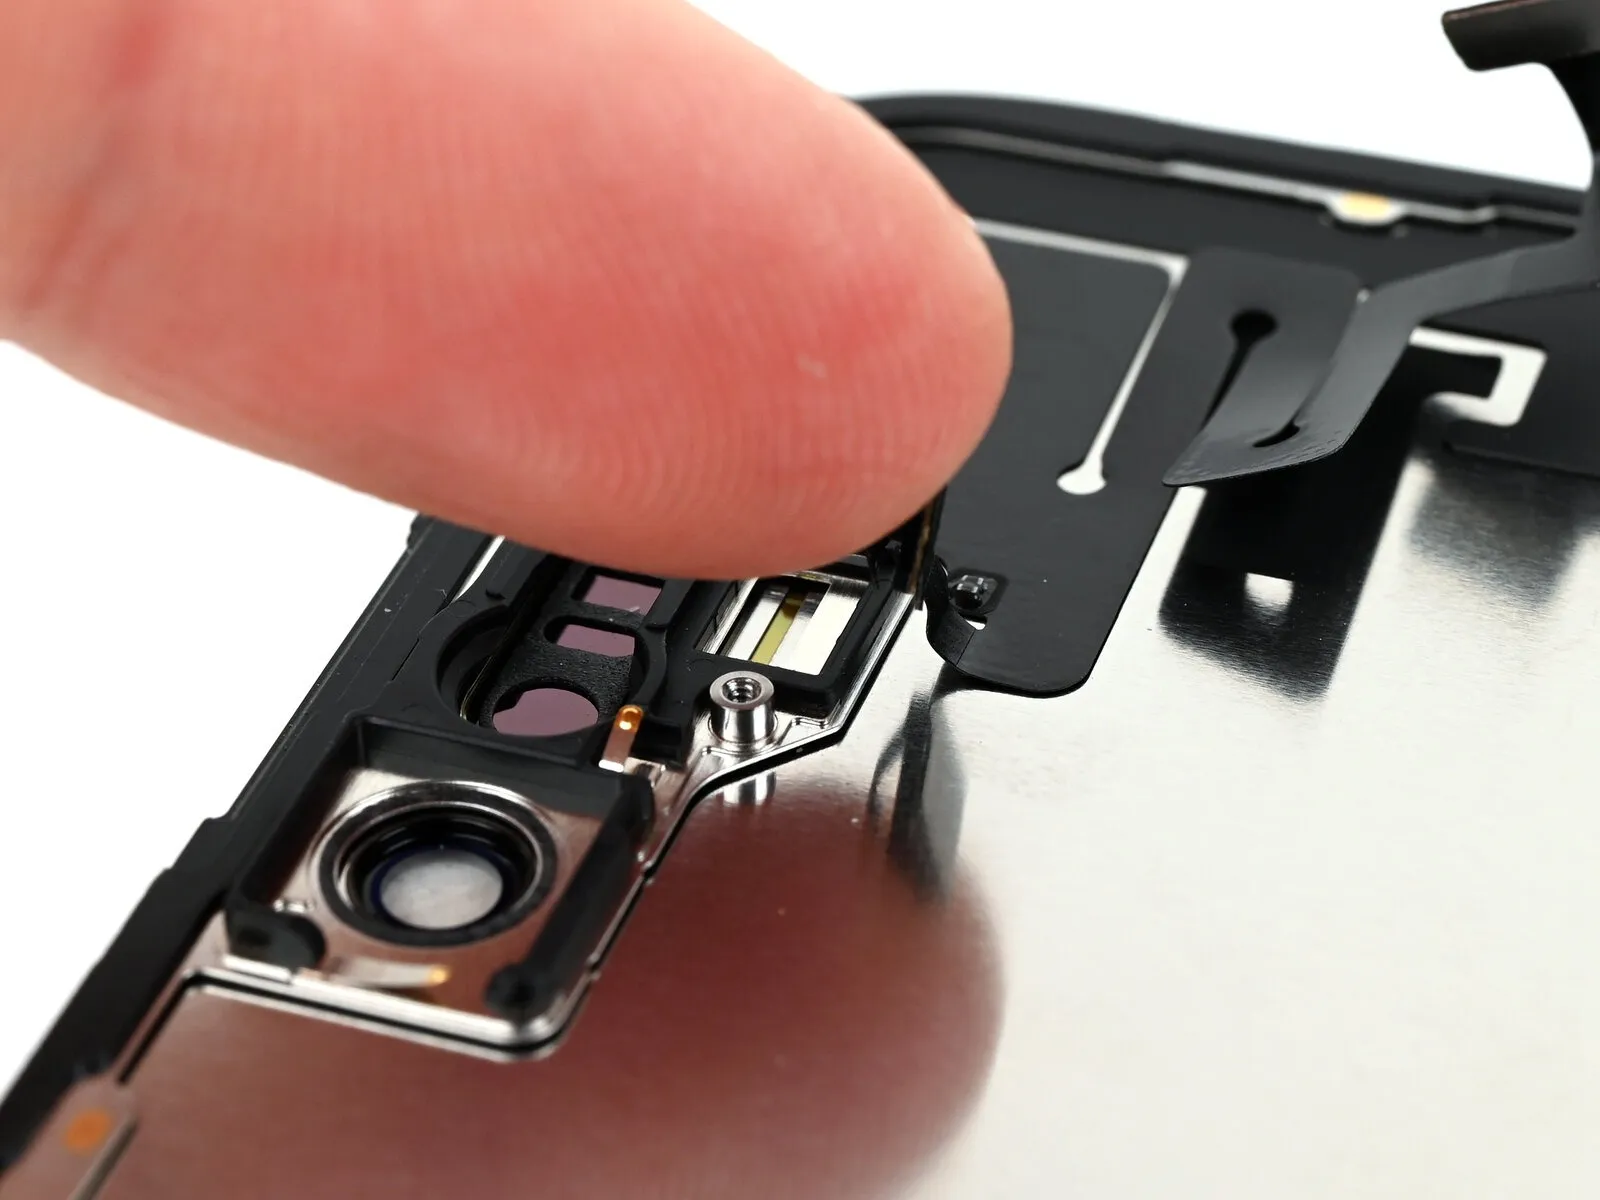
- Employ a fingertip to disengage the ambient light sensor from its designated cavity.
Step 23 | Peel up the ambient light sensor cable
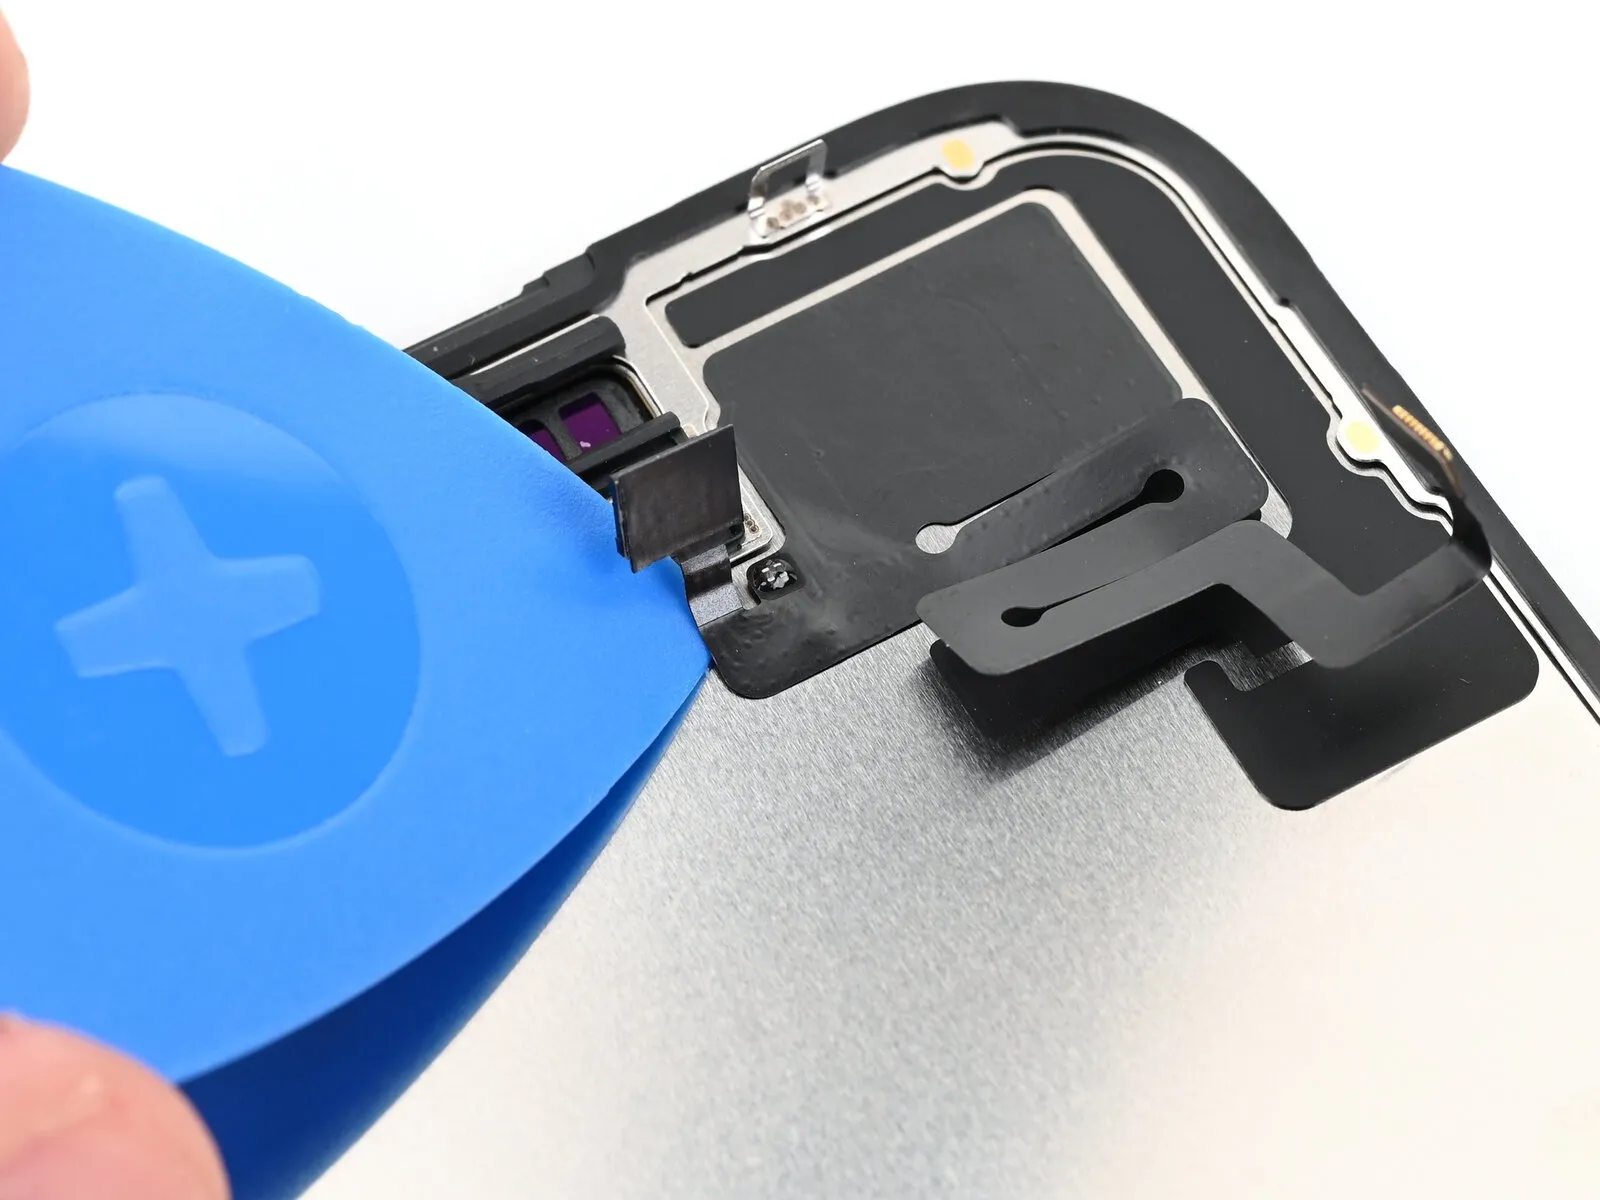
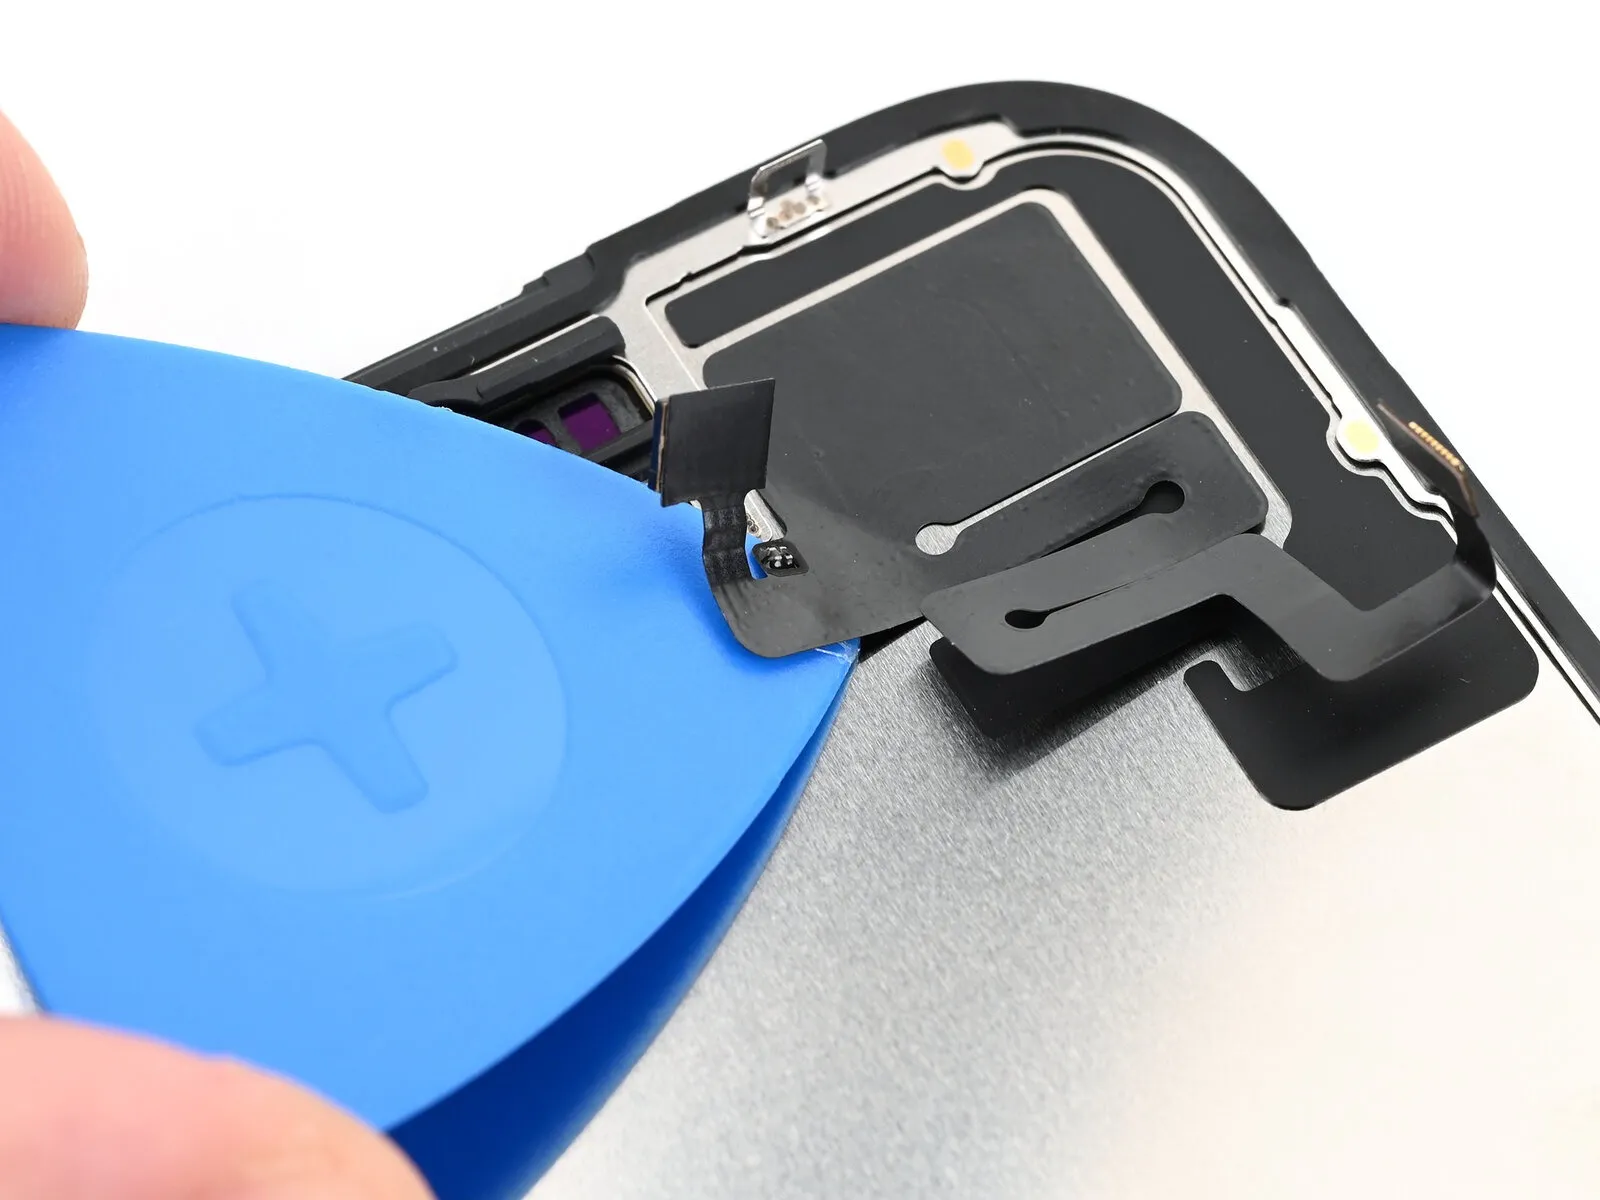
- Begin separating the ambient light sensor's cable from its adhesive backing by carefully inserting a specialized opening tool beneath it, initiating the separation close to the sensor itself and progressing towards the distant corner.
Should the adhesive layer resist separation, additional warmth is required to soften it.Applying increased thermal energy will facilitate the release of the adhesive.Ensure the adhesive is adequately softened to prevent damage during separation.
Step 24 | Remove the ambient light sensor
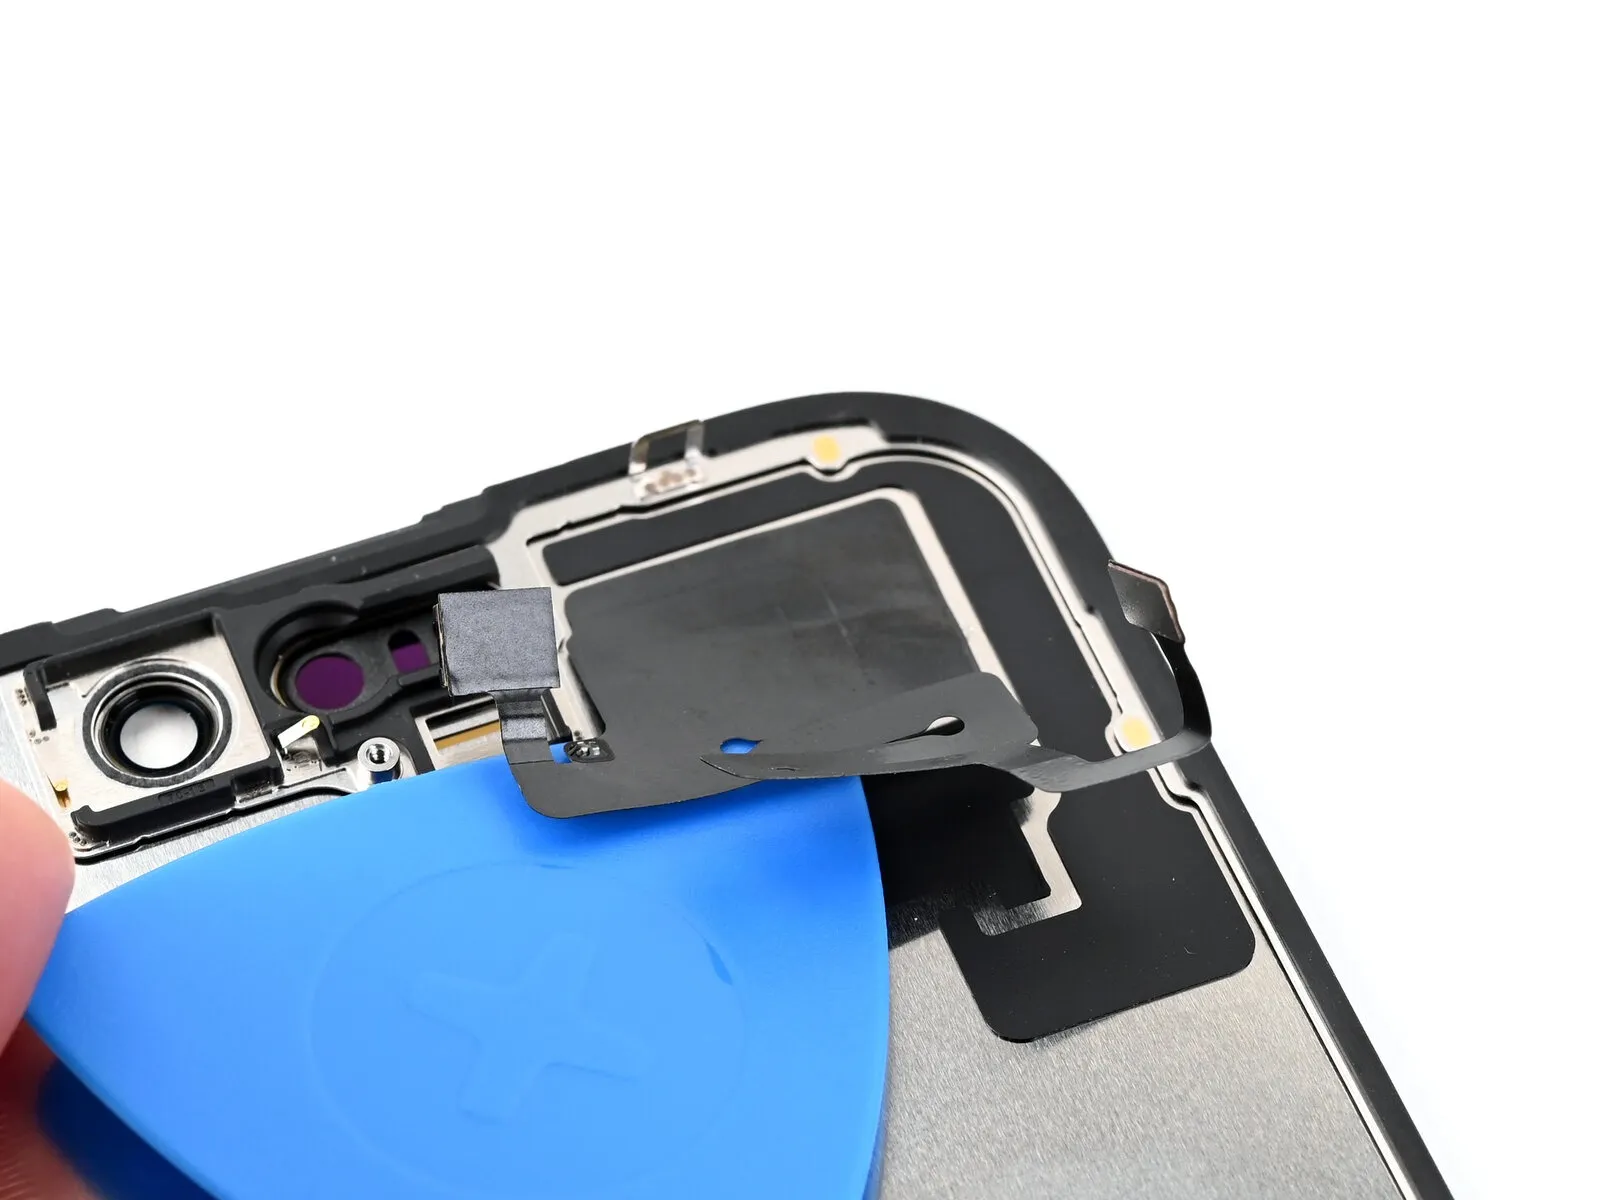
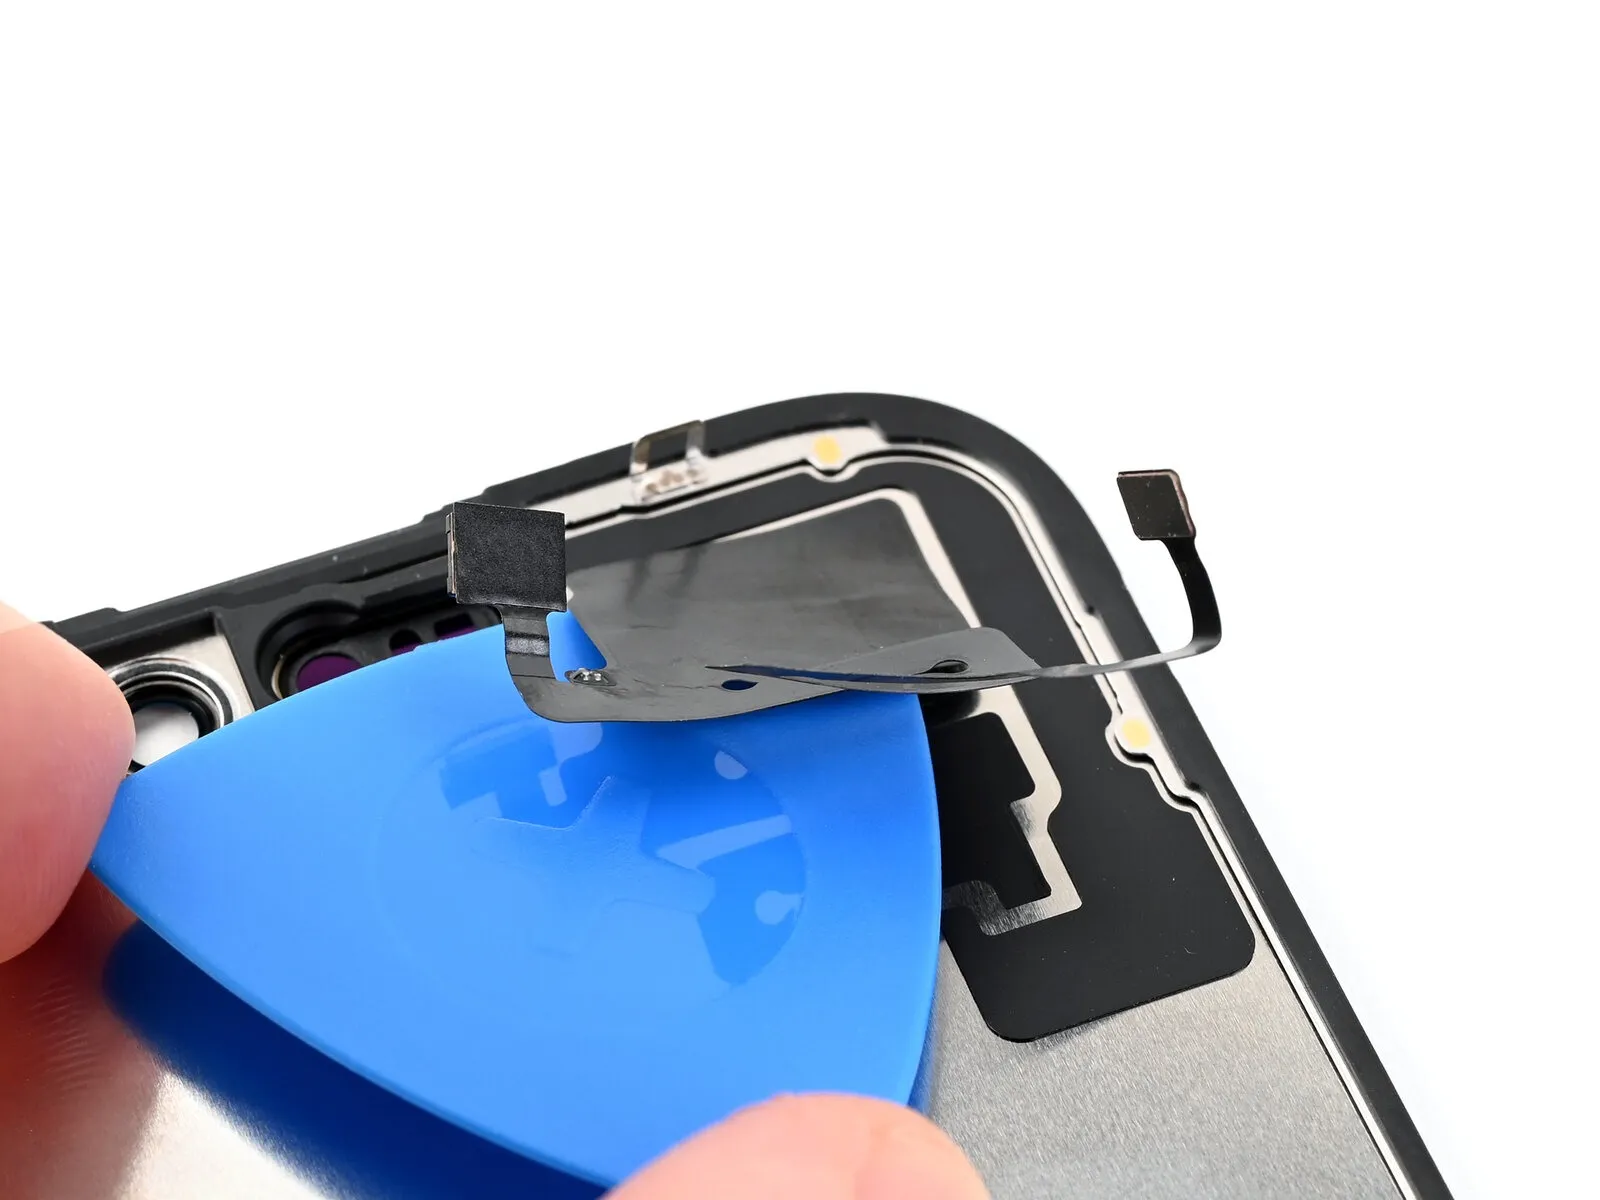
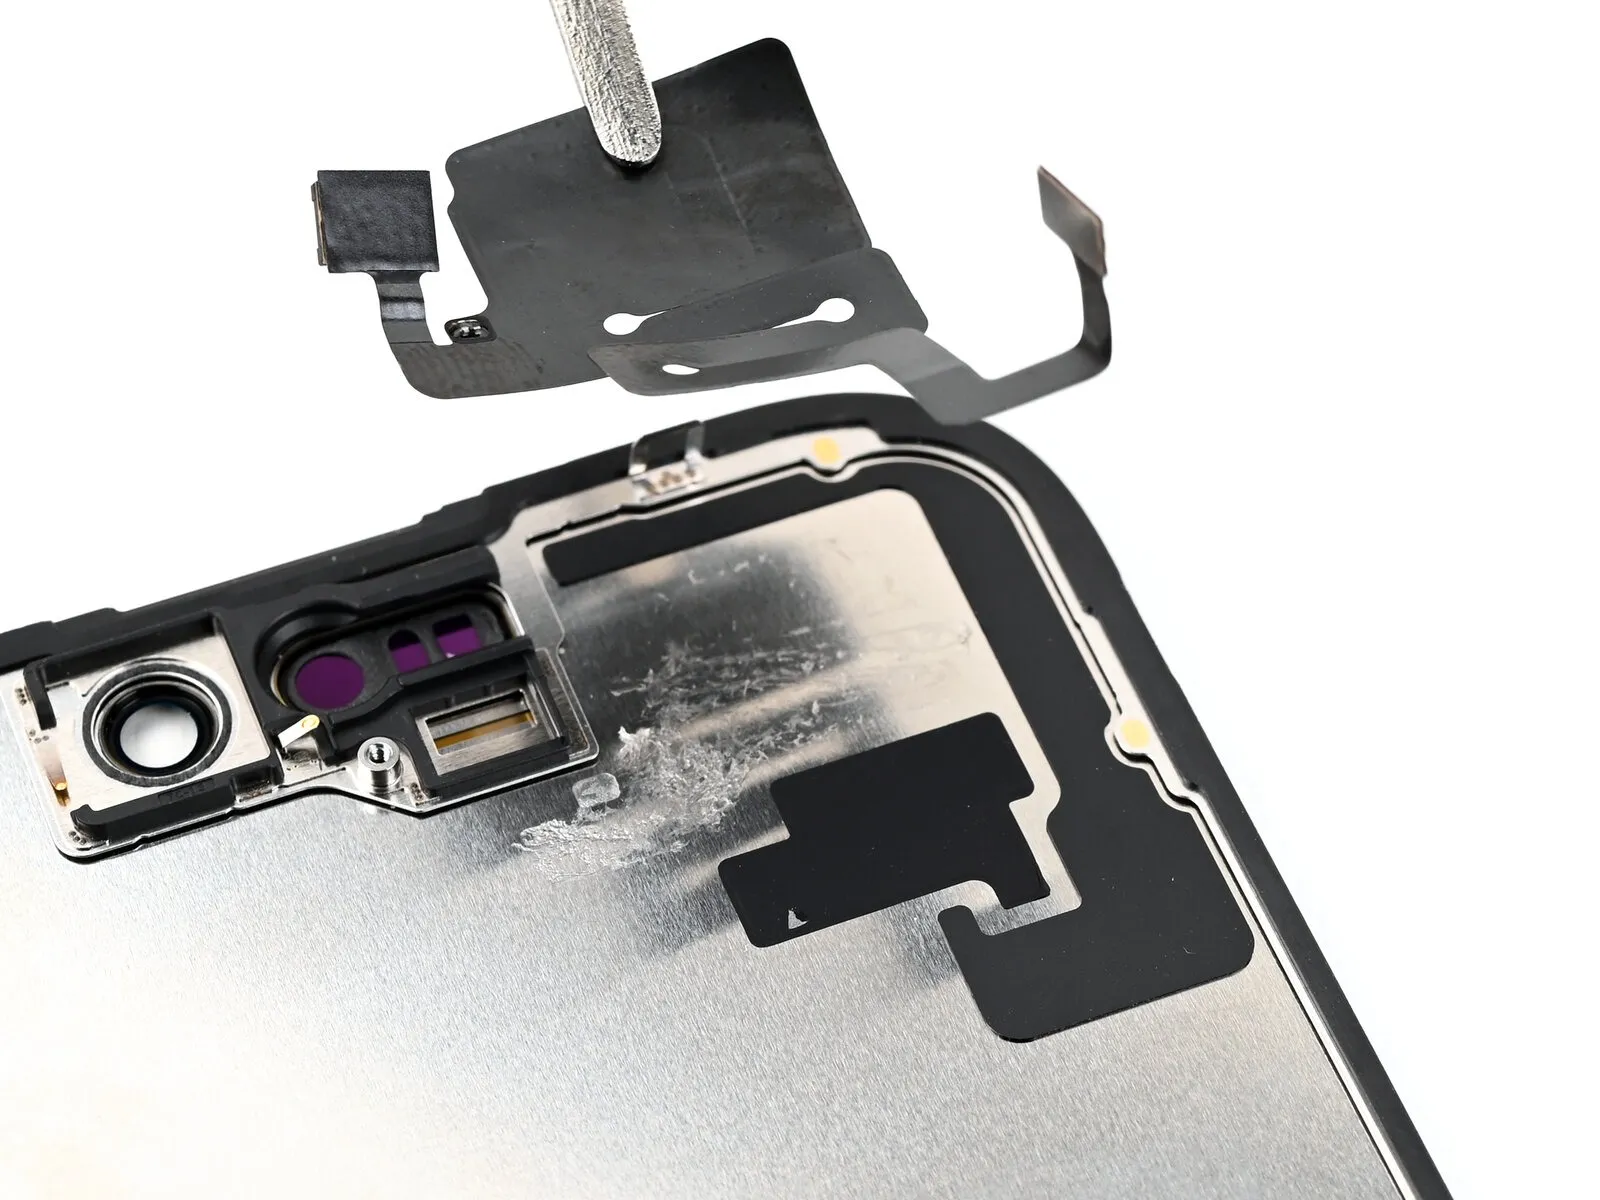
- Progressively advance the separation tool beneath the ambient light sensor's cable, ensuring complete dislodgement from the display assembly.
Employing tweezers, carefully detach the ambient light sensor component from the screen surface.
Step 25 | End of disassembly

Having finished the device's disassembly, the subsequent instructions detail the reassembly process.
- To ensure proper engagement when reattaching connectors, precisely position the connector above its corresponding receptacle and apply downward pressure, initially on one edge with a fingertip or spudger, then on the opposite edge, until a distinct click is heard.
- Avoid applying excessive force during connector reattachment; should difficulties arise, reposition the connector and attempt the connection once more.
Step 26 | Place the ambient light sensor
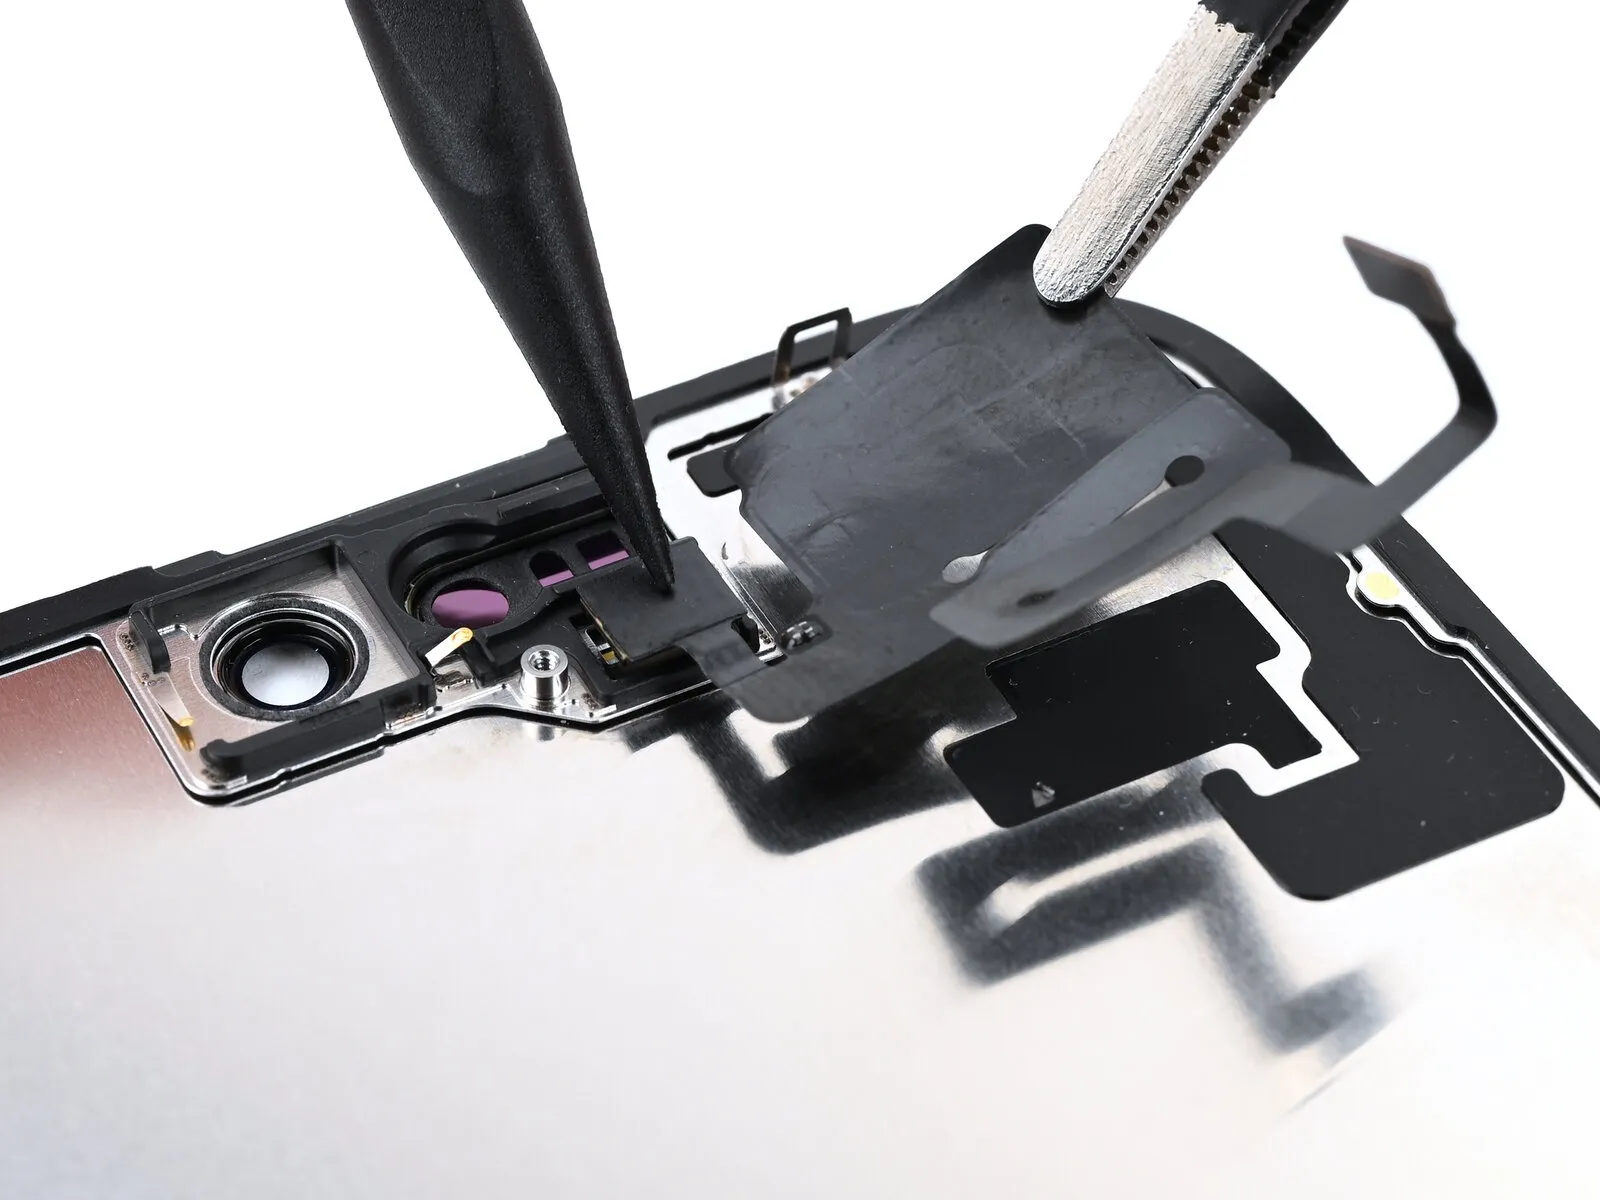
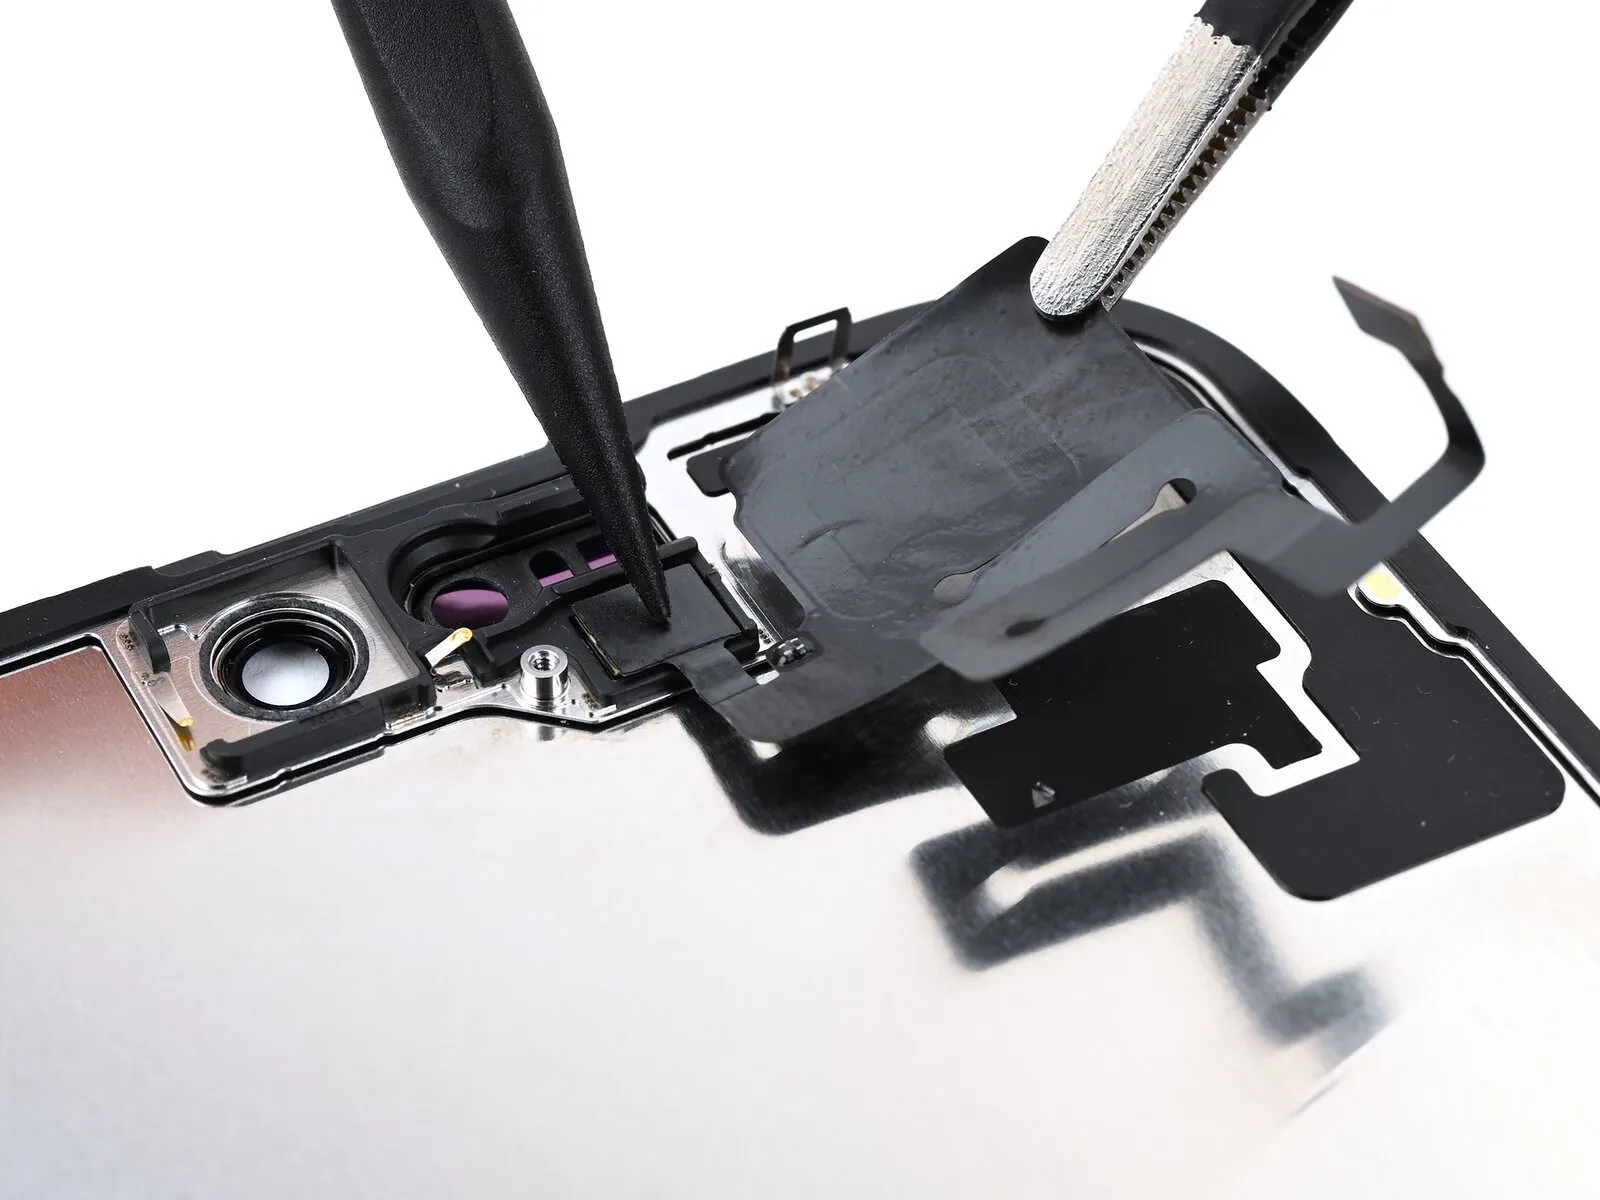
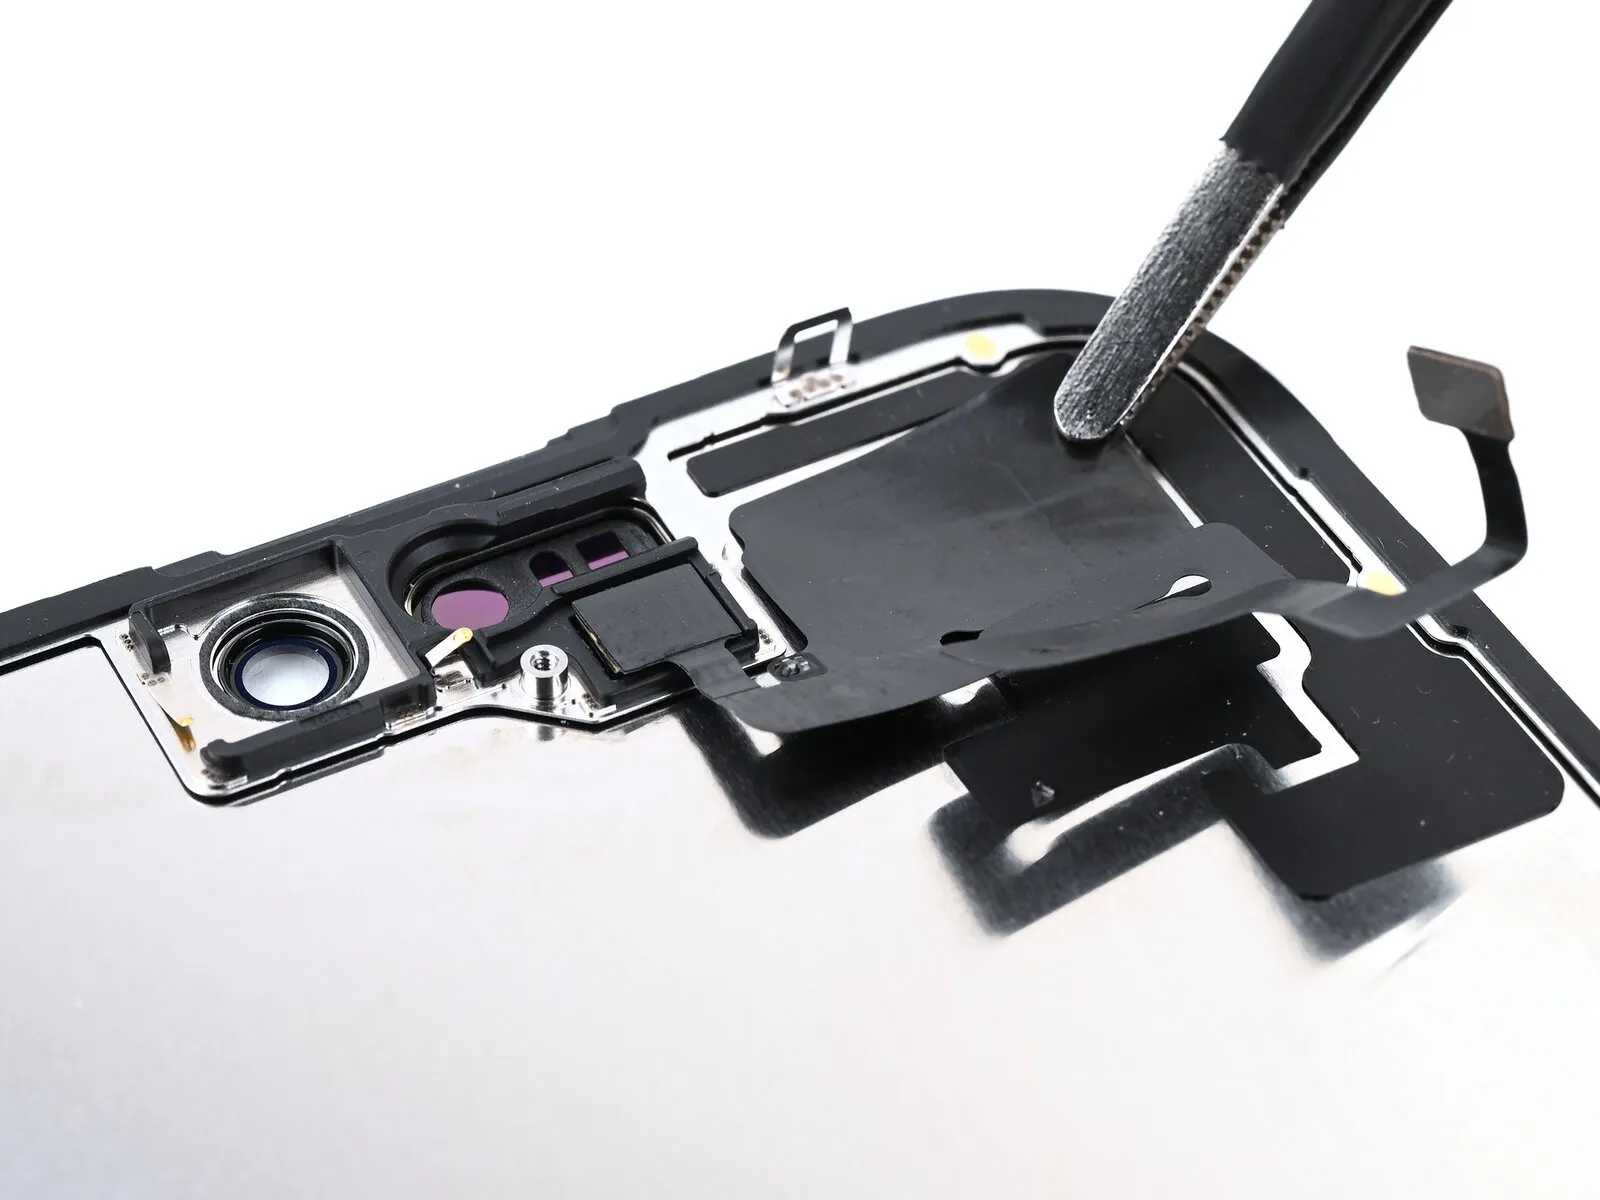
- To prevent adhesive contact with the display surface, secure the ambient light sensor with tweezers, positioning it above the replacement screen’s rear.
- Carefully position the ambient light sensor so that it aligns precisely with the designated cavity on the screen’s backside.
- Employ a spudger or fingertip to apply downward pressure on the ambient light sensor.The ambient light sensor is the component being pressed.Ensure the sensor is fully seated within its designated recess.
- Arrange the ambient light sensor cable across the rear surface of the screen.In cases where the ambient light sensor cable does not adhere adequately, use small segments of double-sided adhesive tape, such as Tesa tape, on the cable’s backside.The purpose of the tape is to improve adhesion of the cable.
- Small pieces of tape are recommended to avoid excess adhesive.Tesa tape is a suitable adhesive for this purpose.Proper cable adhesion is crucial for correct functionality.
Step 27 | Press the ambient light sensor
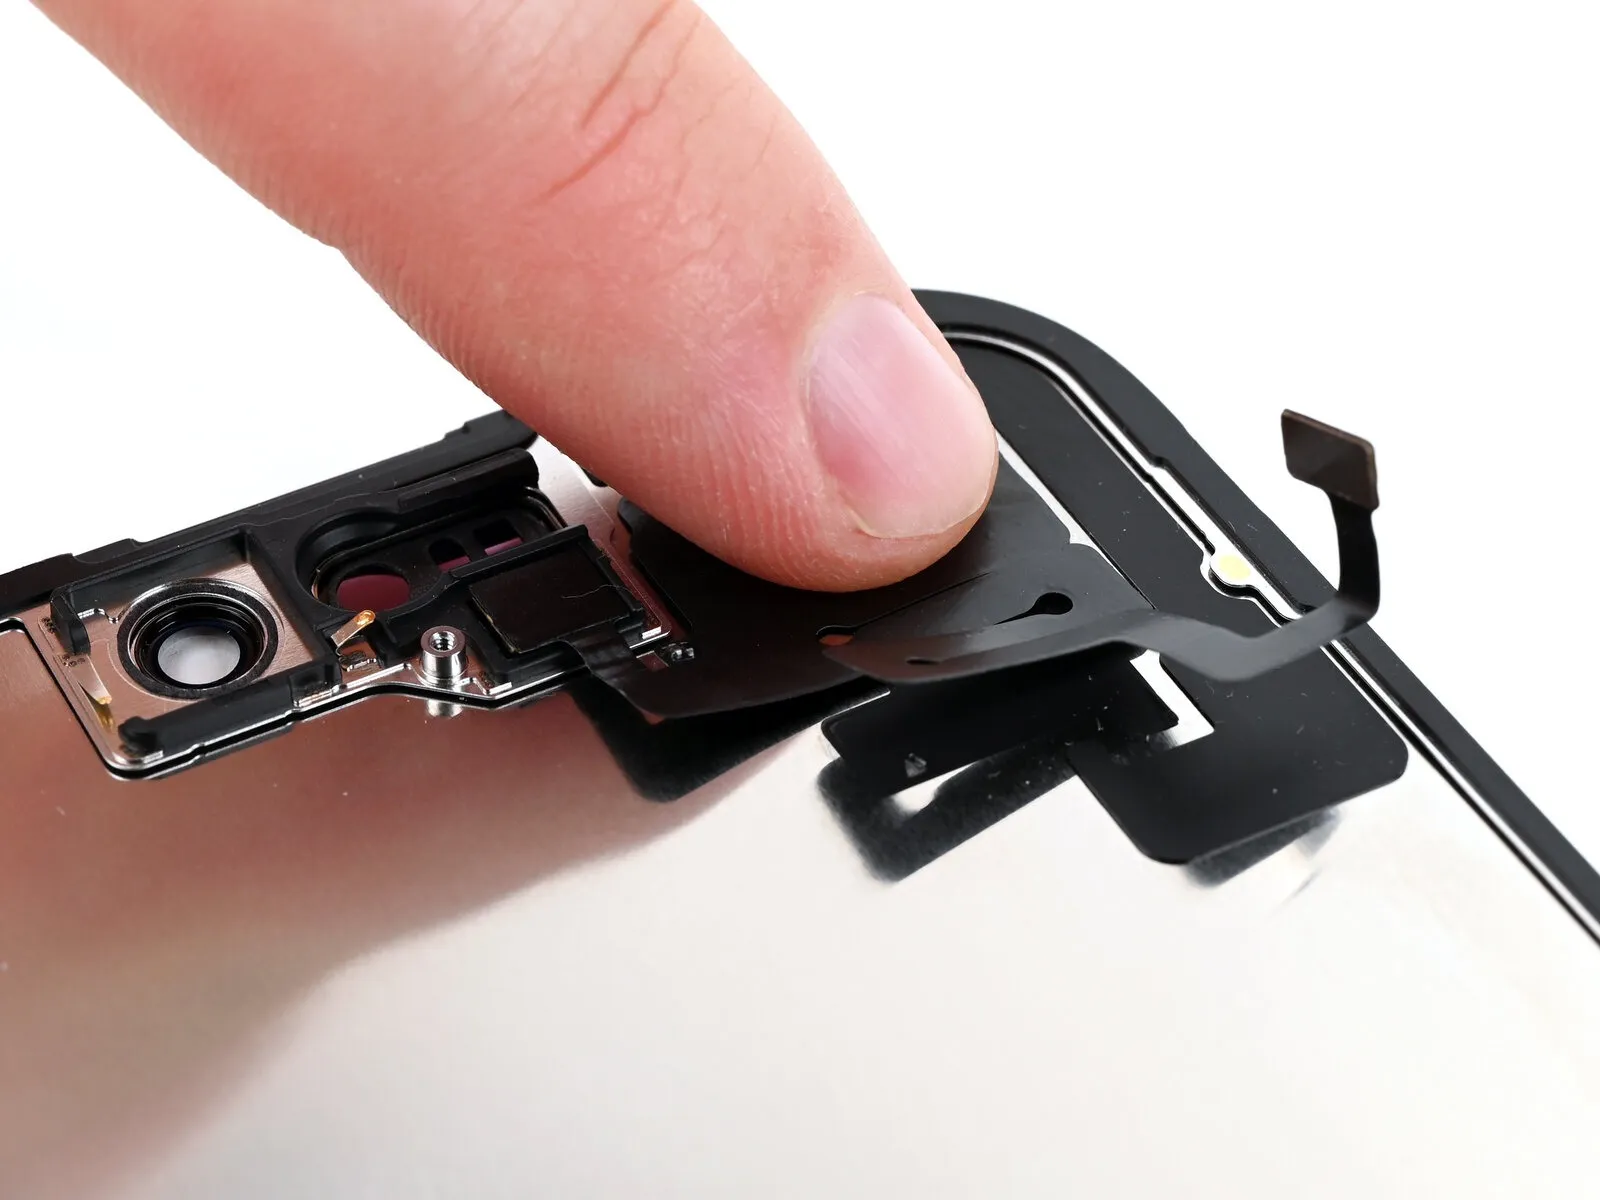
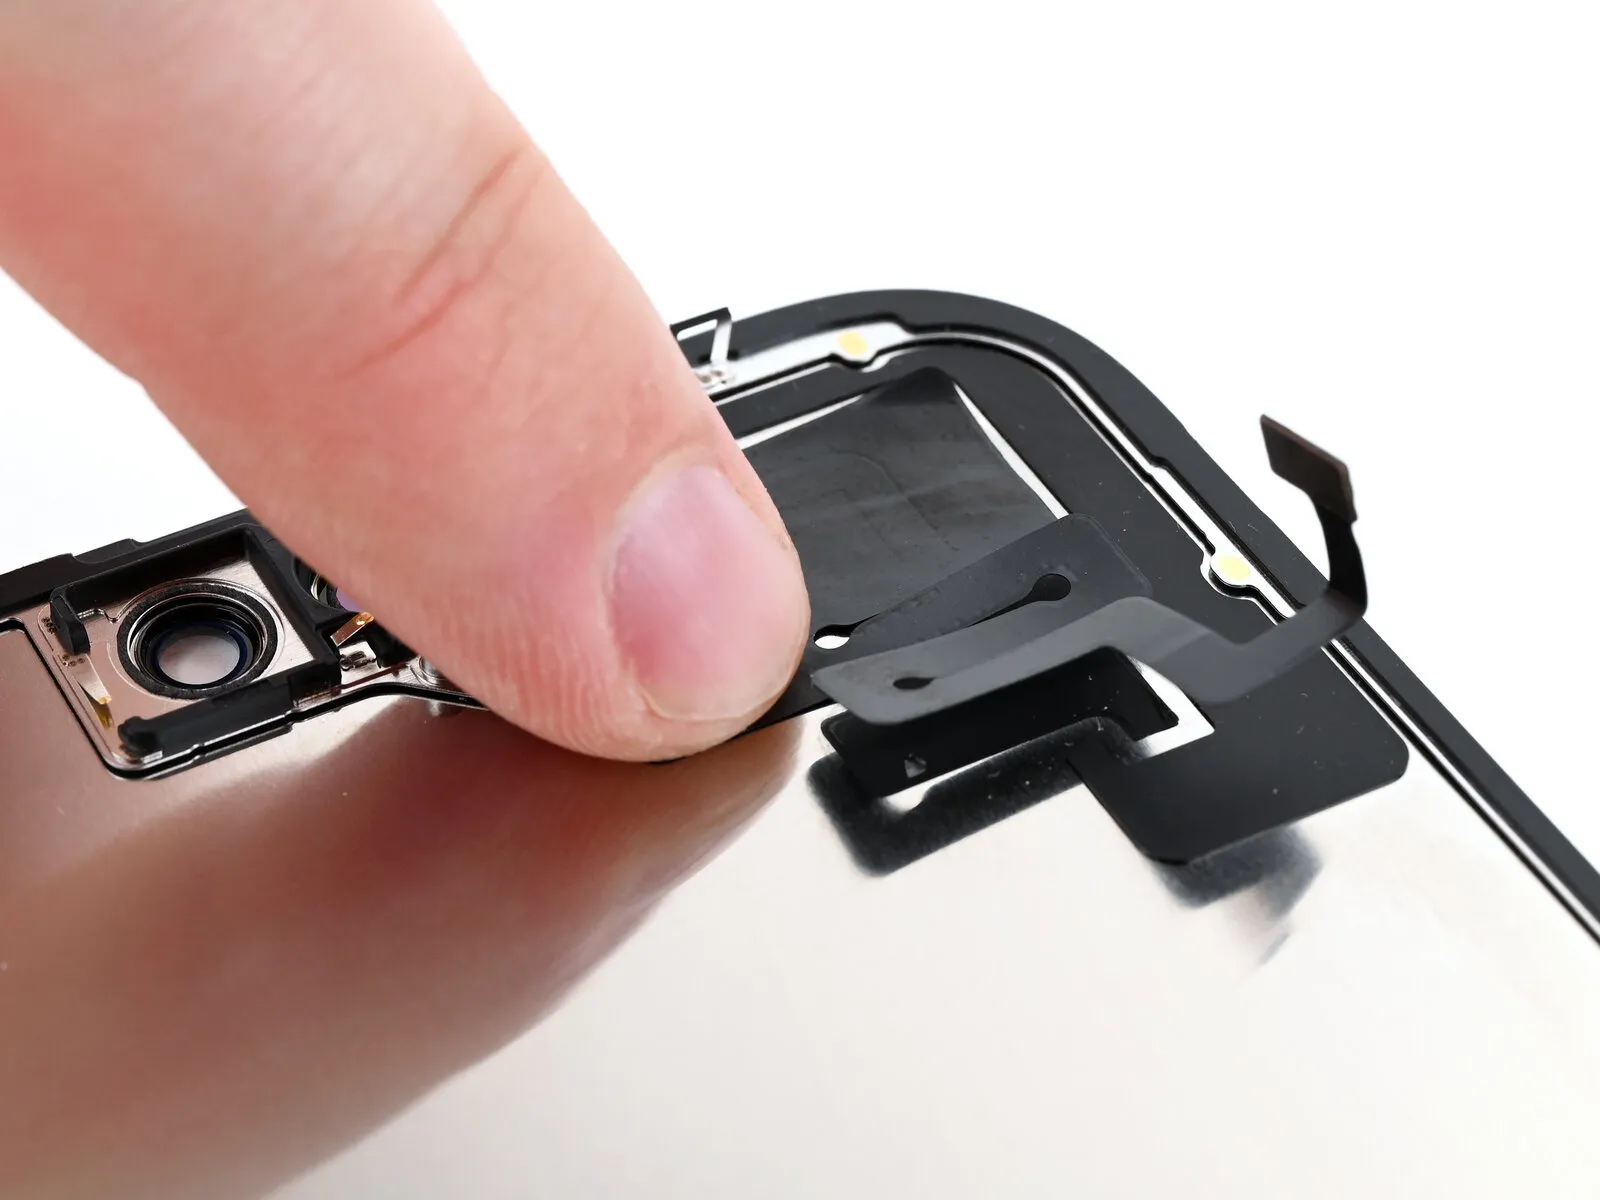
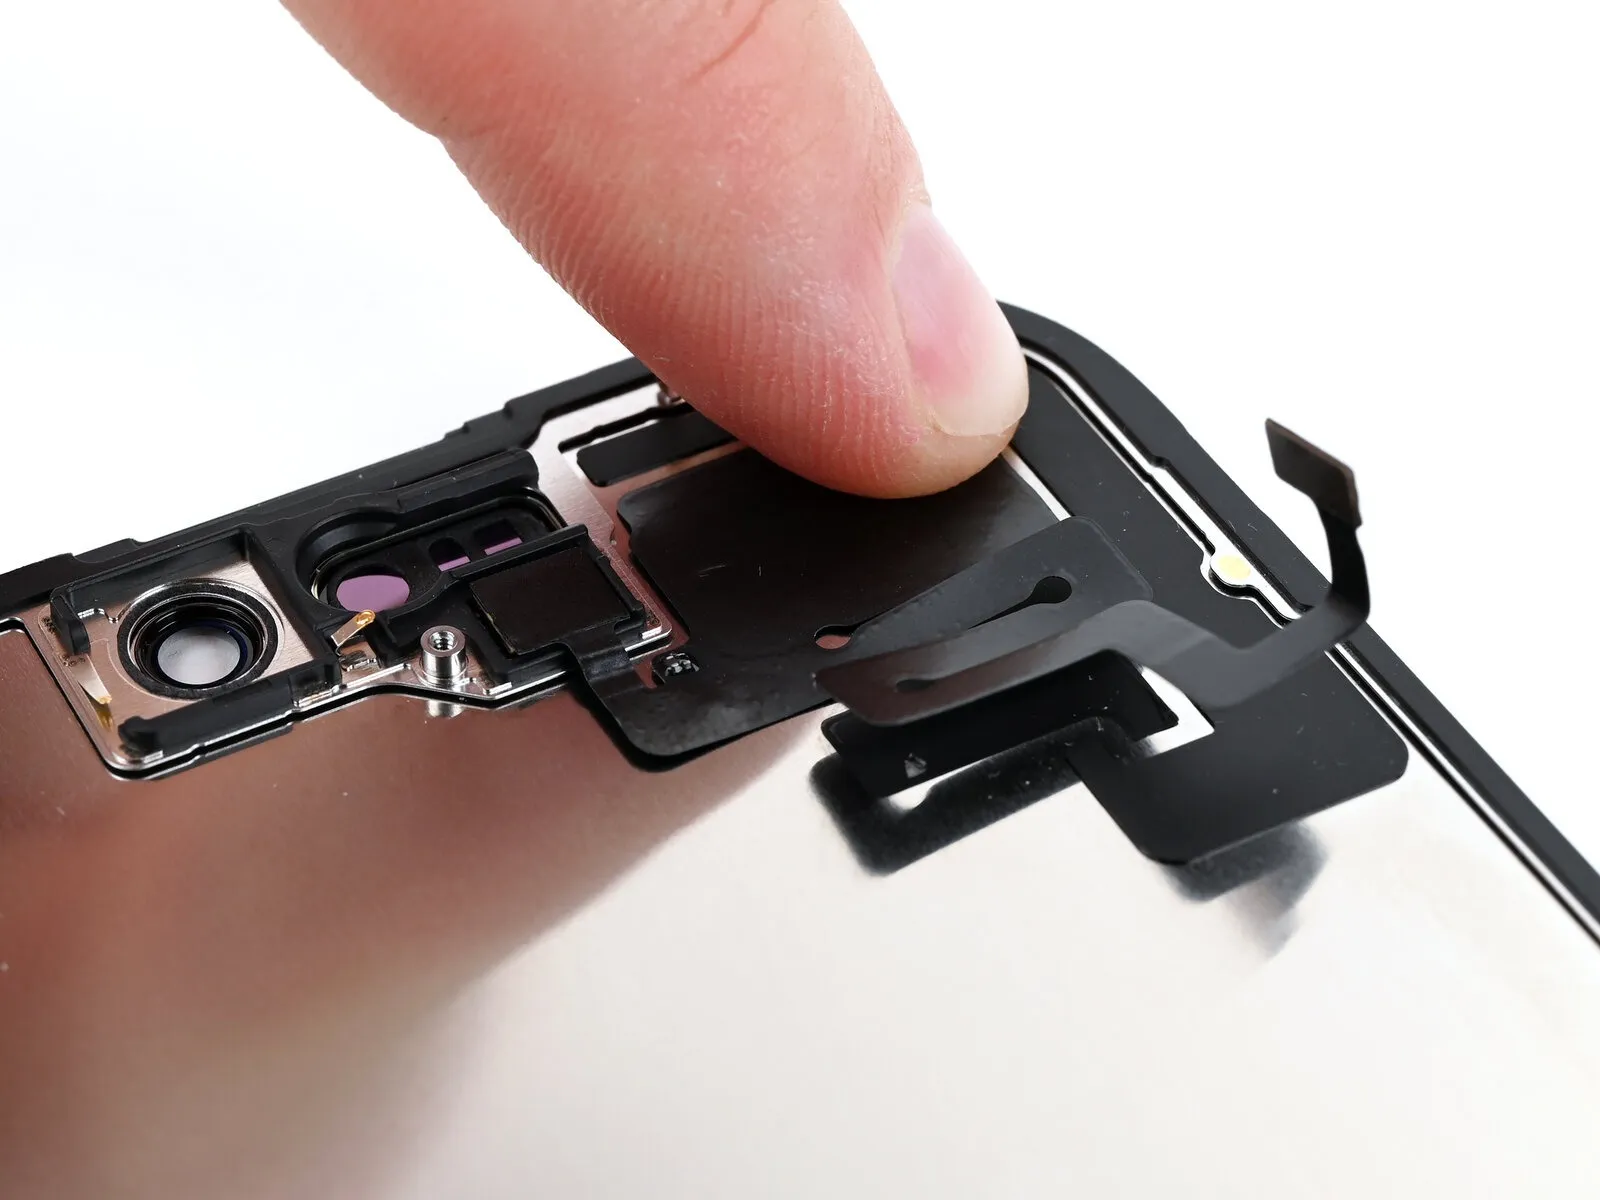
- Apply downward pressure on the ambient light sensor cable utilizing a fingertip.The ambient light sensor cable necessitates manual depression for proper engagement.A fingertip should be employed to secure the ambient light sensor cable through downward force.
Step 28 | Install the ambient light sensor bracket
- Carefully position the ambient light sensor bracket onto the sensor's rear surface, utilizing either tweezers or your fingertips.The ambient light sensor bracket should be situated precisely over the back of the sensor.Employ a Phillips screwdriver to fasten the bracket in place.
- A 1.3 mm screw is required for secure attachment of the ambient light sensor bracket.The screw's length is specifically 1.3 mm to ensure proper engagement.Securely affix the ambient light sensor bracket by tightening the 1.3 mm screw with a Phillips screwdriver.
Step 29 | Remove the screen adhesive
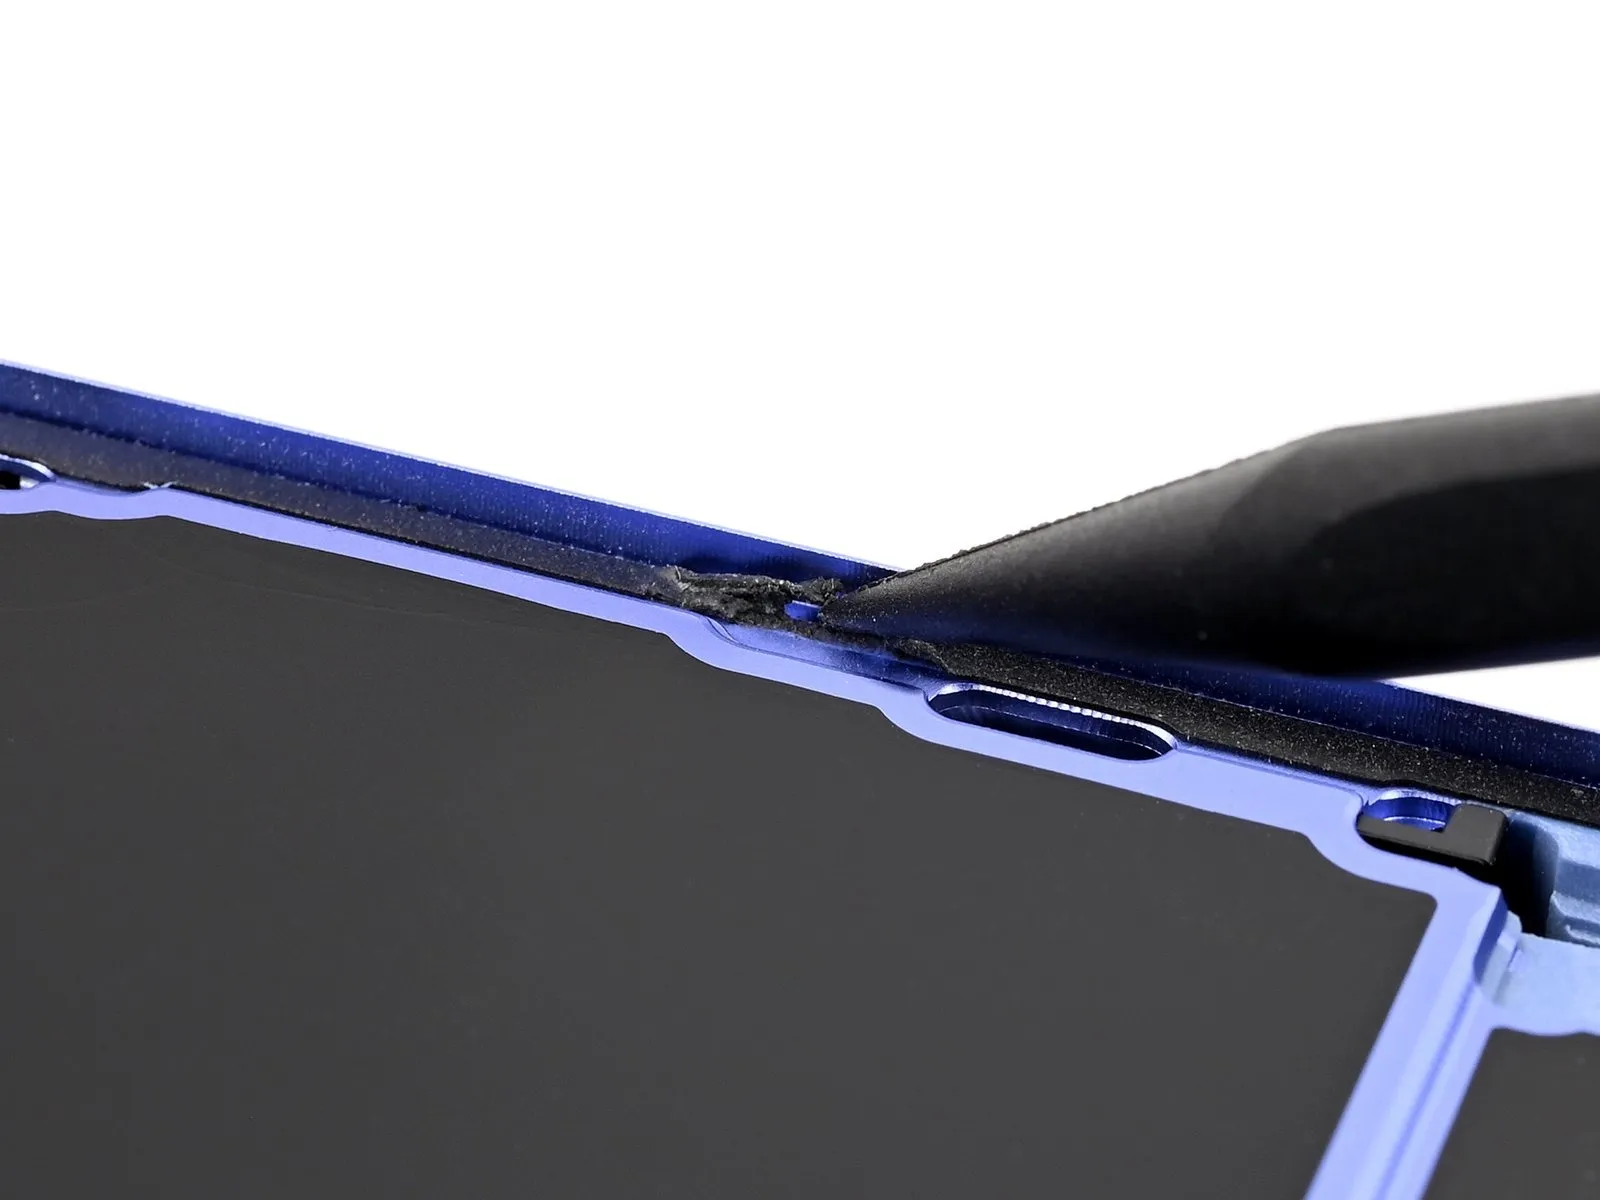
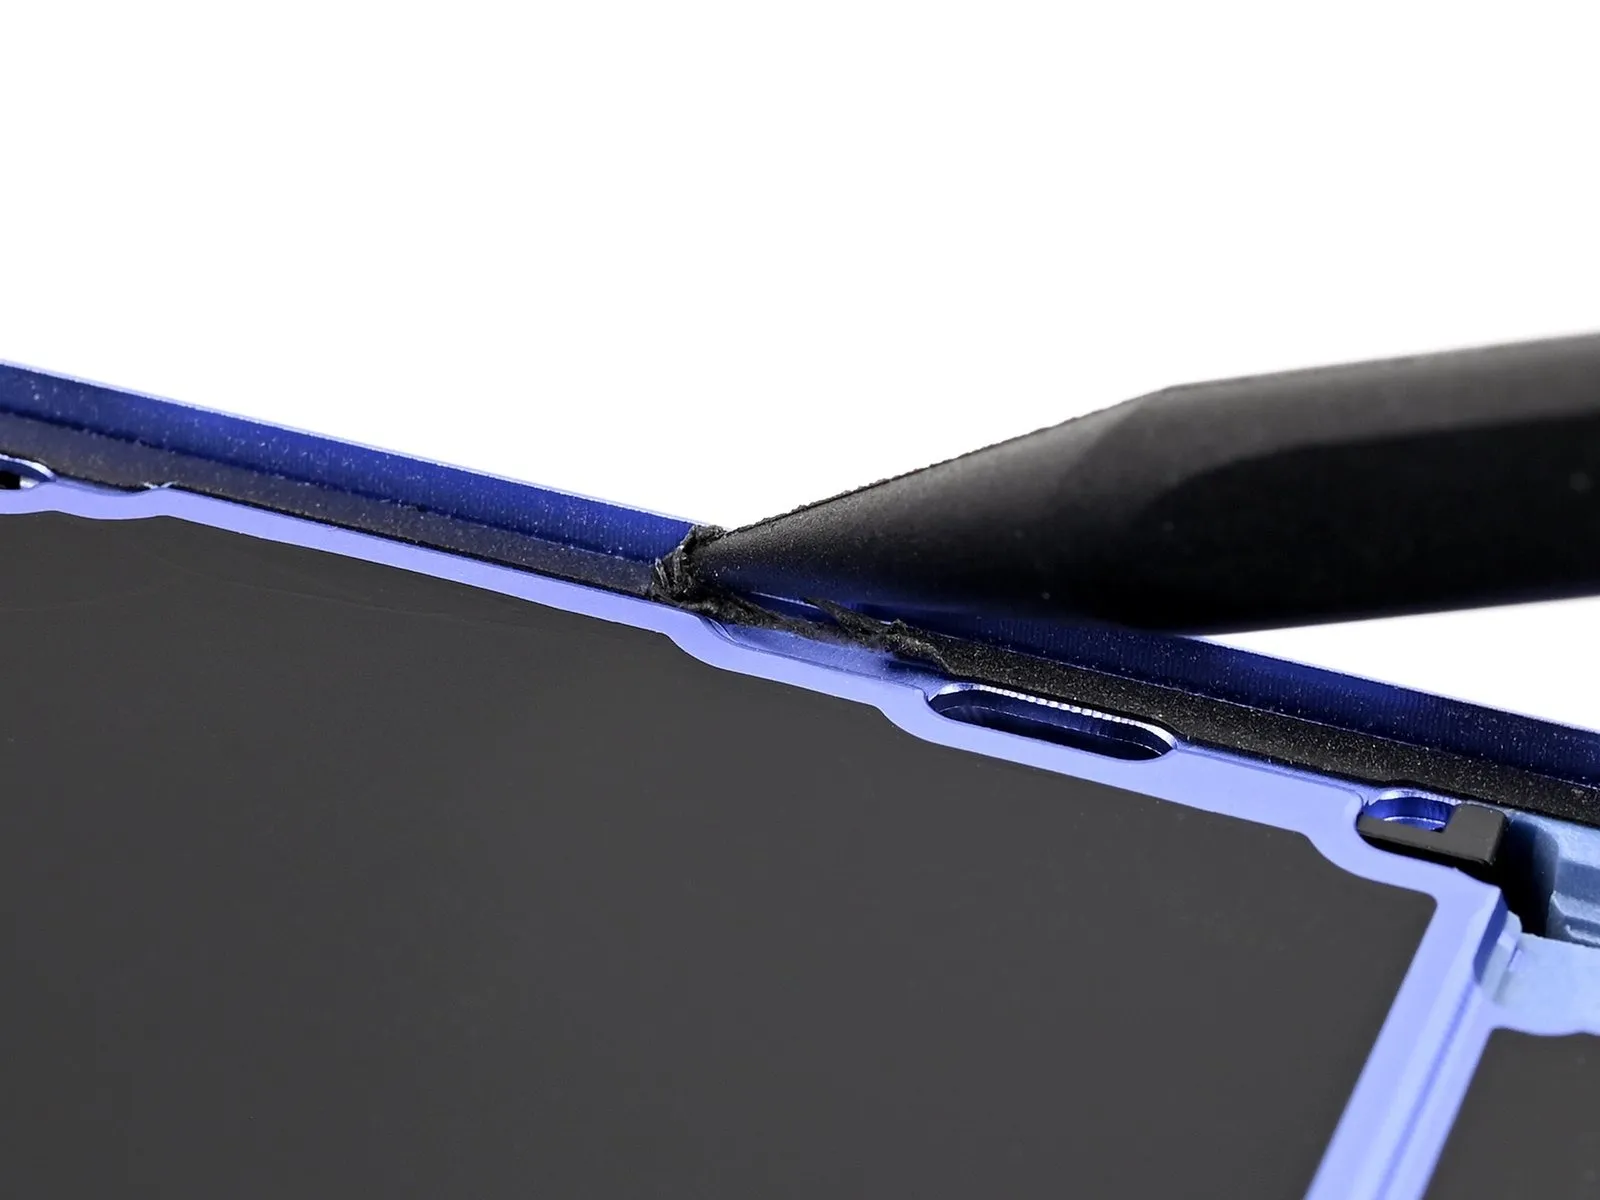
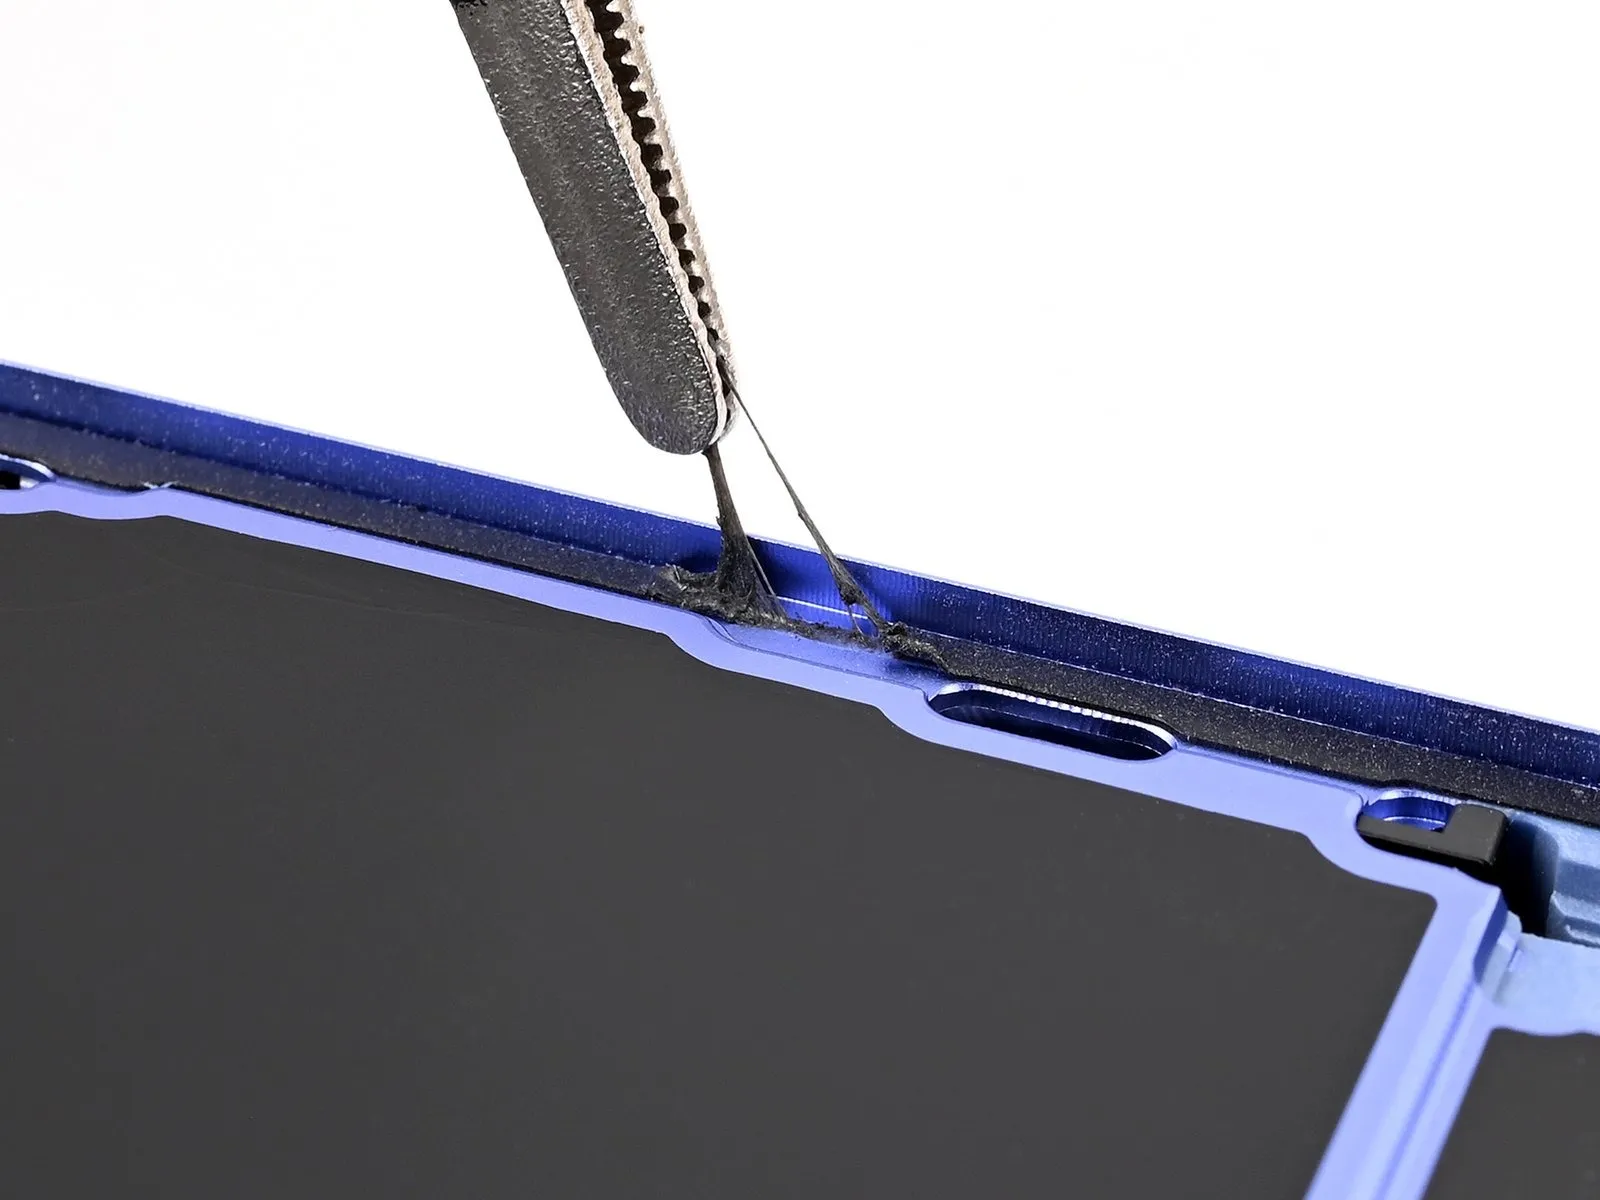
Exercise caution to prevent any harm to the spring contacts during the cleaning process of the frame.
- Establish a connection with the display assembly.
- Verify proper functionality by activating the device and observing its expected behavior.
The adhesive present on the device's surfaces proves challenging to eliminate and may leave behind traces; should removal prove difficult, utilize a hair dryer or heat gun to apply warmth.
Employ a spudger to lift the screen adhesive, facilitating a grip with tweezers.
Utilize tweezers to extract the adhesive completely around the device's outer edges.
Step 30
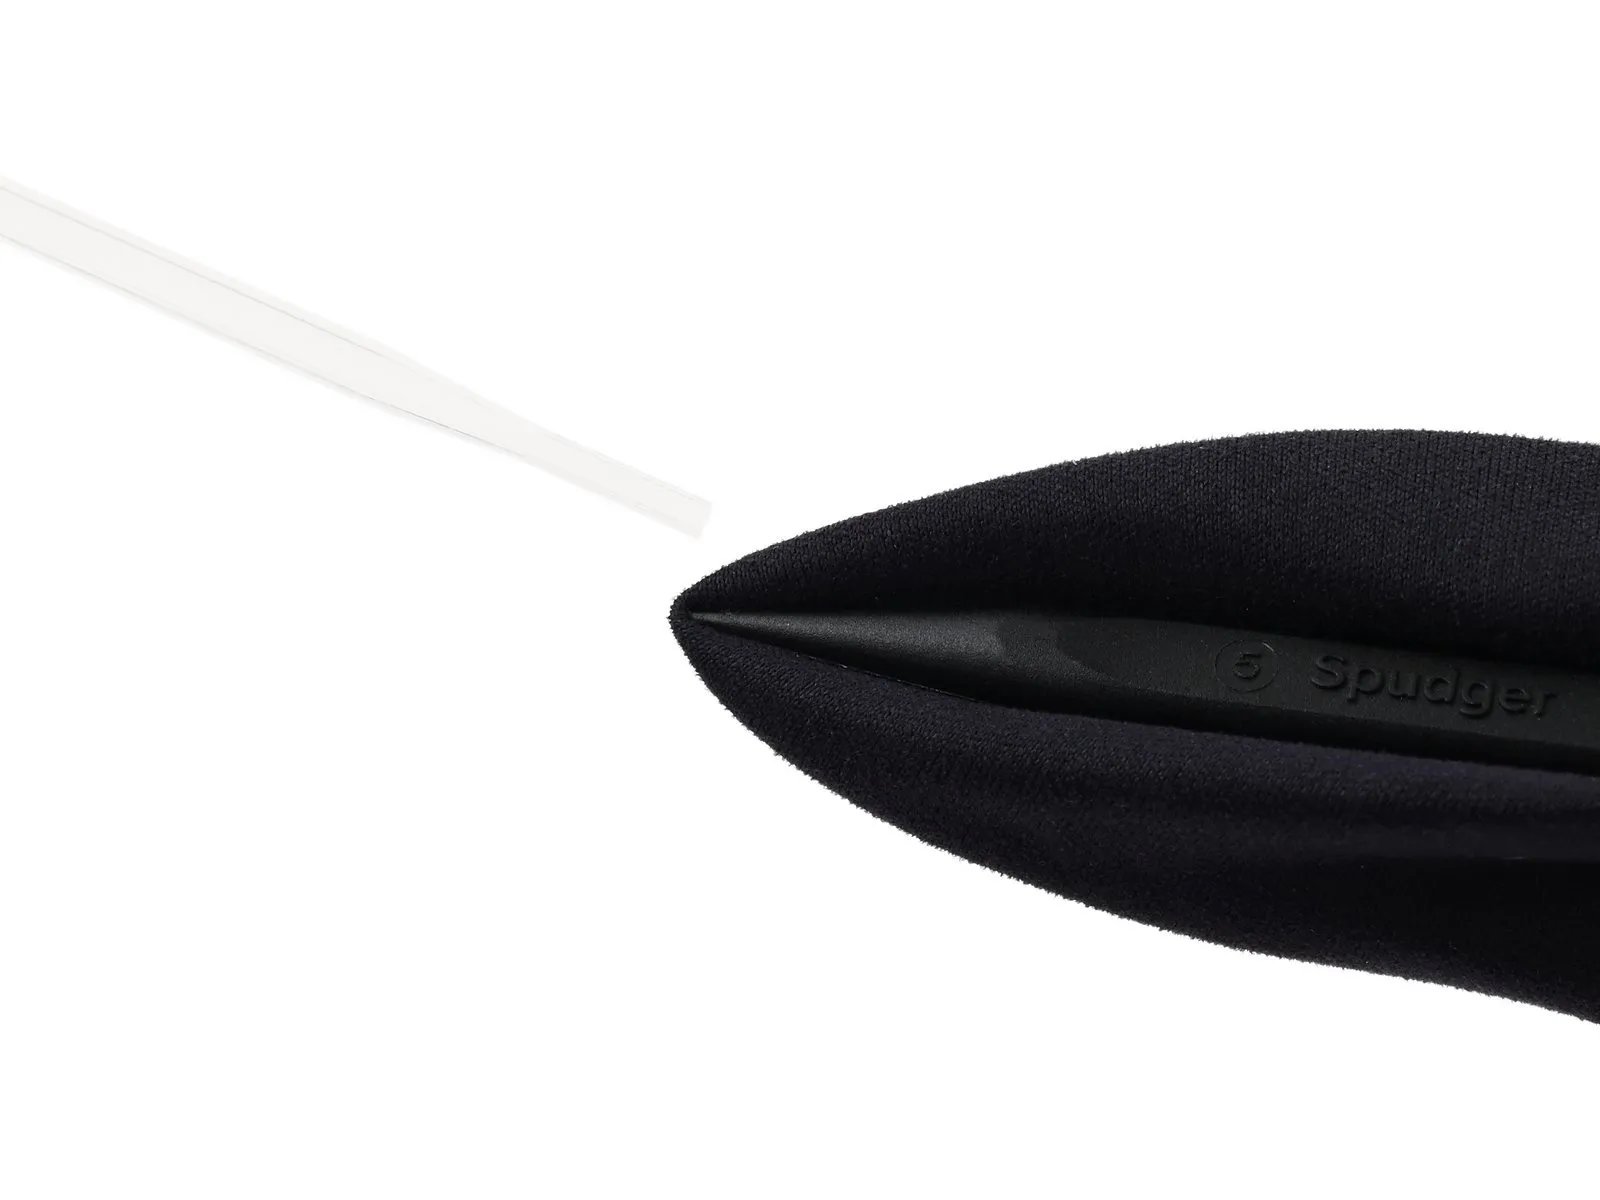
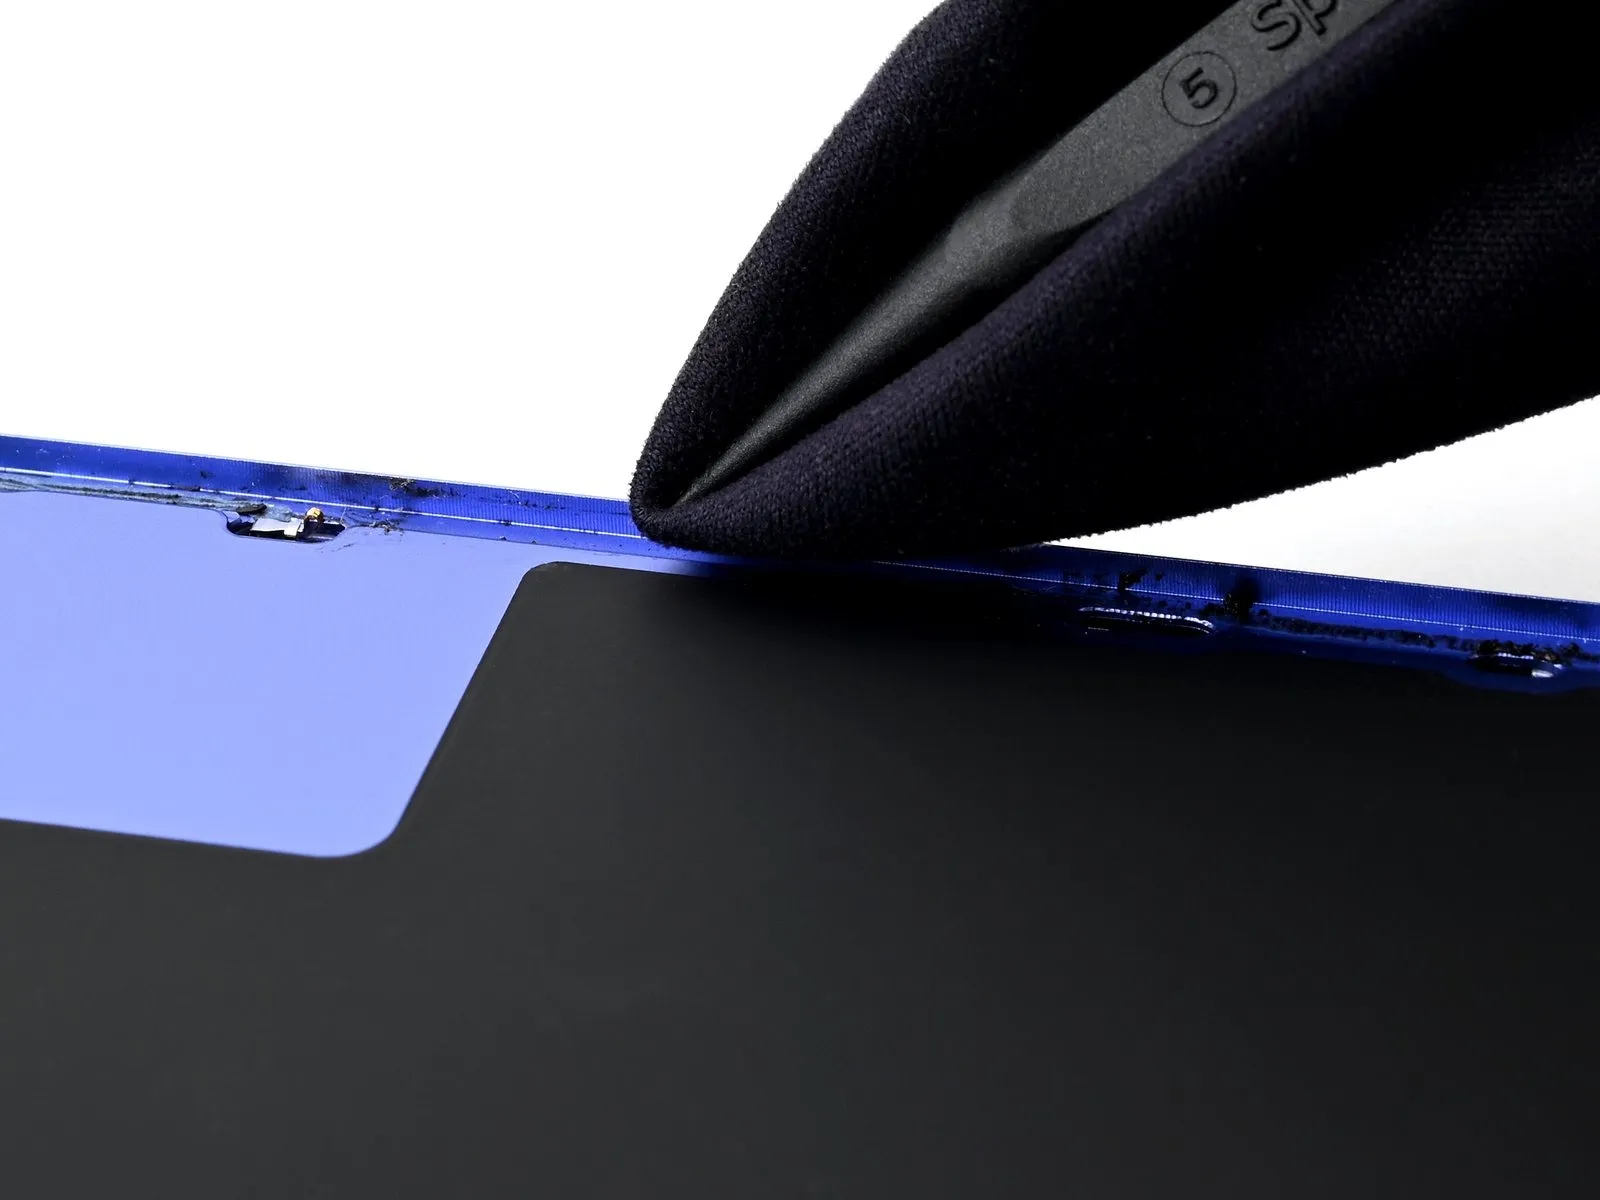
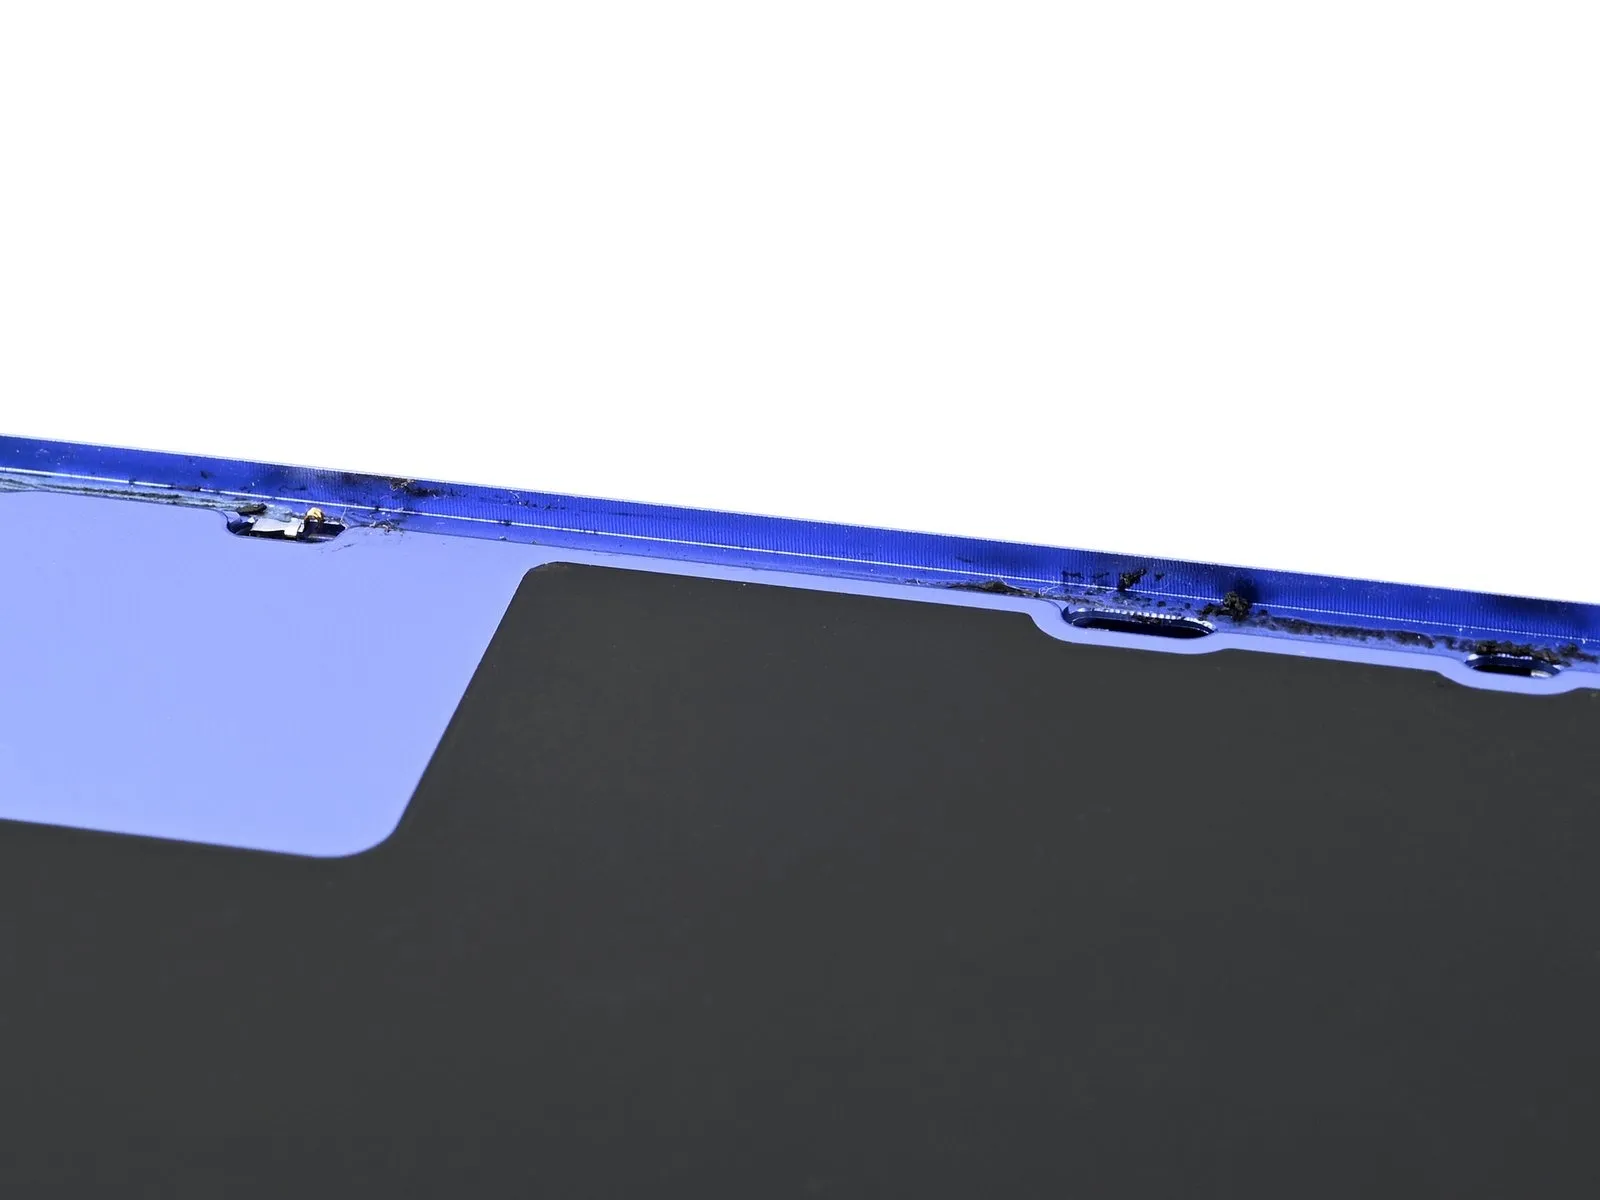
Remaining adhesive traces can negatively affect the iPhone's protective seal, necessitating a complete cleaning of the frame.
- Securely enclose the tip of a spudger with a microfiber cloth or a similar lint-free material.
- Introduce a small quantity of isopropyl alcohol, possessing a concentration exceeding 90%, onto the cleaning cloth.
Allow several minutes of drying time to ensure complete evaporation of any excess isopropyl alcohol before continuing the repair process.
Step 31 | Orient the adhesive
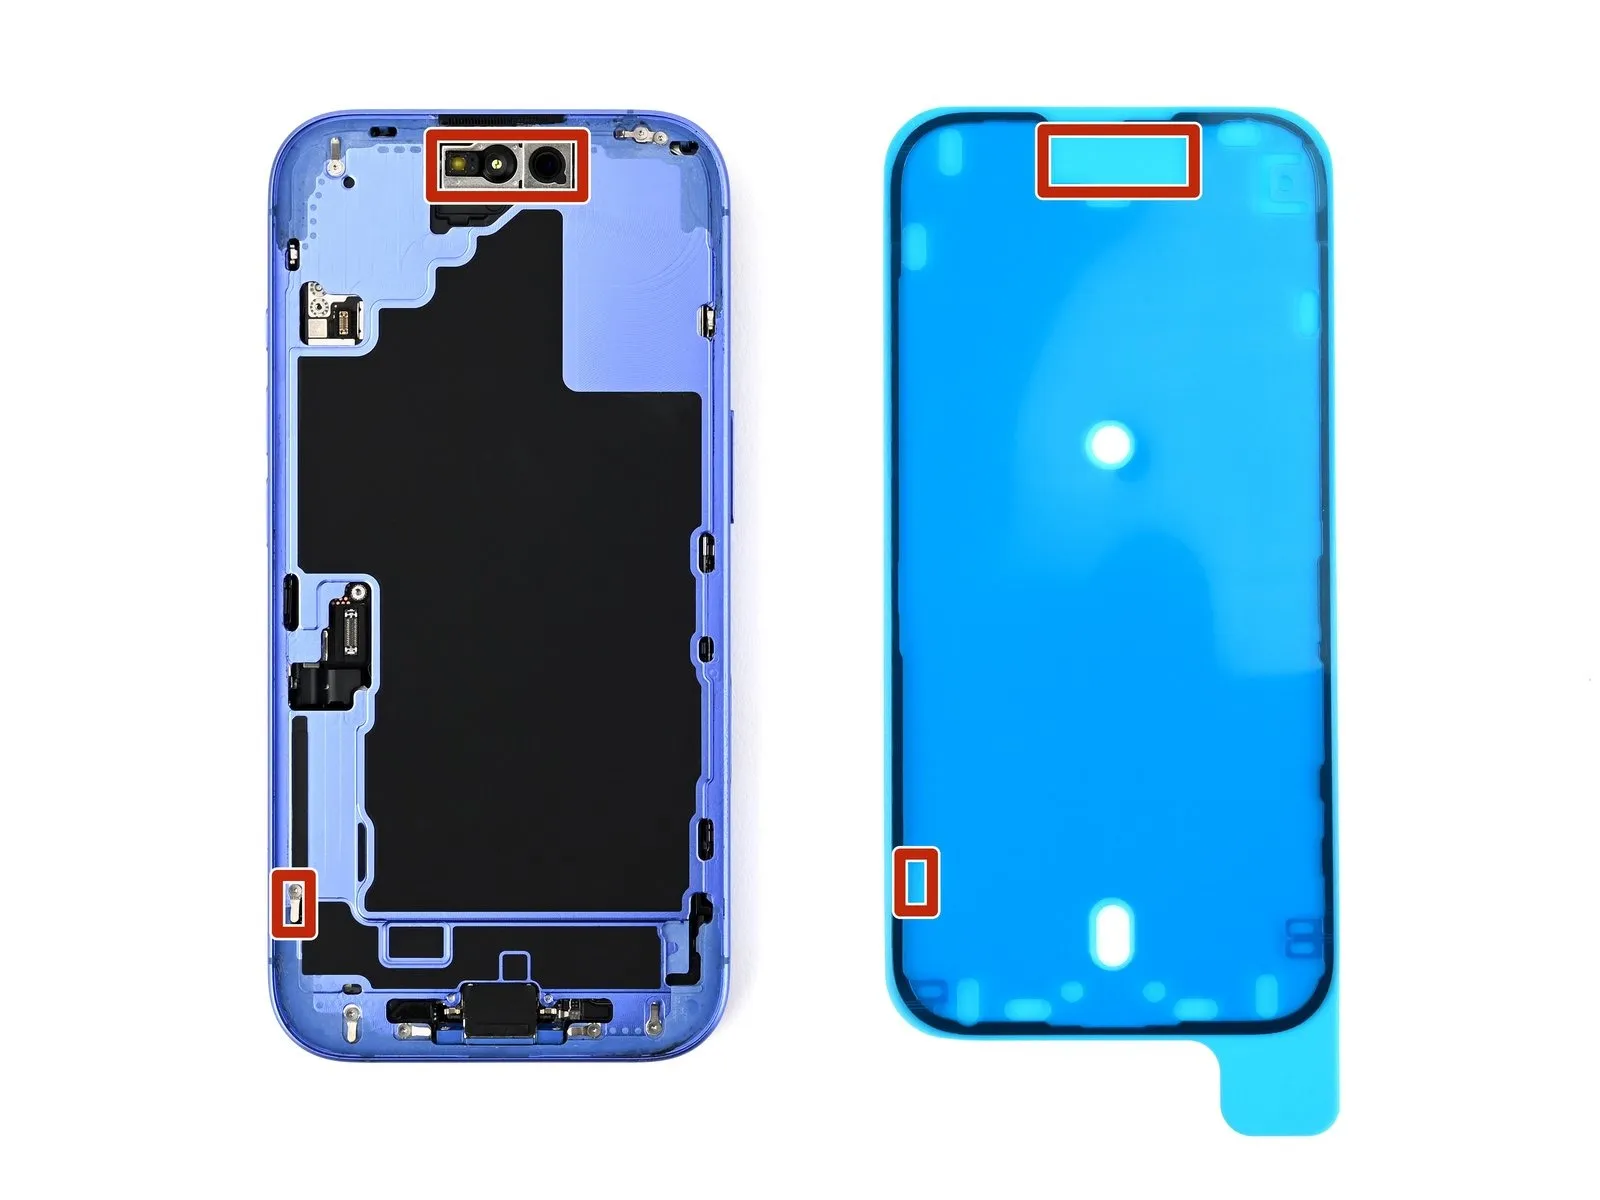
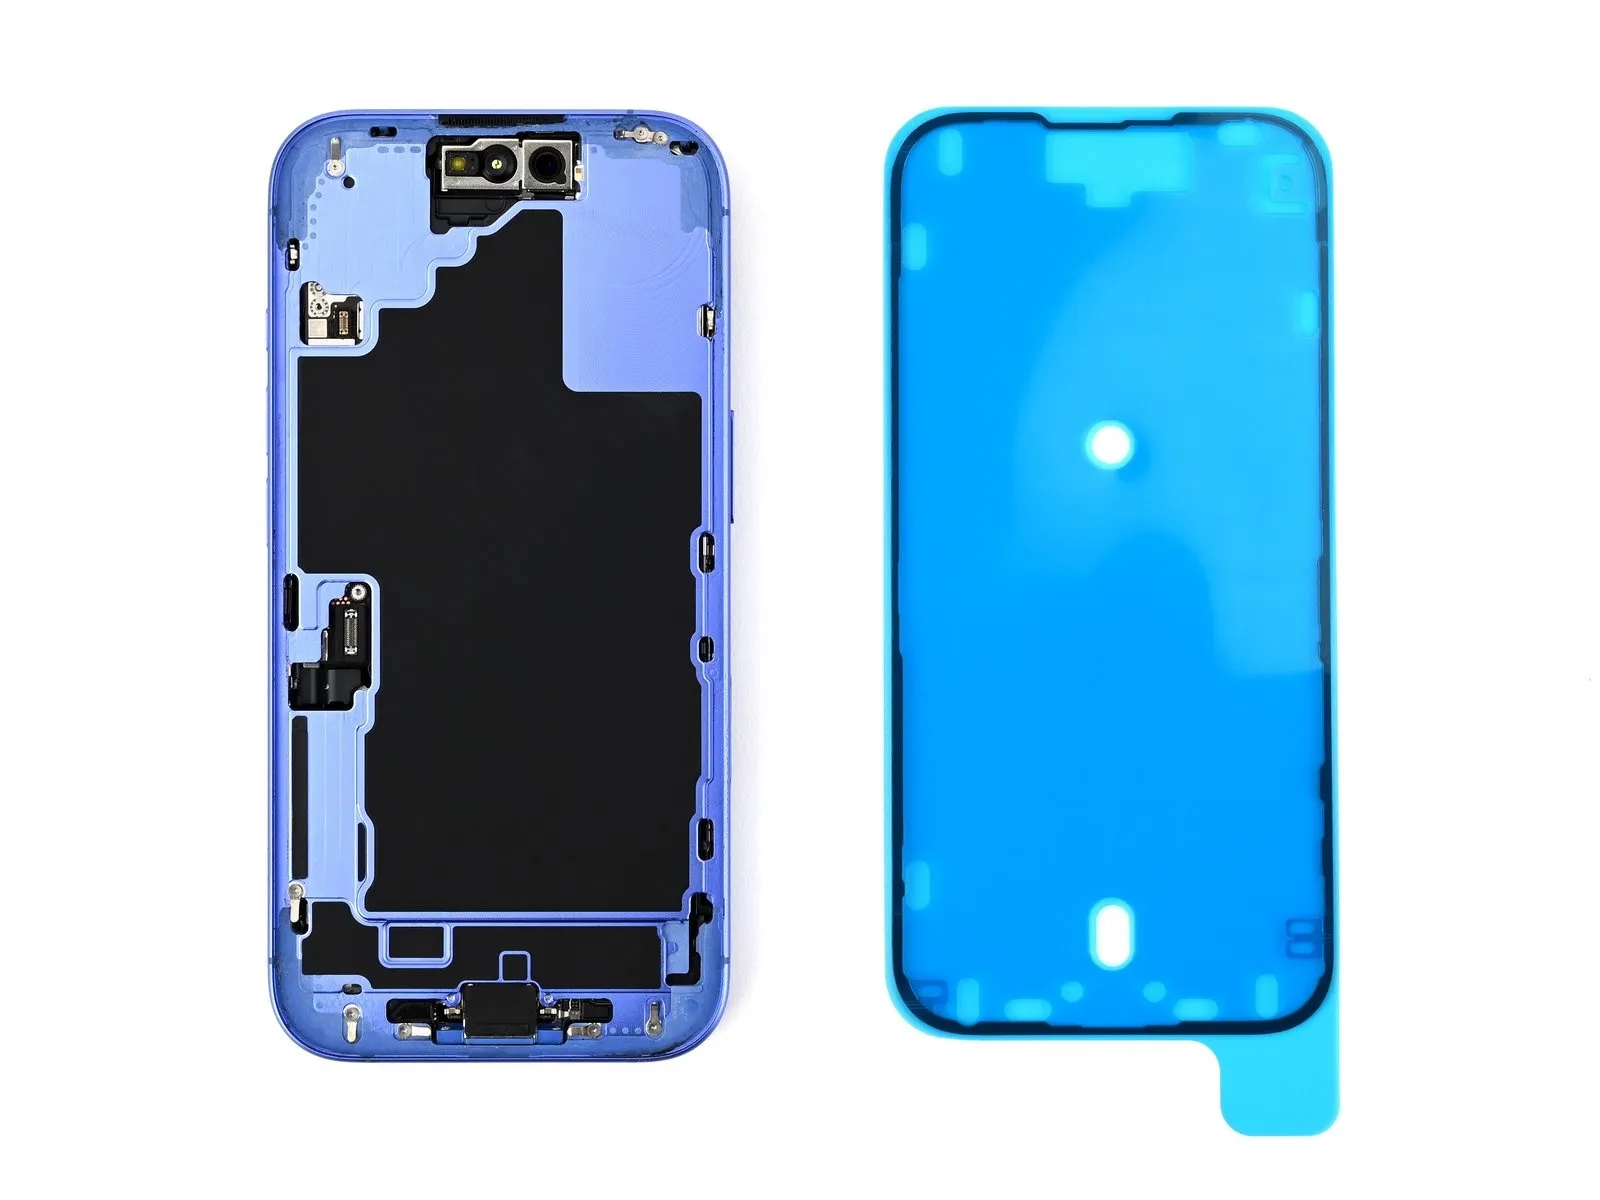
To ensure proper alignment, position the adhesive strip adjacent to the device, utilizing openings for spring contacts and the front-facing camera as guides; variations in adhesive appearance are possible.
Step 32 | Expose the bottom edge of the adhesive
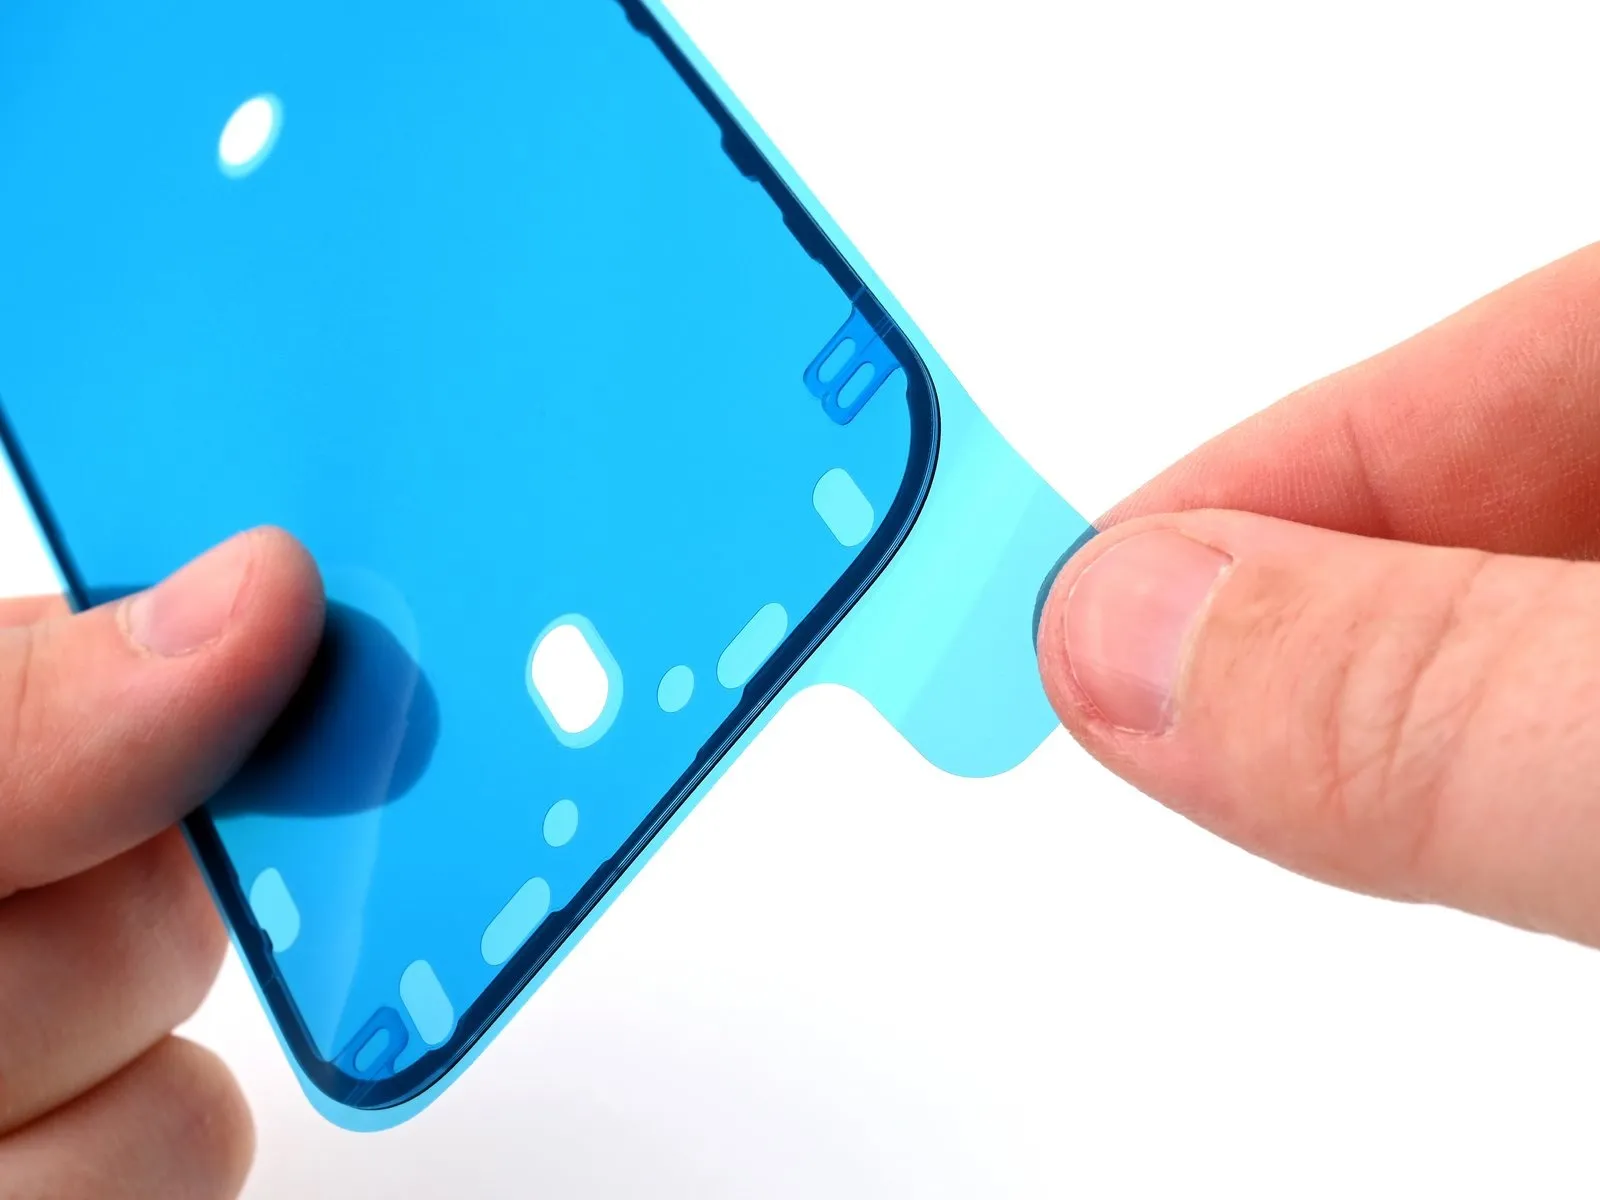
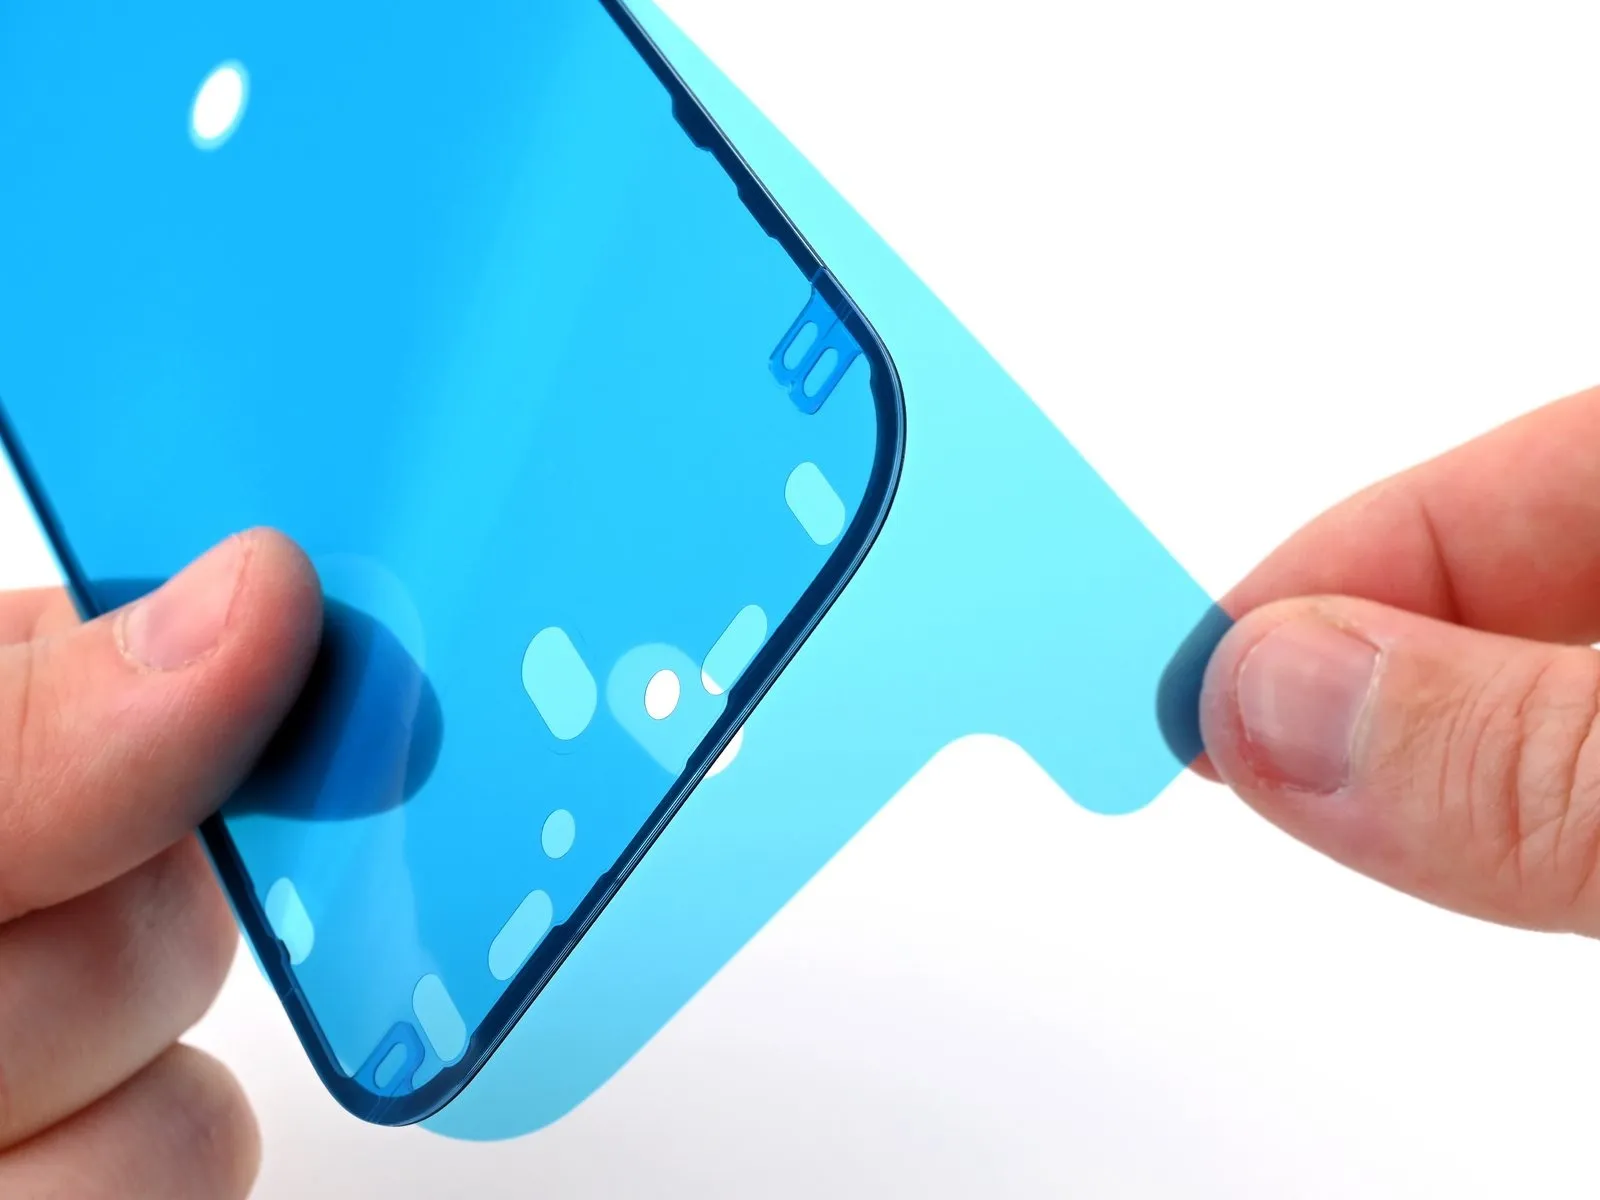
Initiate the liner separation process by grasping the designated pull tab and gently lifting the backing from the adhesive layer, commencing at the lower edge, while ensuring the liner remains partially attached.
Step 33 | Apply the adhesive
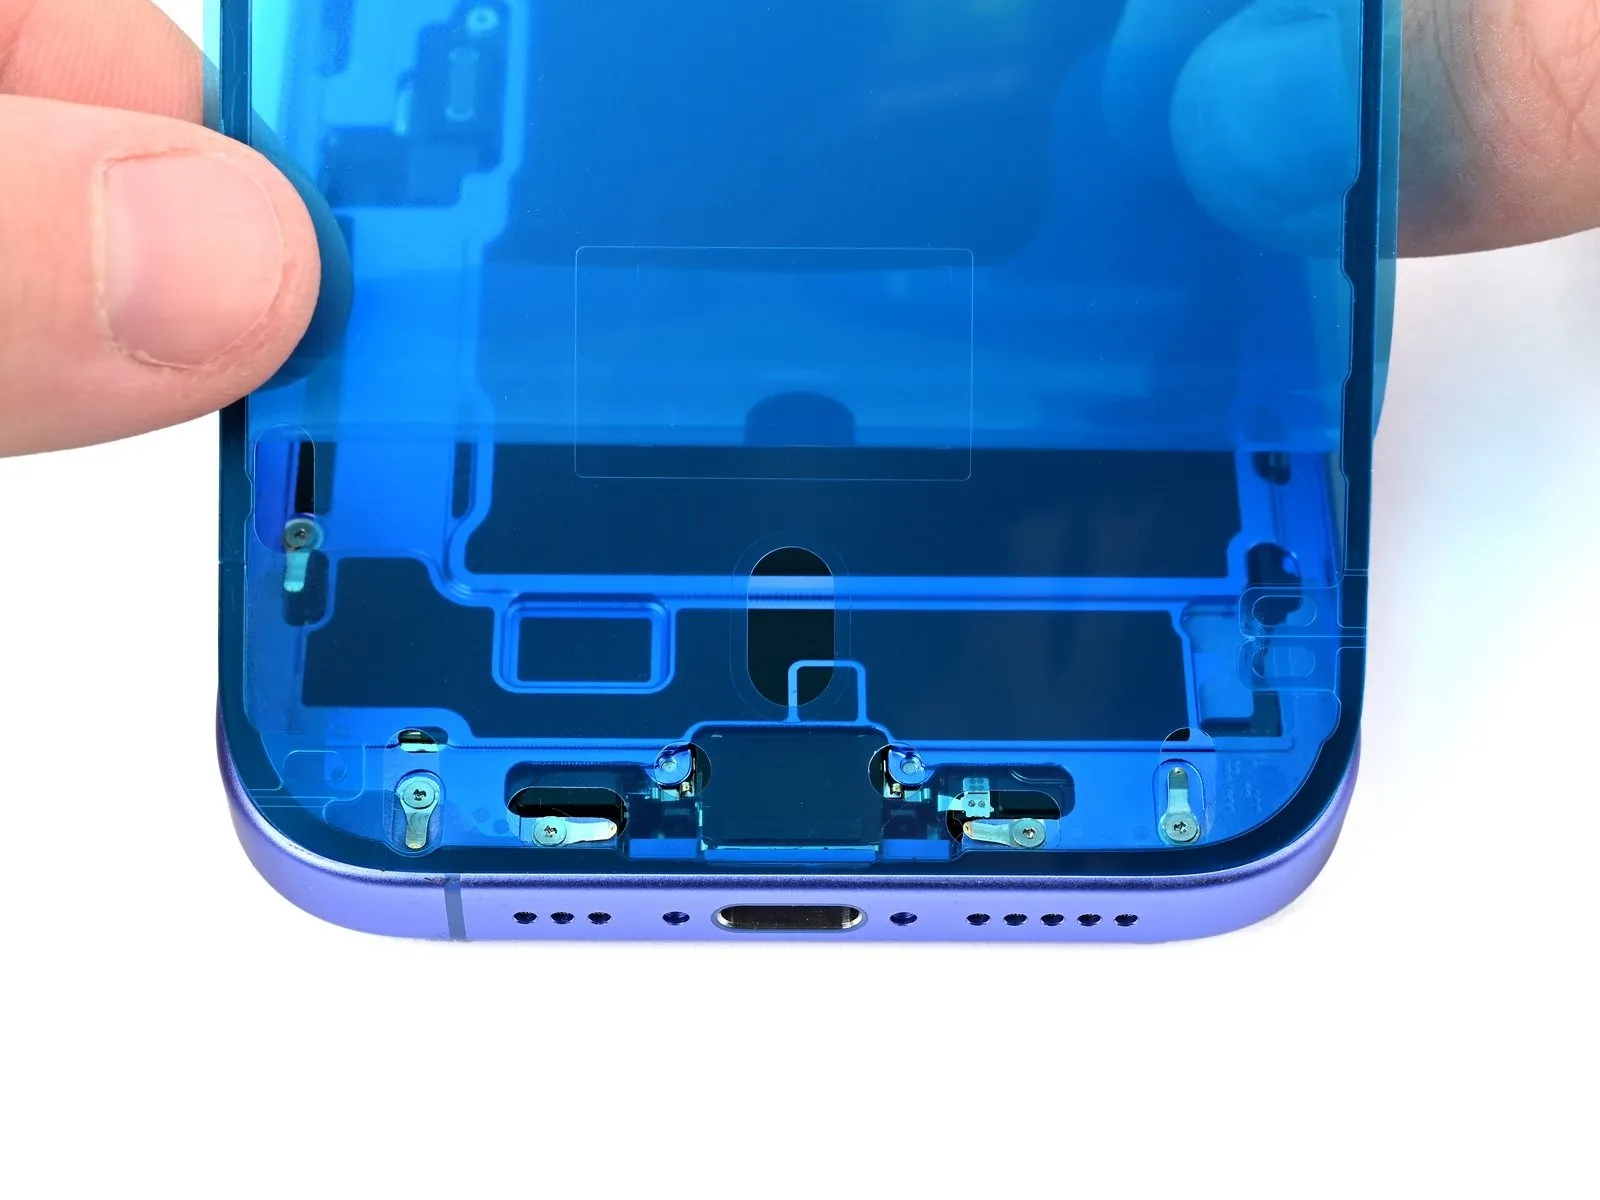
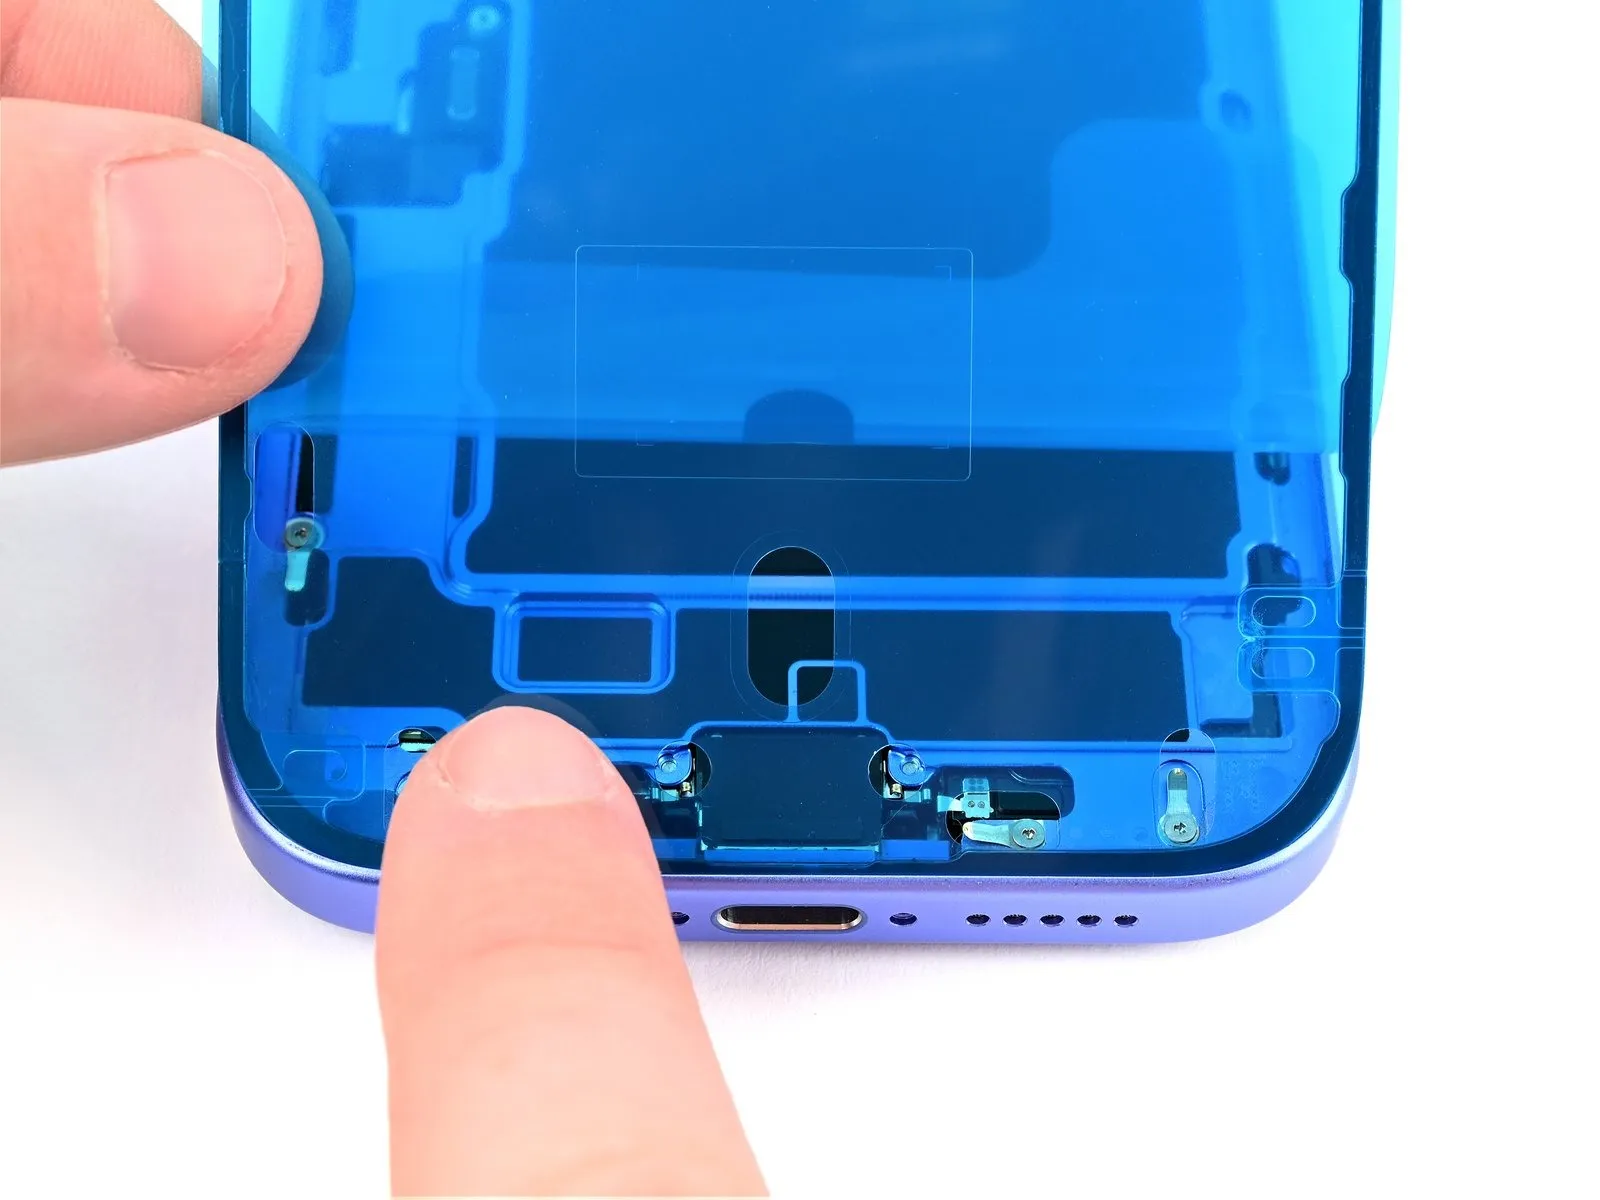
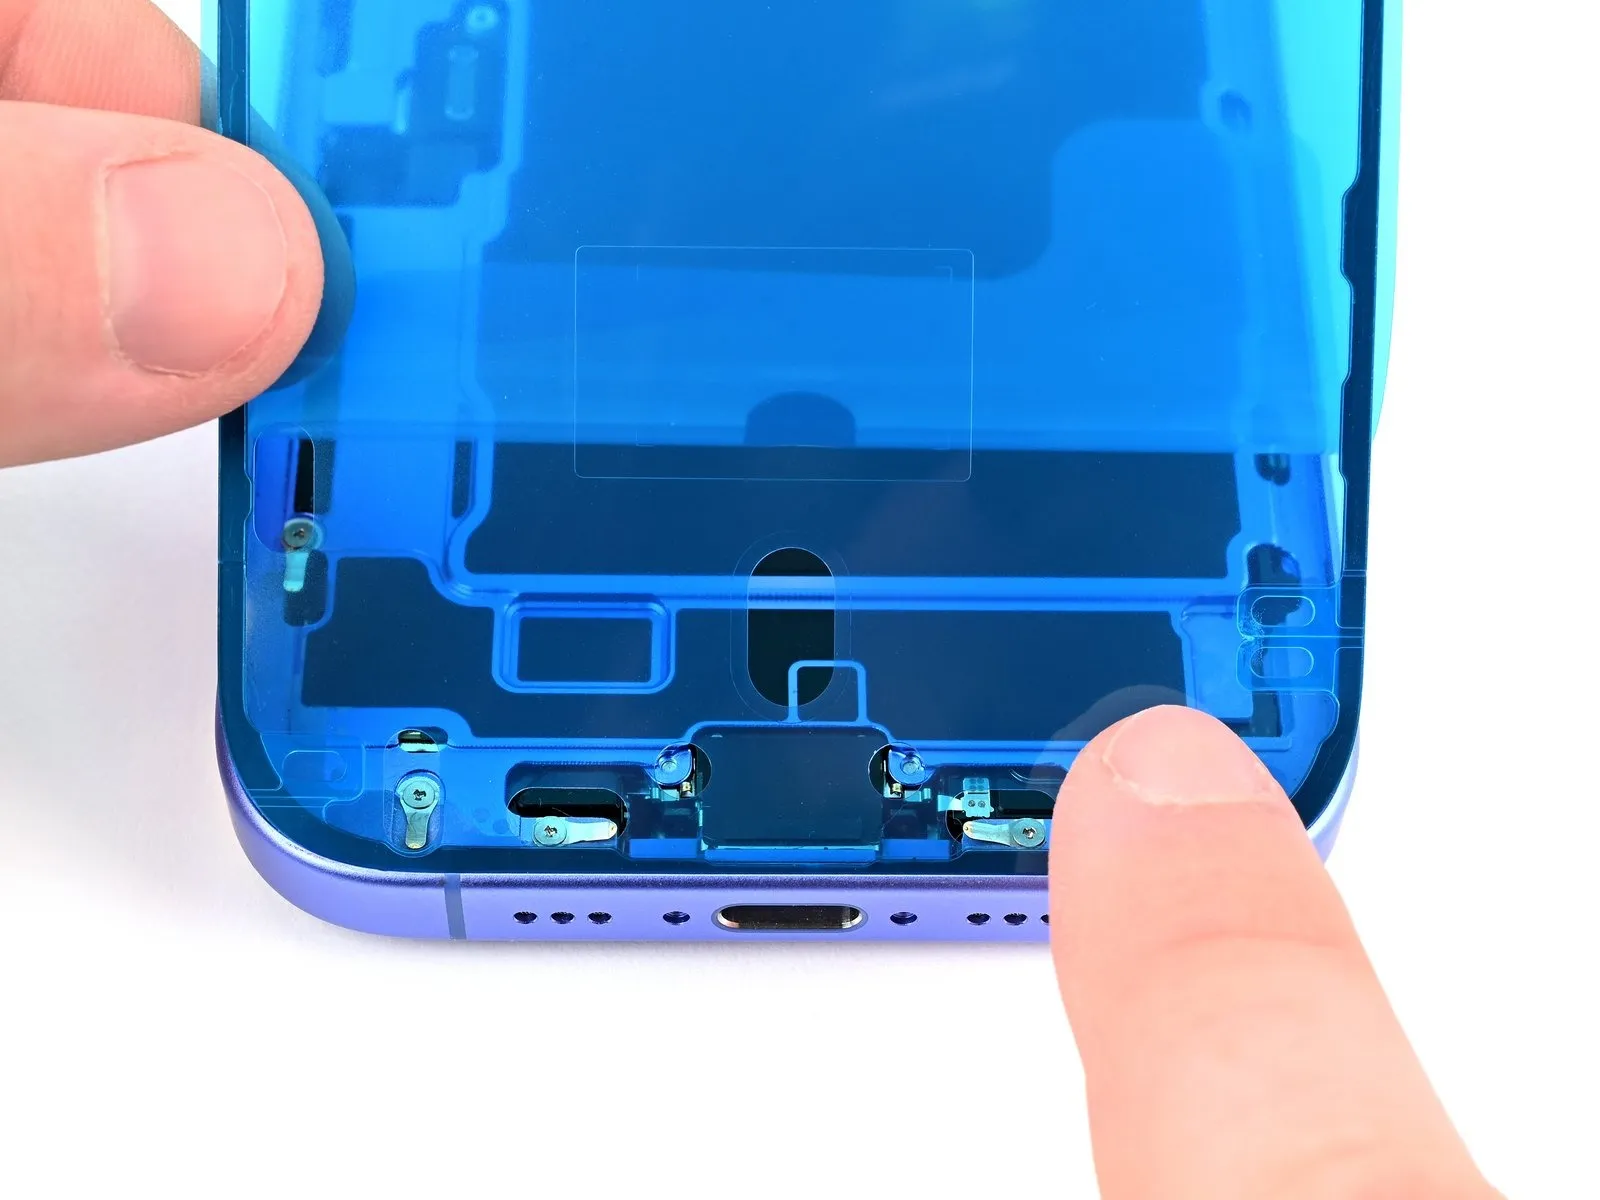
Because repositioning adhesive after initial placement is impossible, necessitating removal and replacement with fresh adhesive, maintain careful alignment during application; specifically, position the exposed adhesive edge to the iPhone's lower frame while preventing the back liner from interfering, then apply firm pressure along the bottom edge with your finger to secure it.
Step 34
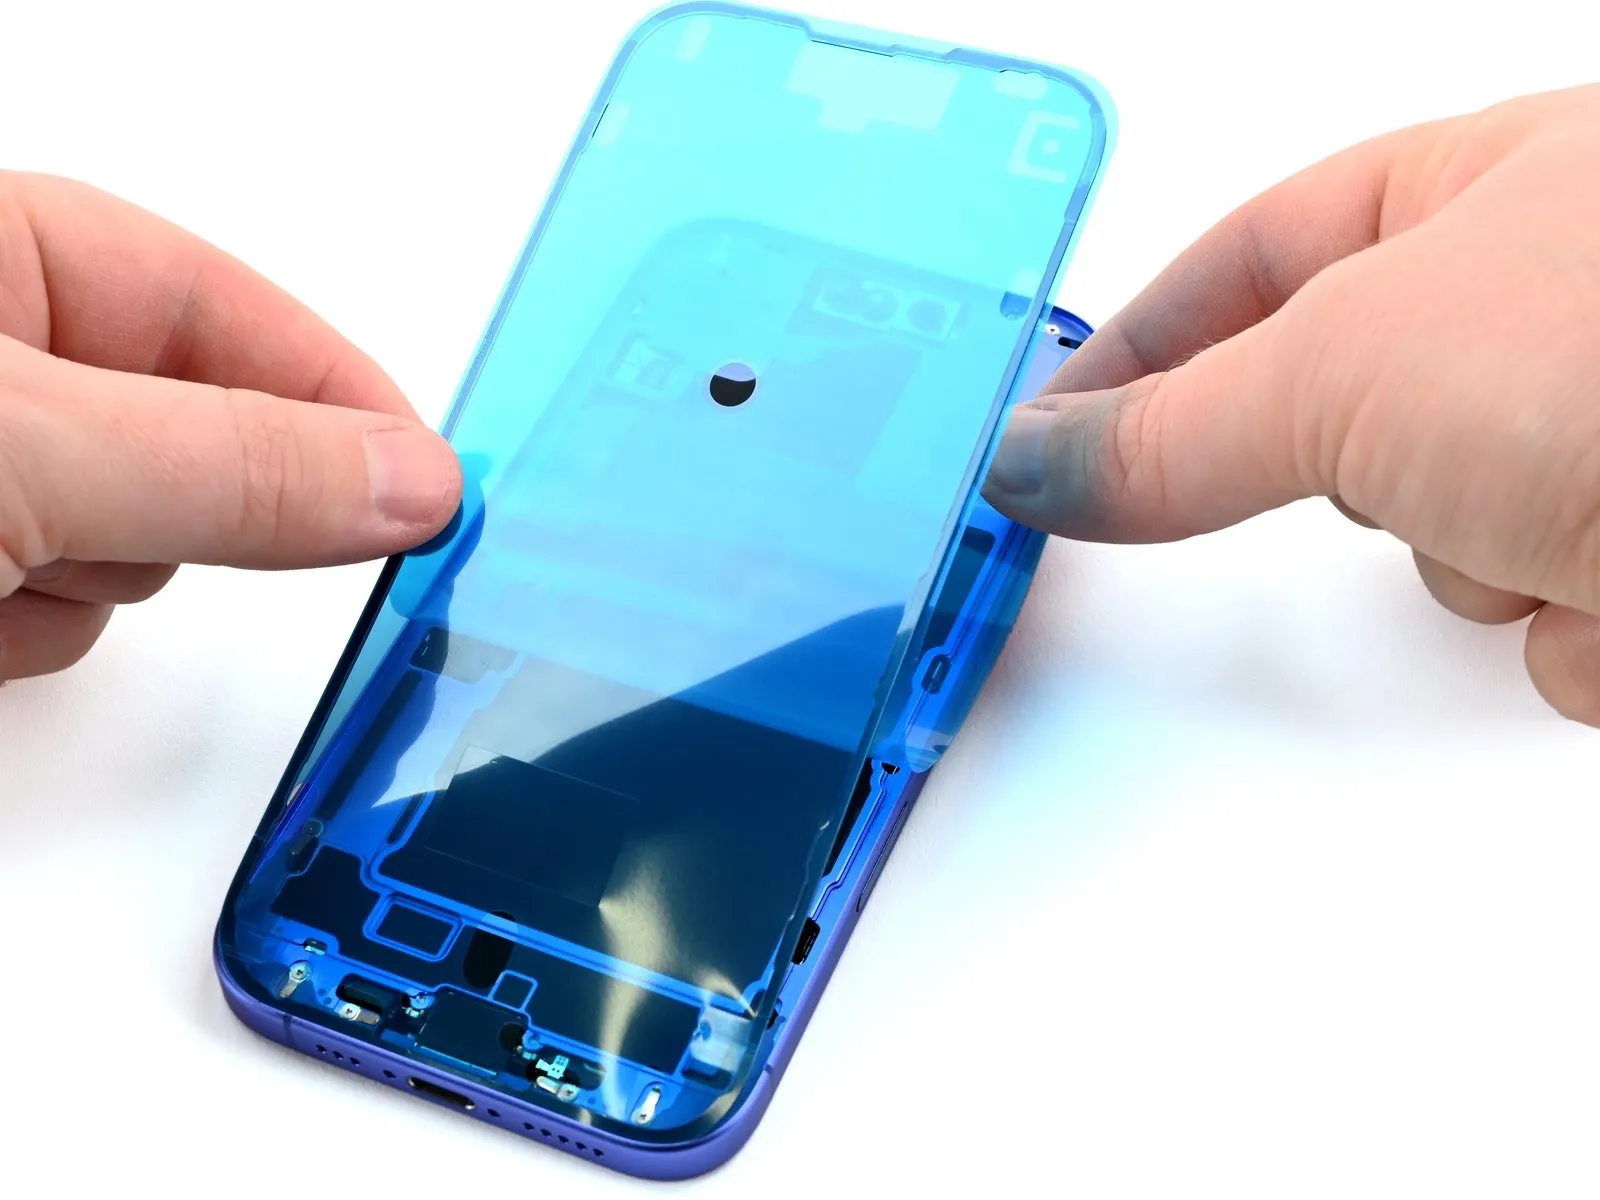
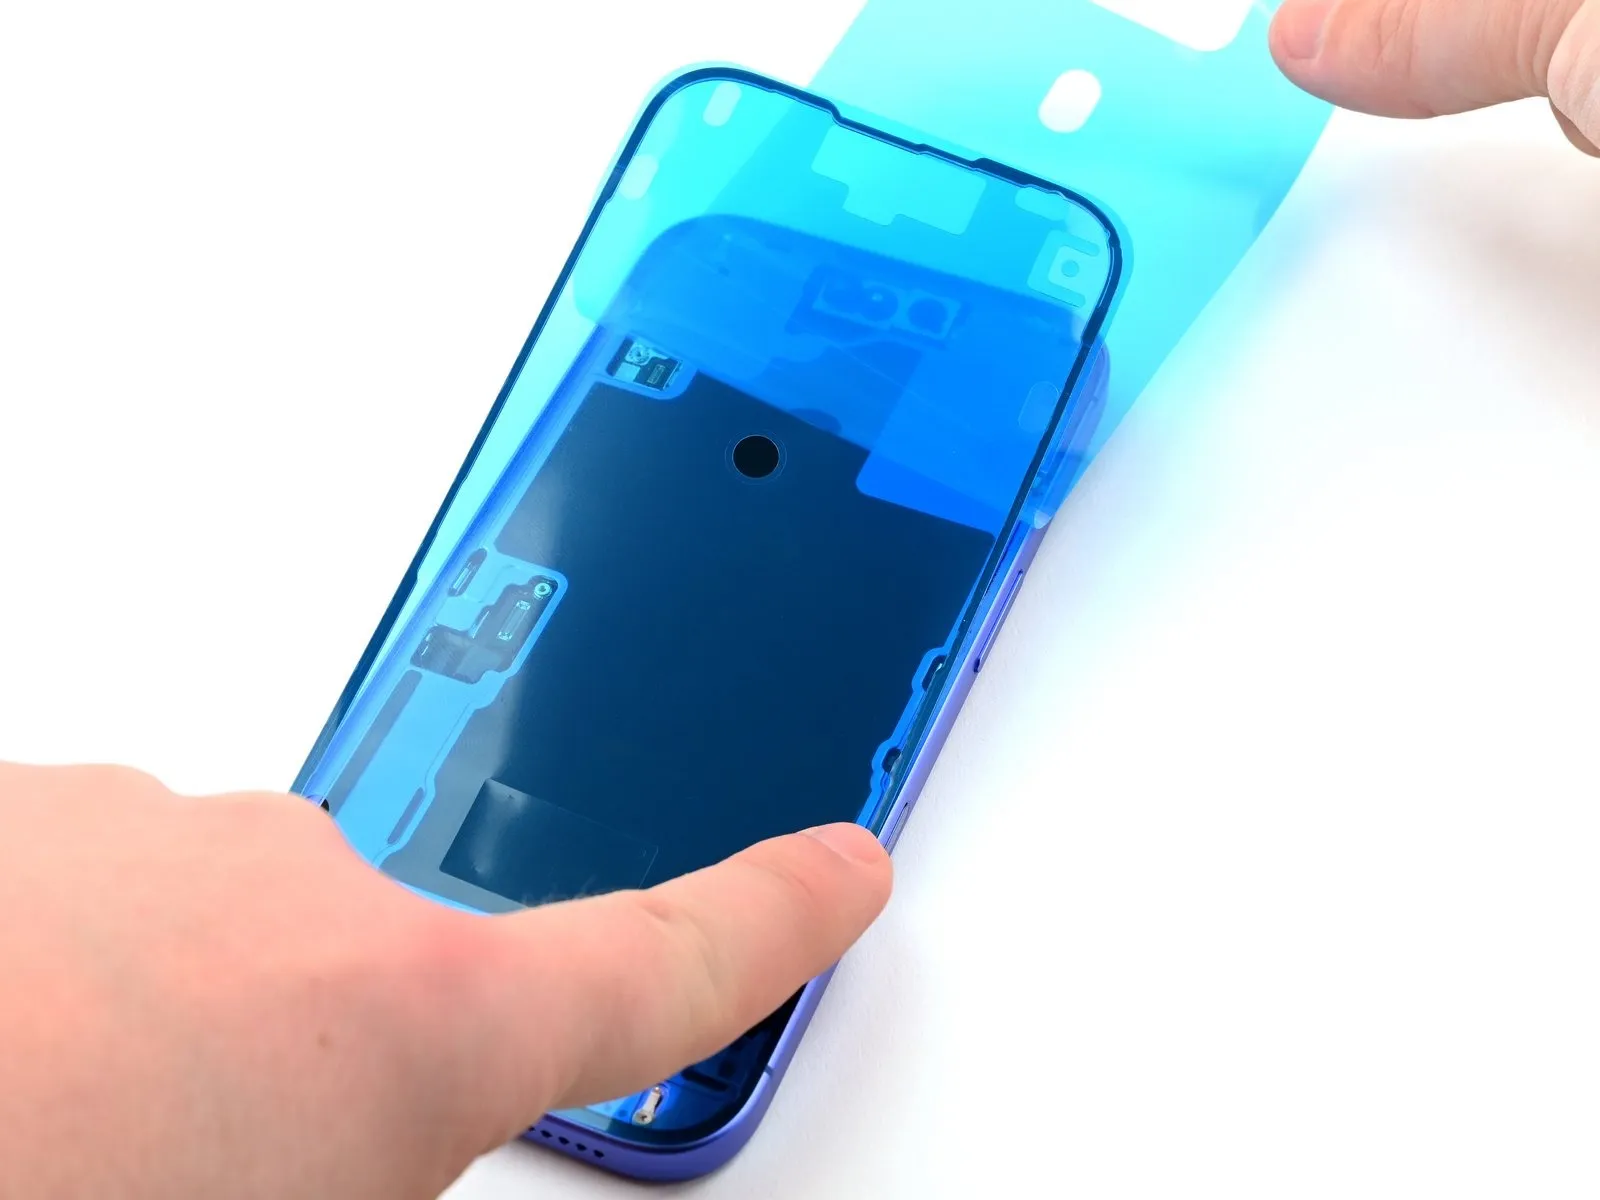
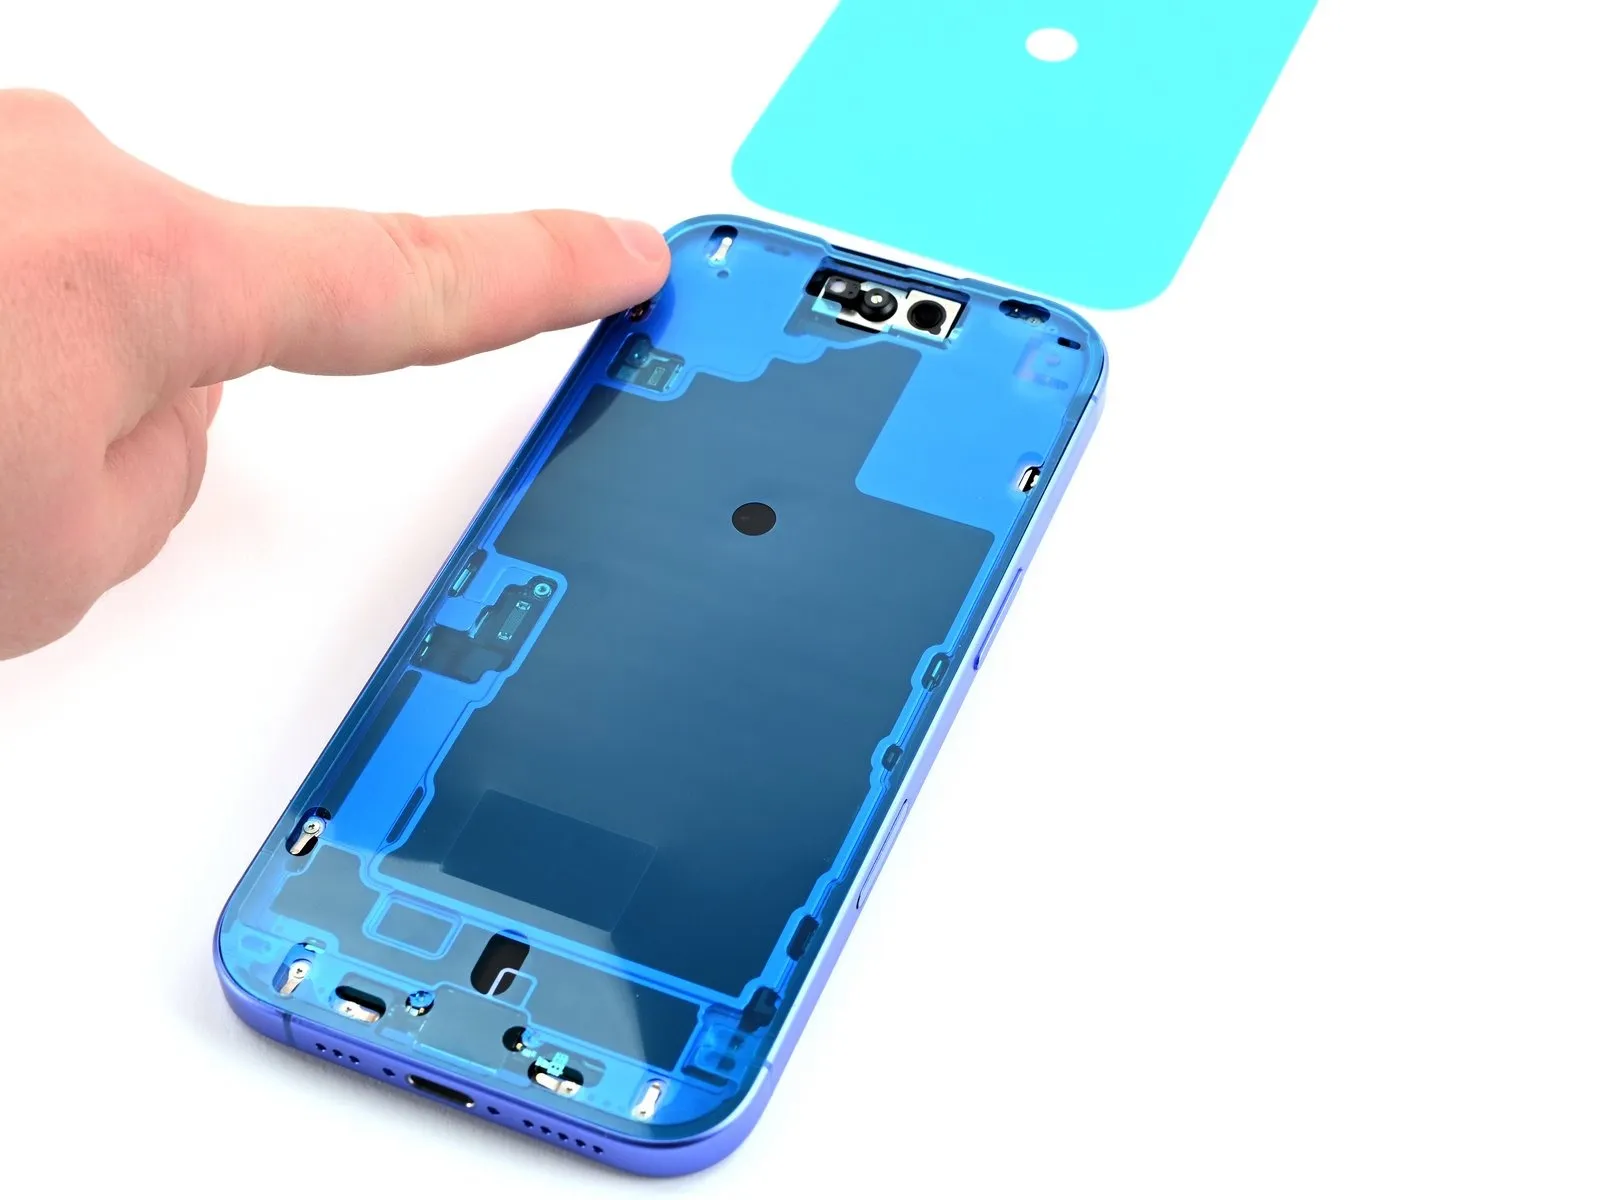
Progressively remove the protective liner from the adhesive strip, ensuring firm contact with the iPhone's frame perimeter during application. Proper alignment of the lower edge will naturally position the side and top edges correctly. Should misalignment occur, discard the adhesive and reapply a fresh strip. In the absence of replacement adhesive, the iPhone can be reassembled and used without it; however, be aware that water resistance will be diminished until new adhesive is installed.
Step 35 | Press the adhesive into place
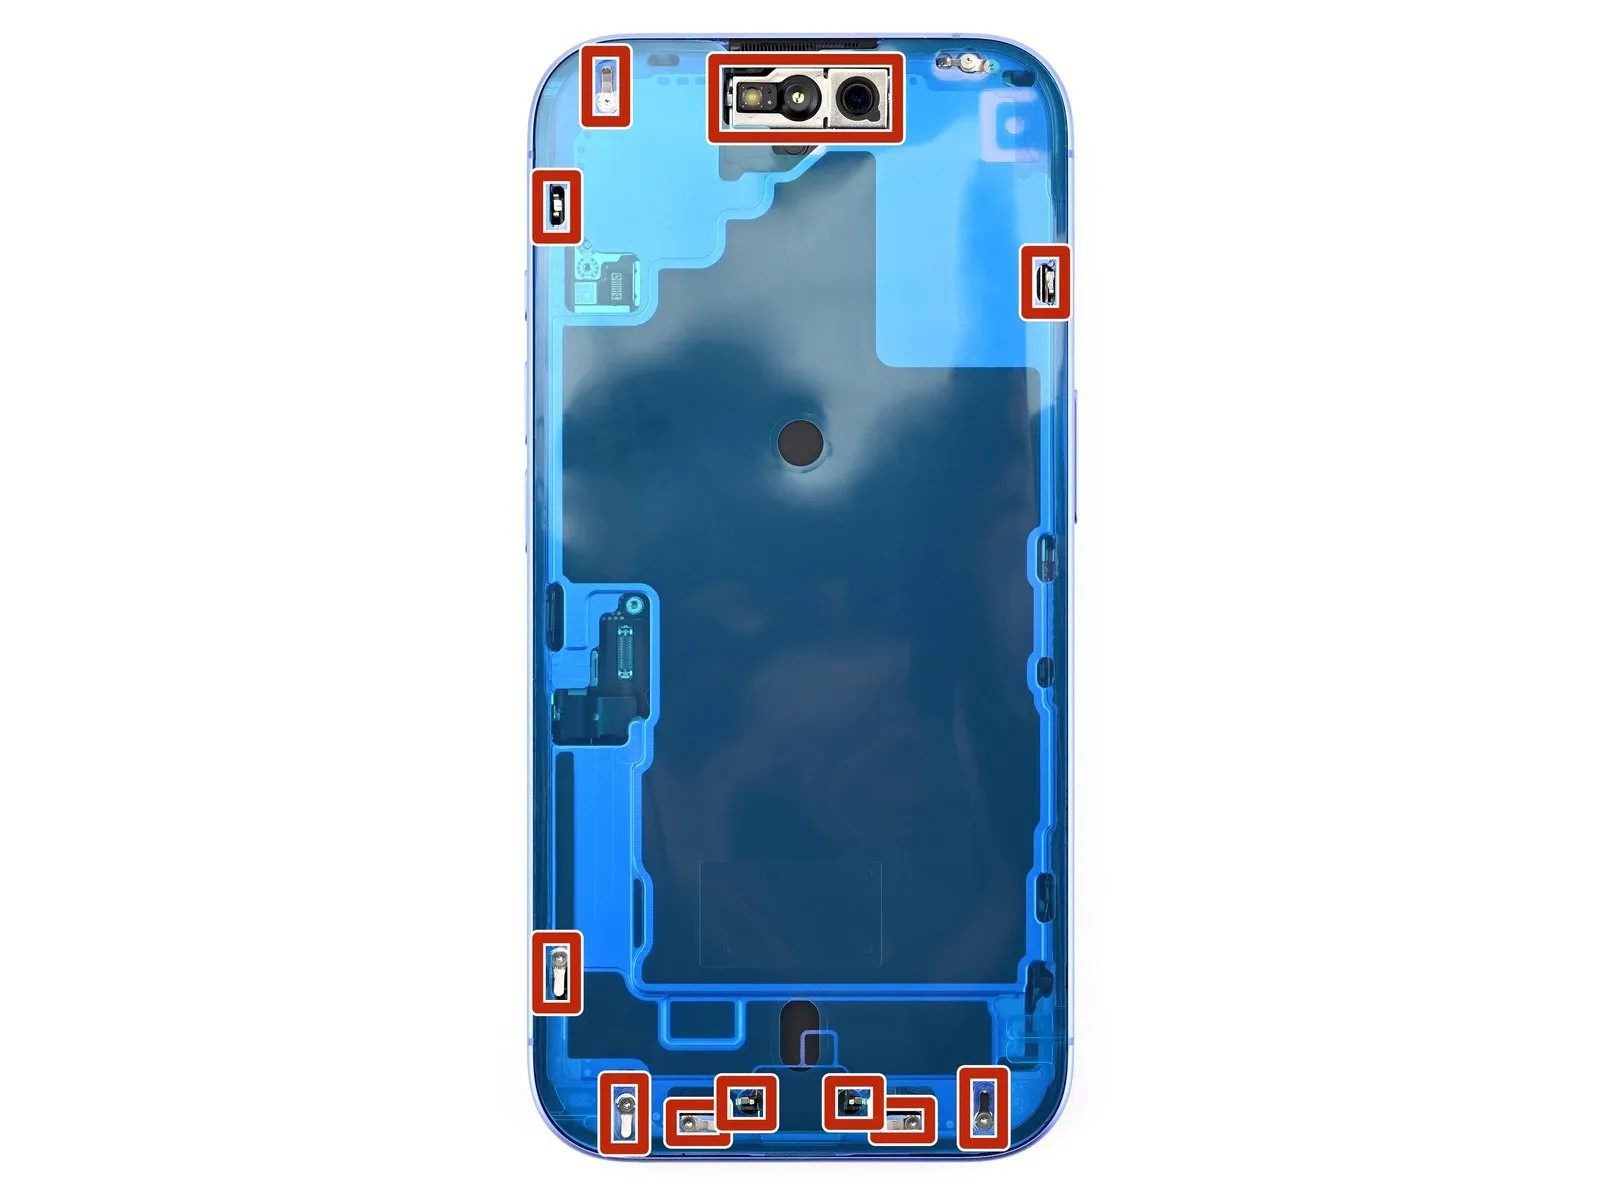
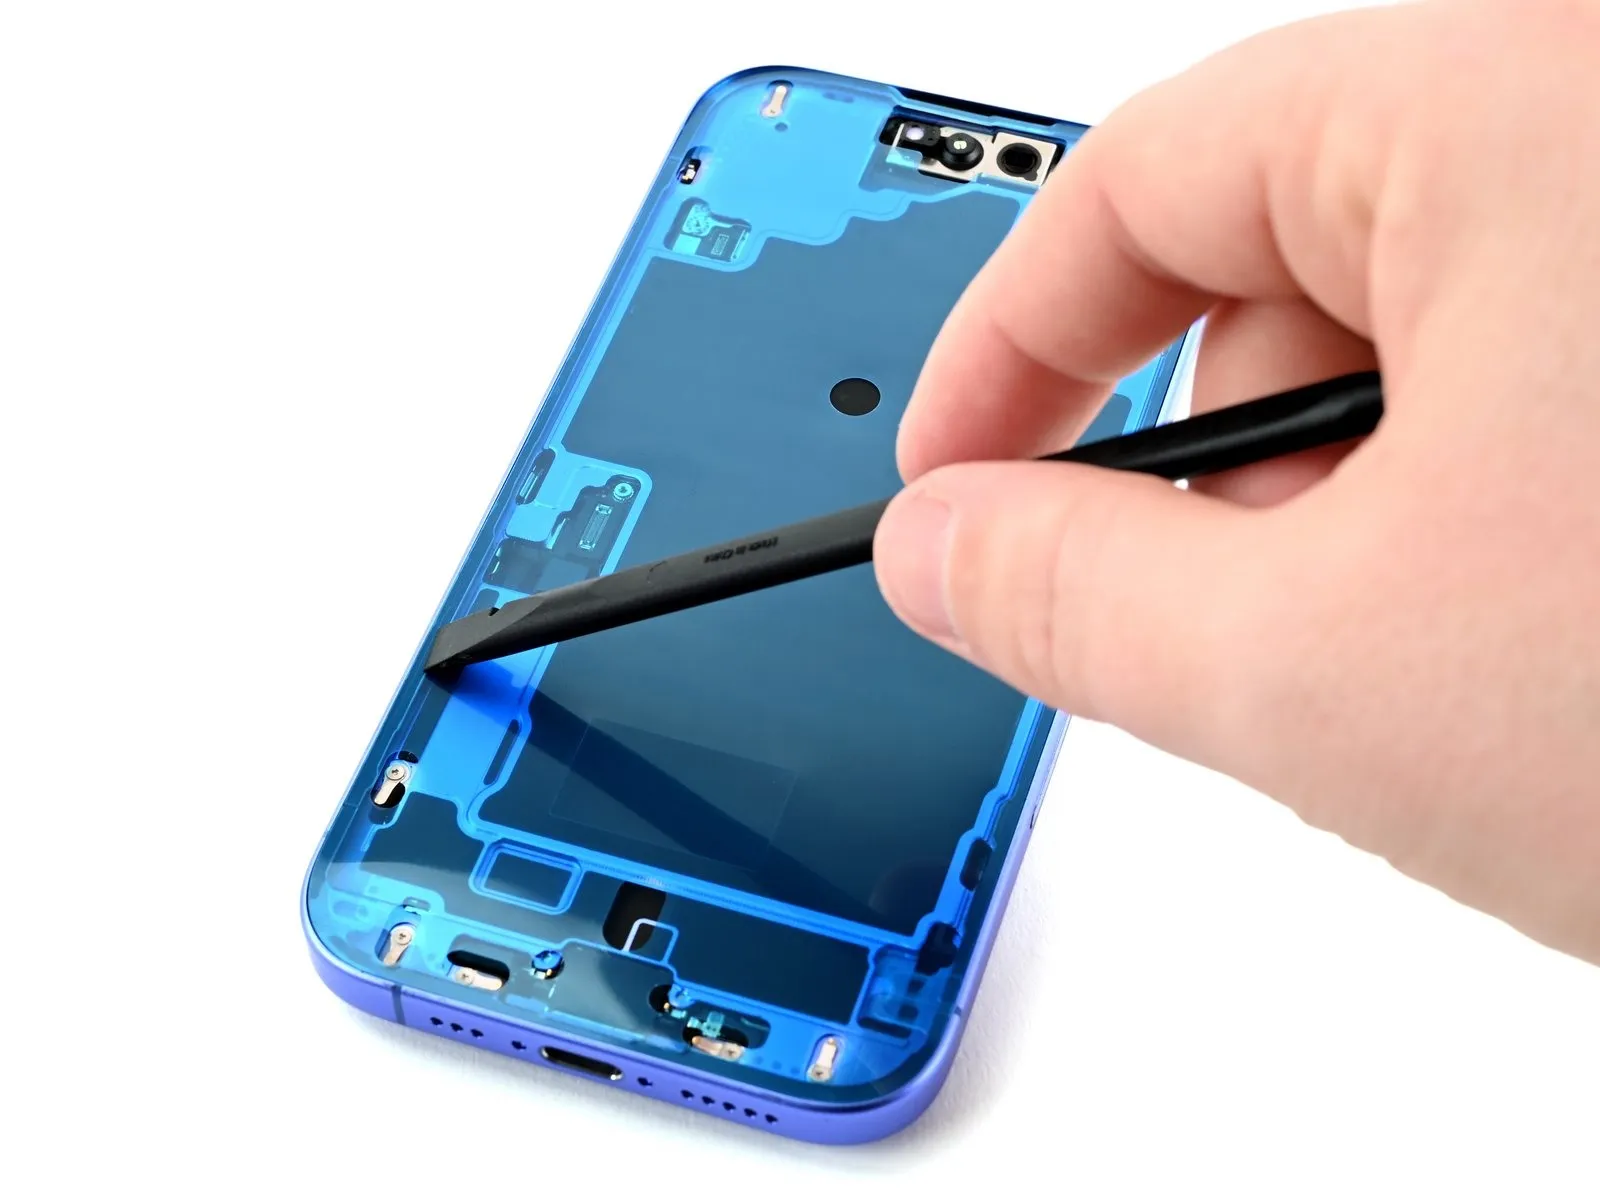
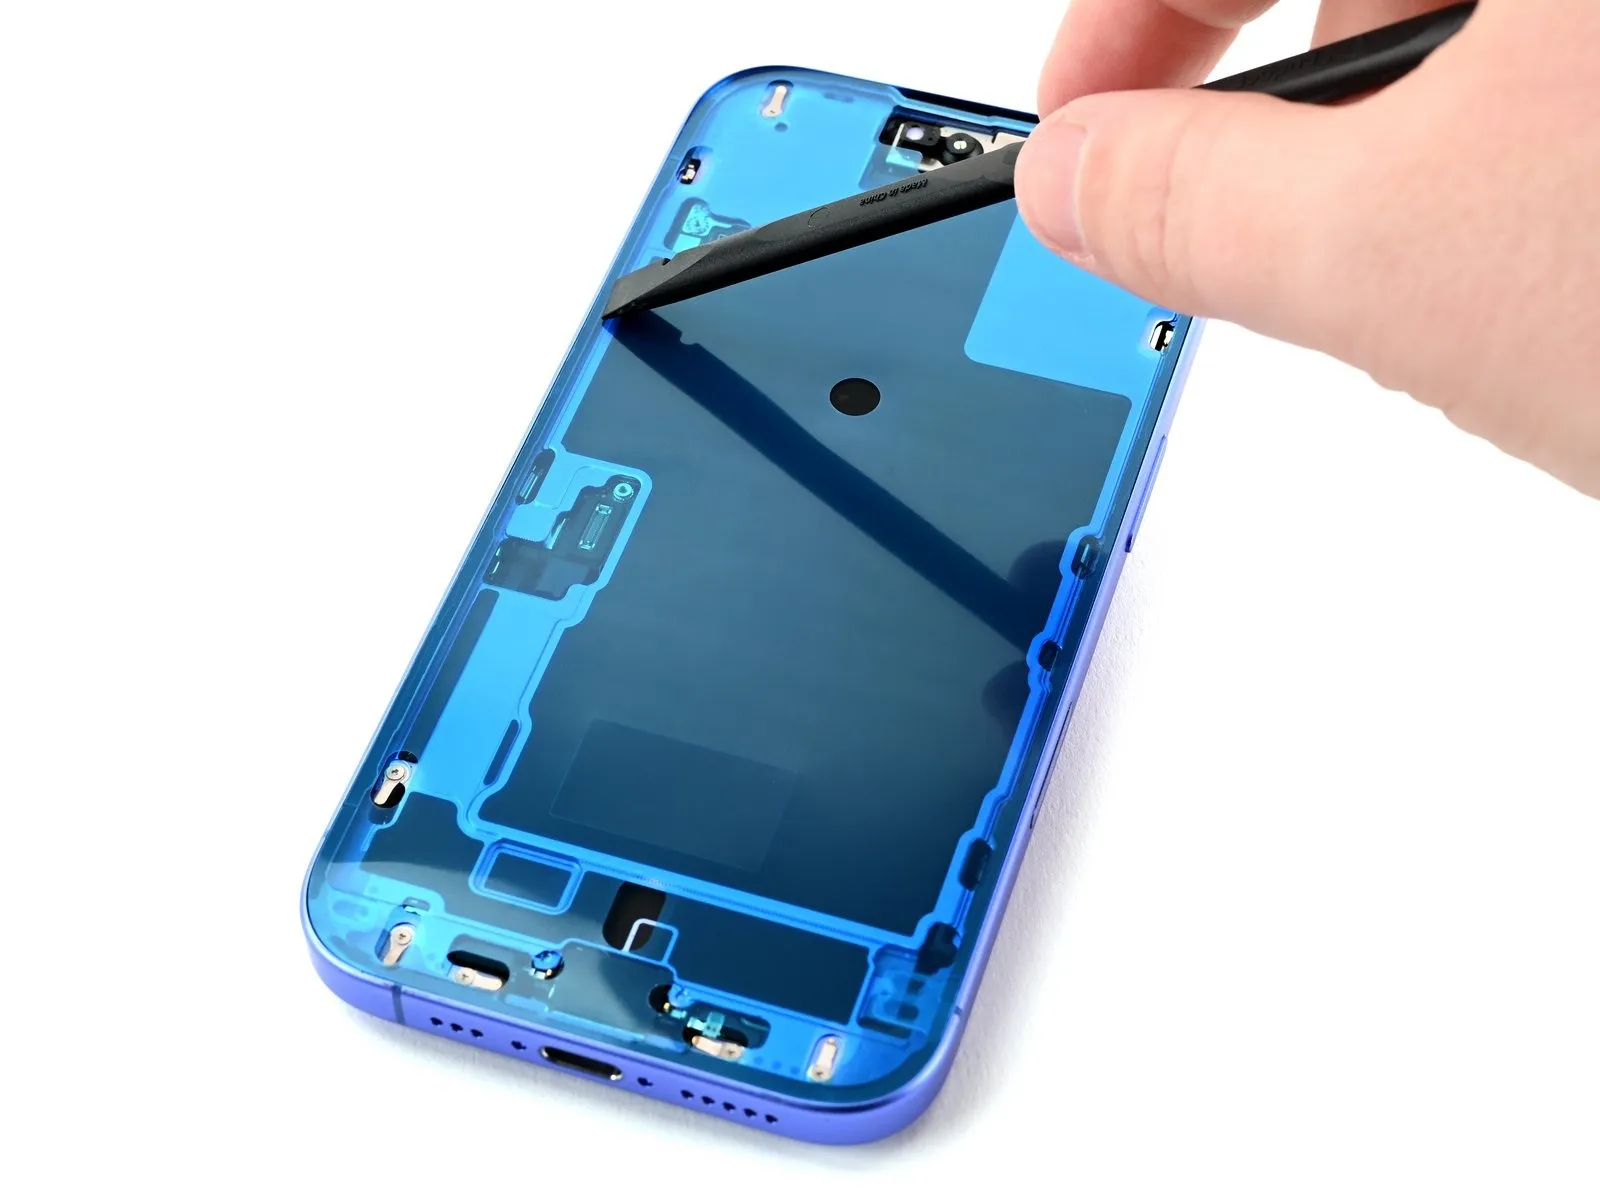
Confirm correct liner positioning by verifying the spring contacts and front-facing camera reside within their designated openings; if misalignment is detected, discard the current adhesive sheet and recommence the process. Employ the spudger's flattened tip to secure the adhesive with consistent pressure across the entire iPhone perimeter, exercising caution to avoid compressing the camera, spring contacts, or other sensitive internal elements.
Step 36 | Remove the top liner
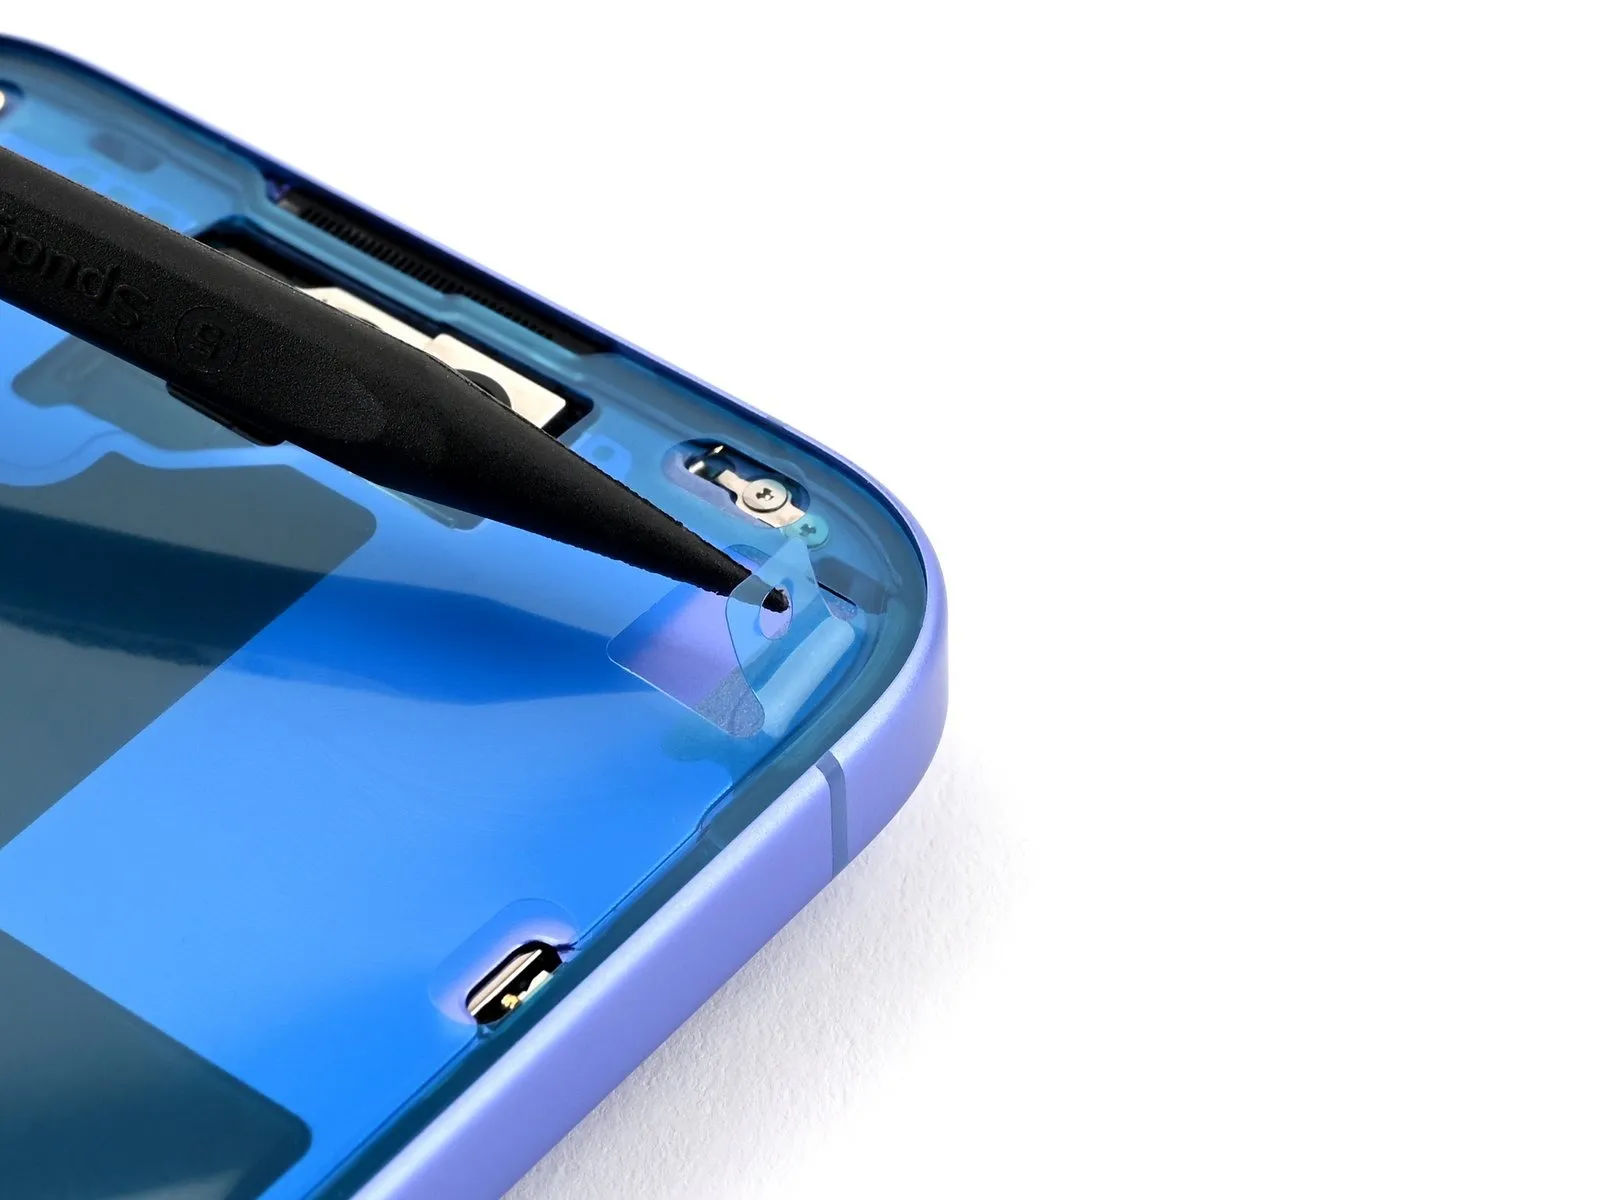
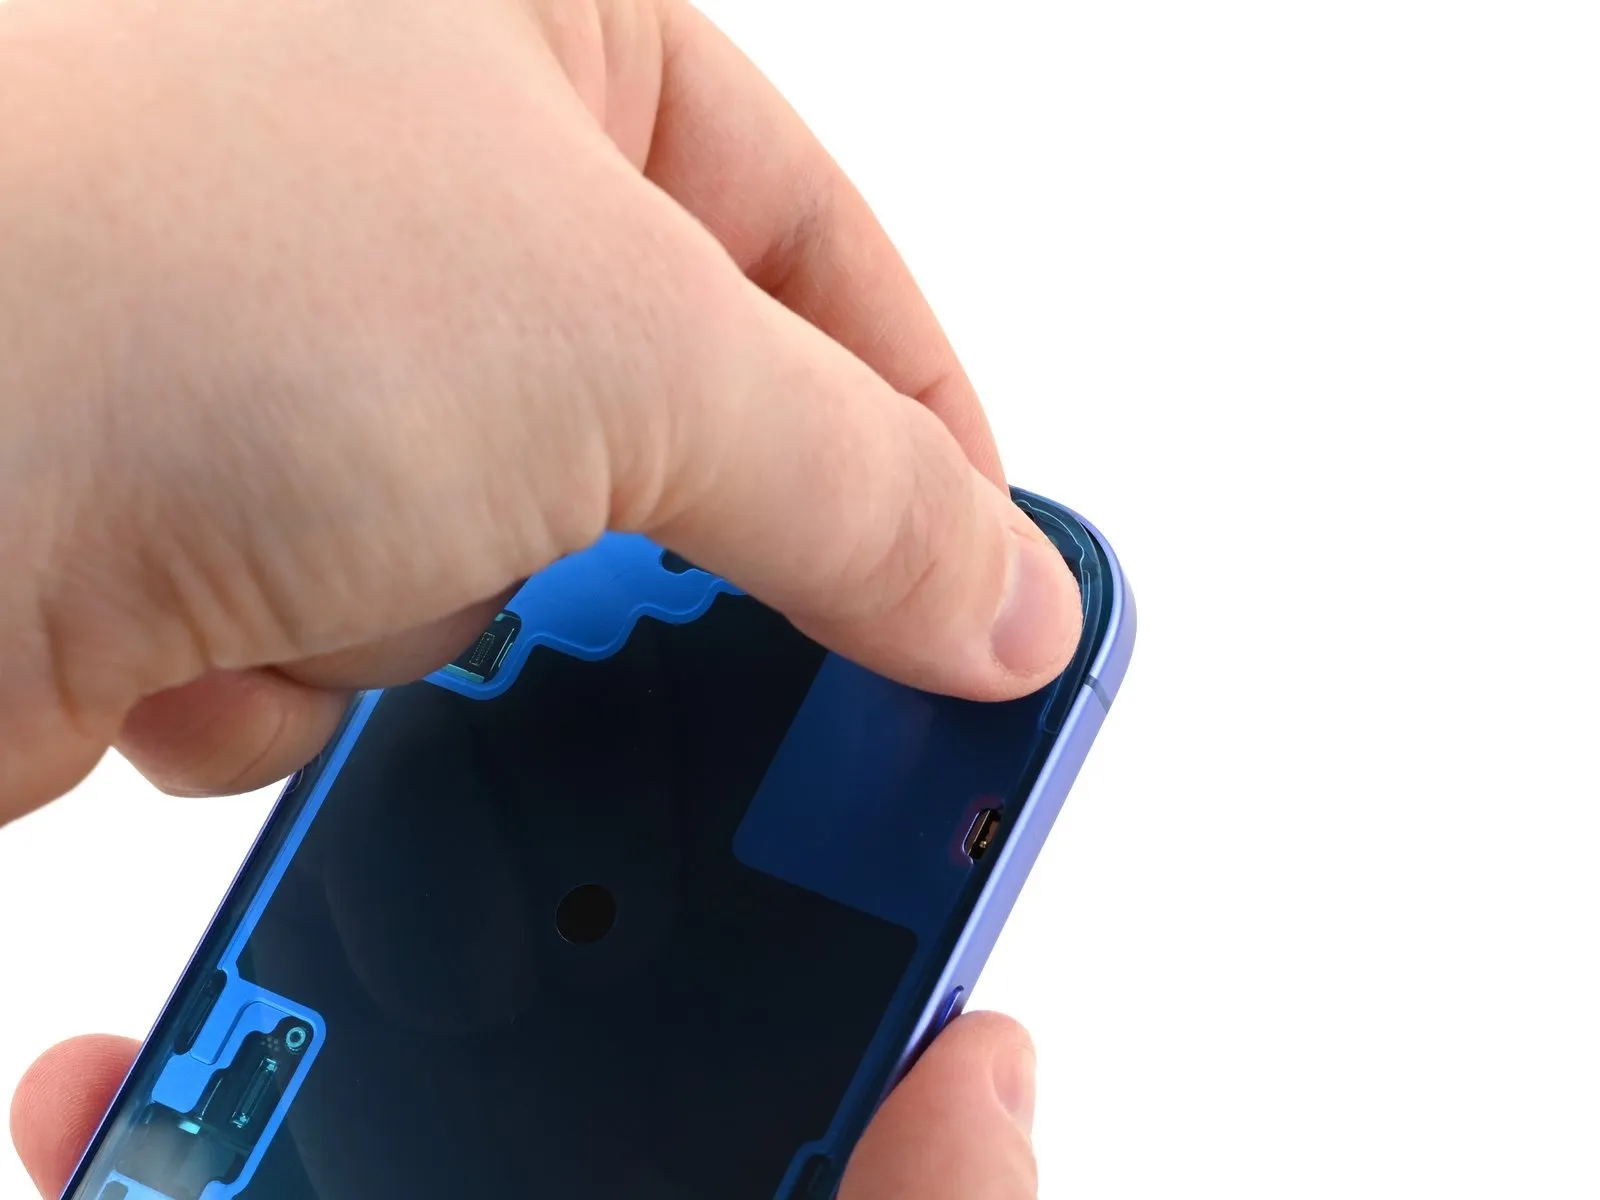
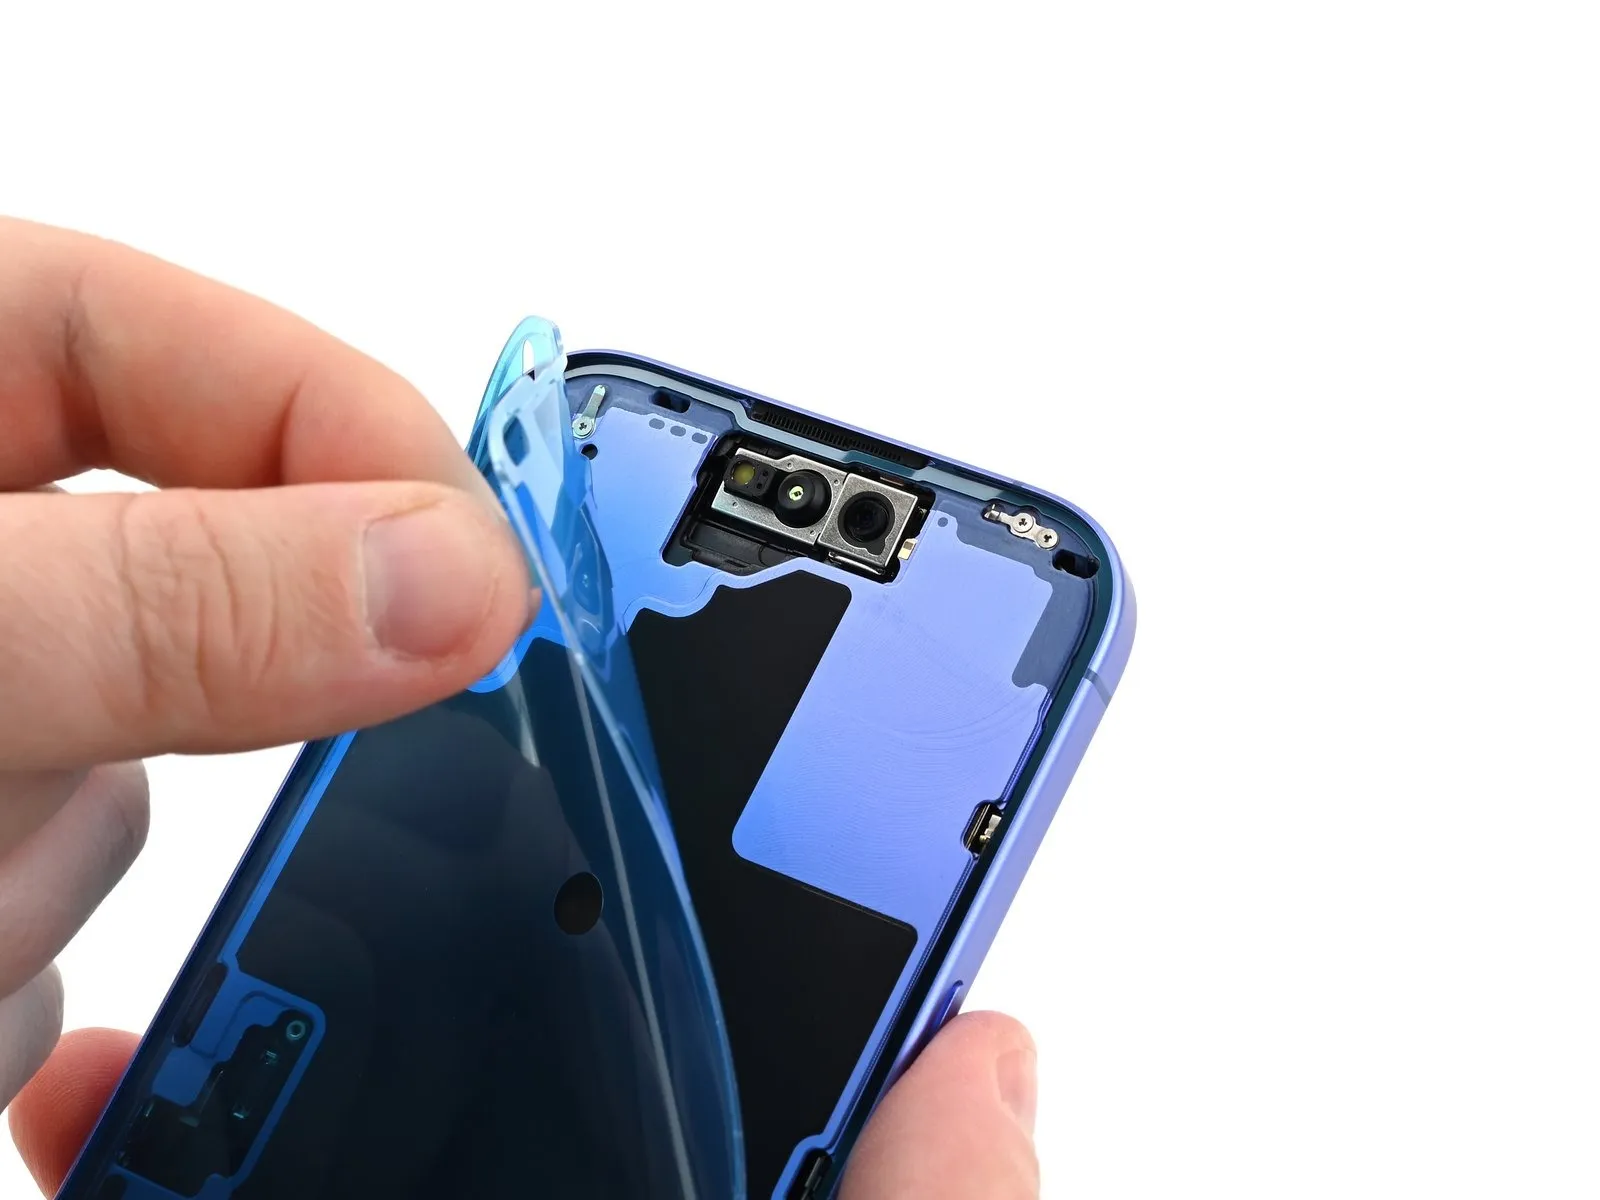
- Employ the tip of a spudger to elevate the pull tab situated in the upper-right portion of the frame's border, allowing for manual grasping.The placement of your pull tab might vary; confirm you are disengaging the complete top liner, rather than the thinner layers positioned beneath it.After gaining a secure hold, detach the top liner from the device.
- Complete the removal process by separating the top liner entirely.
- Ensure proper alignment to avoid damage while peeling back the liner.
Step 37
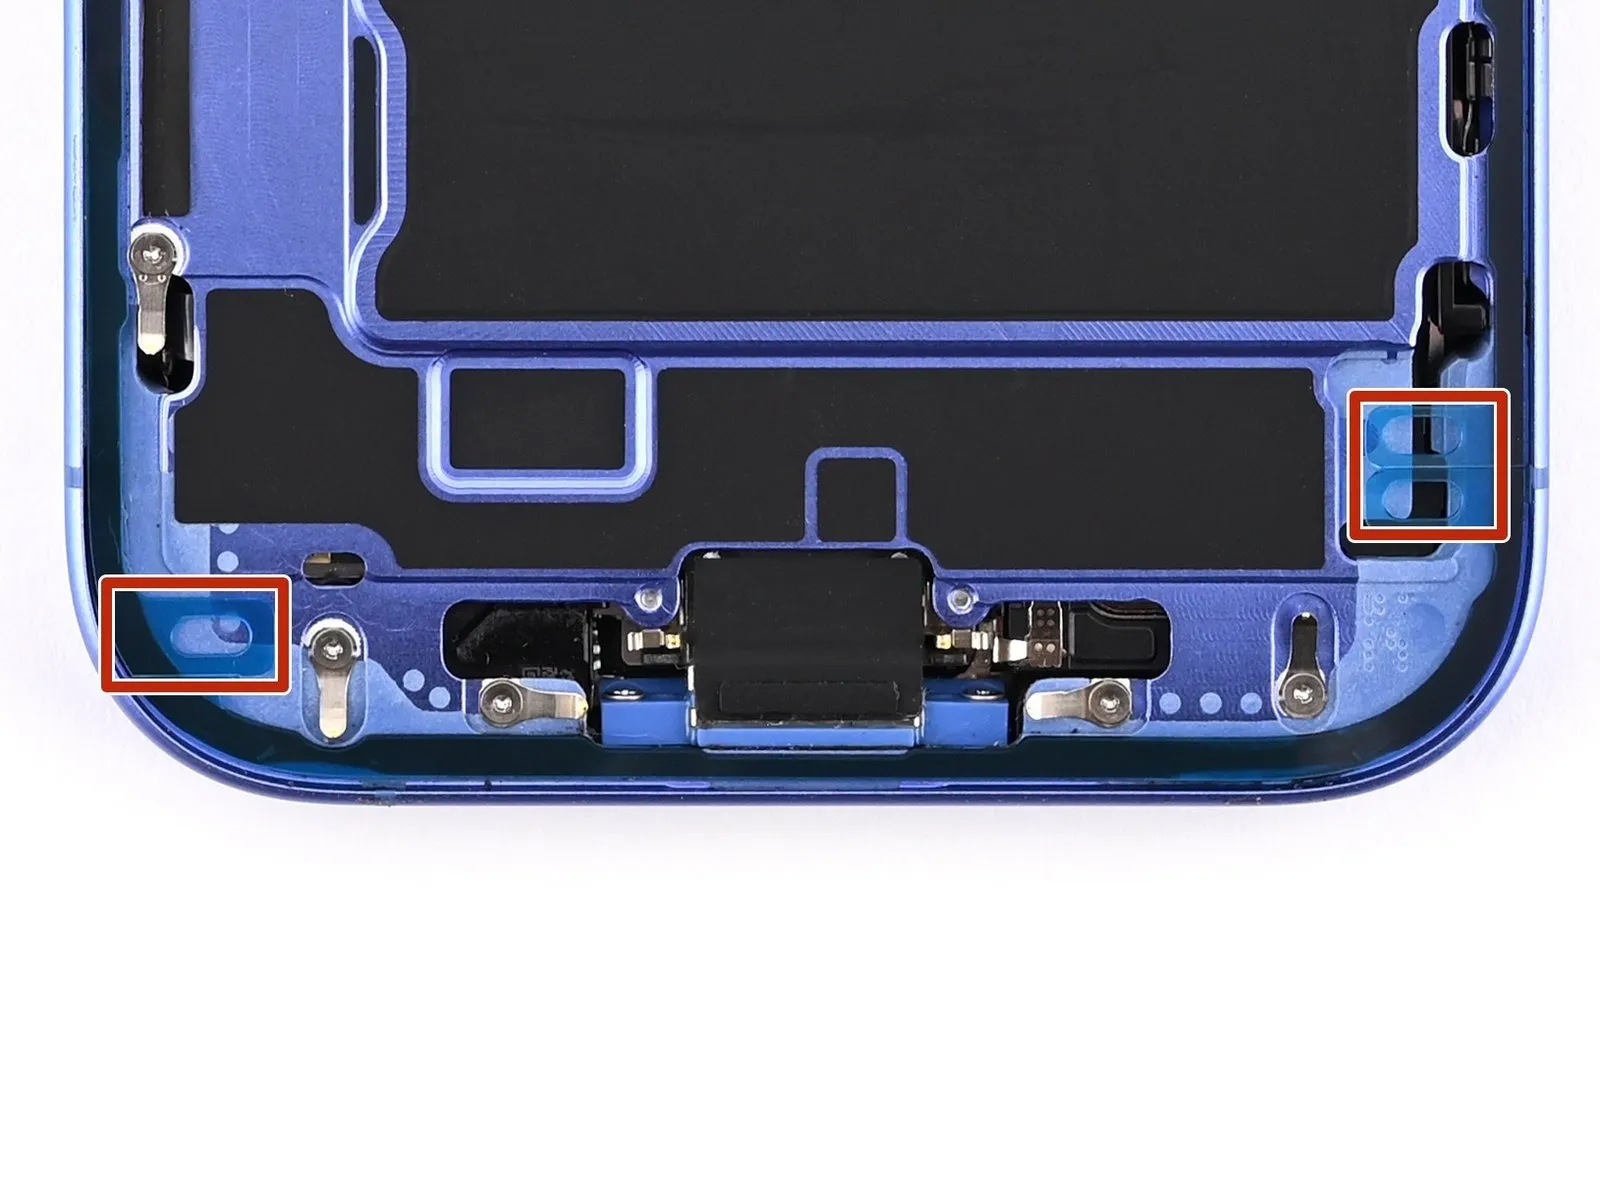
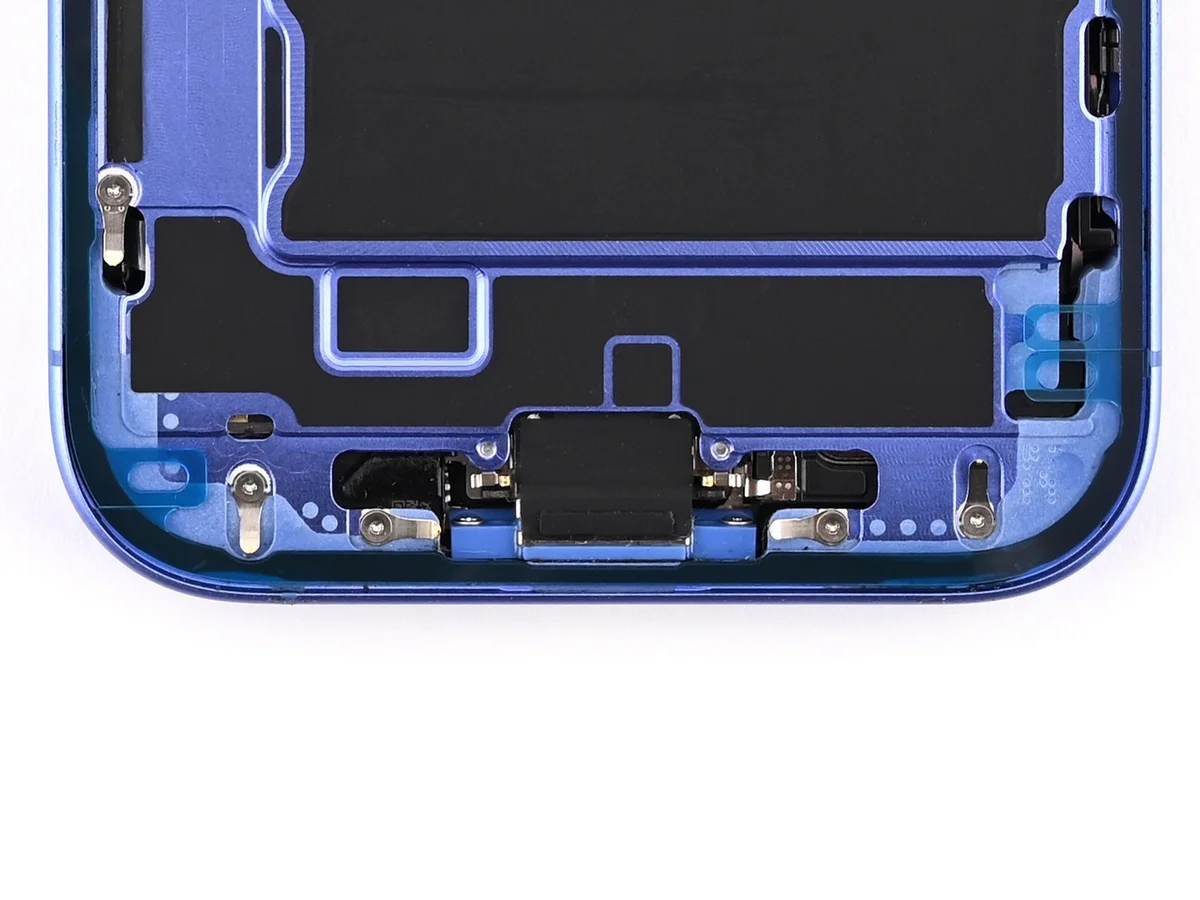
- After the uppermost protective film is peeled away, observe three slender liners situated above the adhesive layer, each featuring a pull tab located close to the lower boundary.
- The placement of these pull tabs can vary.
- Should these pull tabs be absent, it is possible that the thin liners were inadvertently removed during the prior procedure; if the adhesive surface is free of contaminants and correctly positioned, continuation is possible, but avoid any contact with the exposed adhesive until screen installation commences.
Step 38 | Prop up the screen
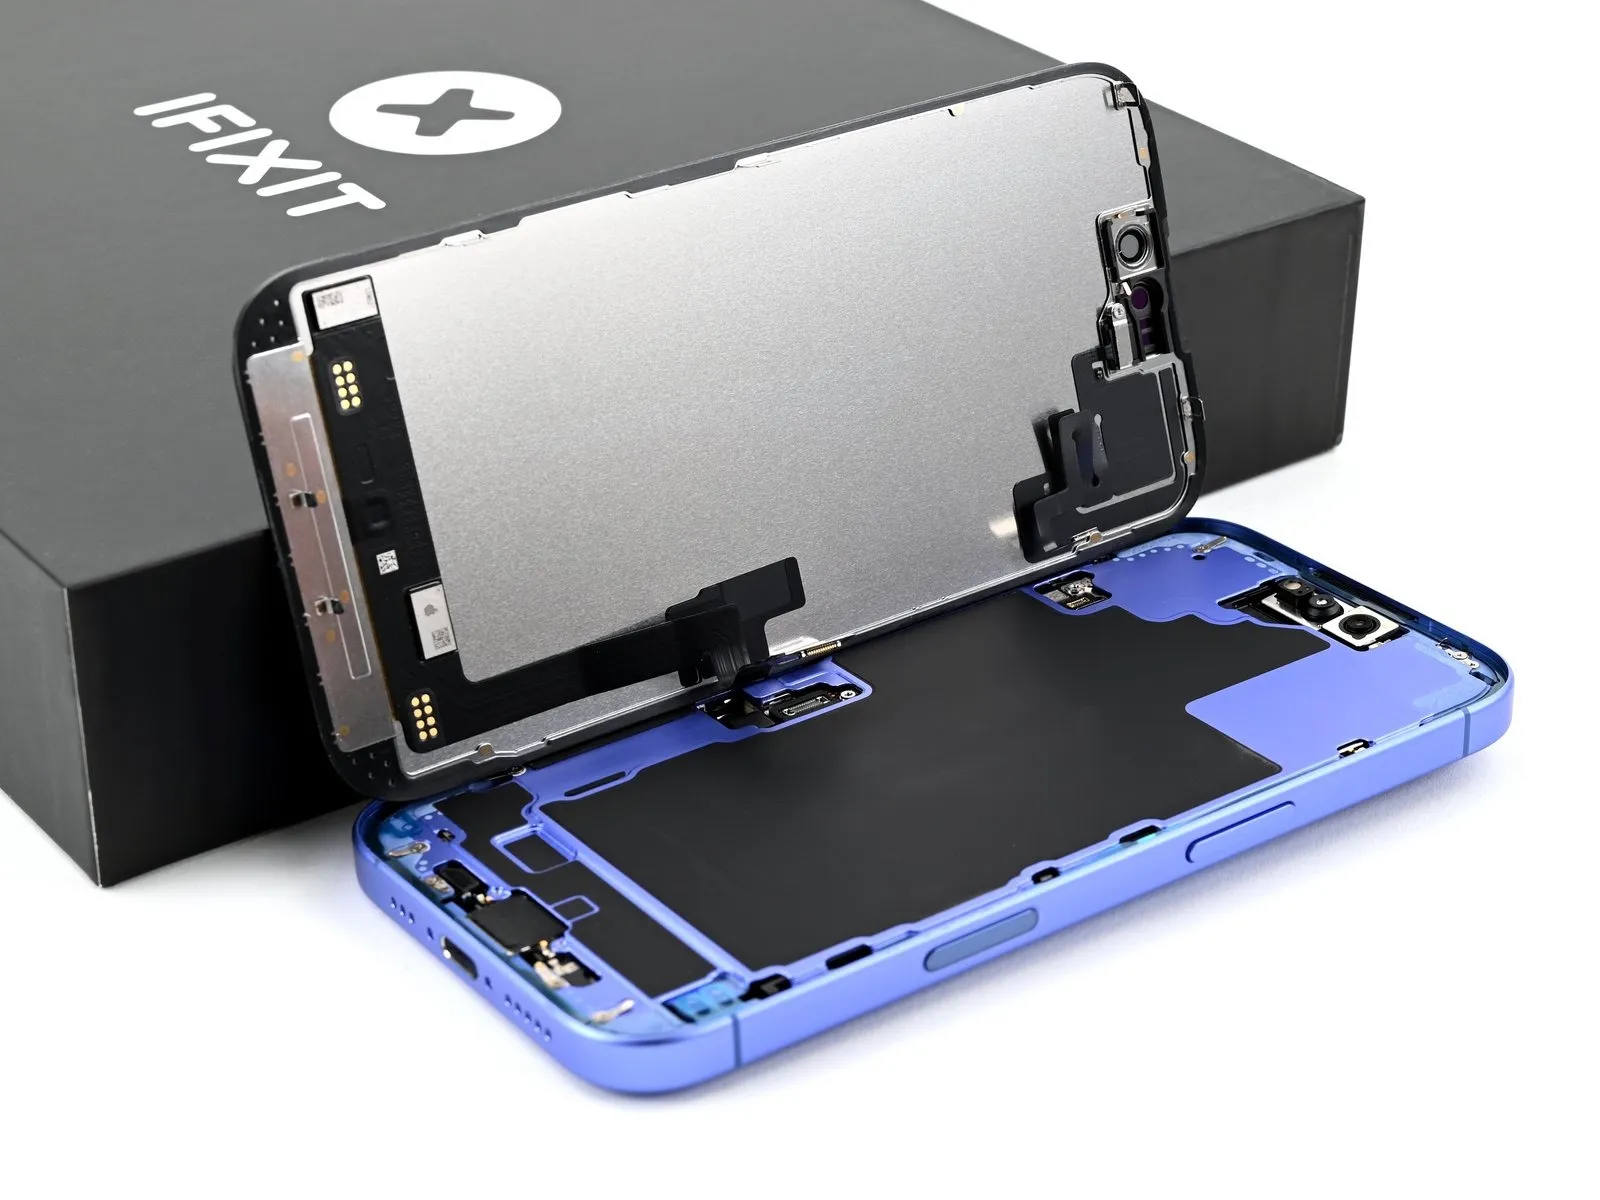
To prevent damage, secure the display panel in an upright position against the left side of the iPhone's chassis, utilizing a rigid support such as a box.
Step 39 | Connect the screen and front sensor
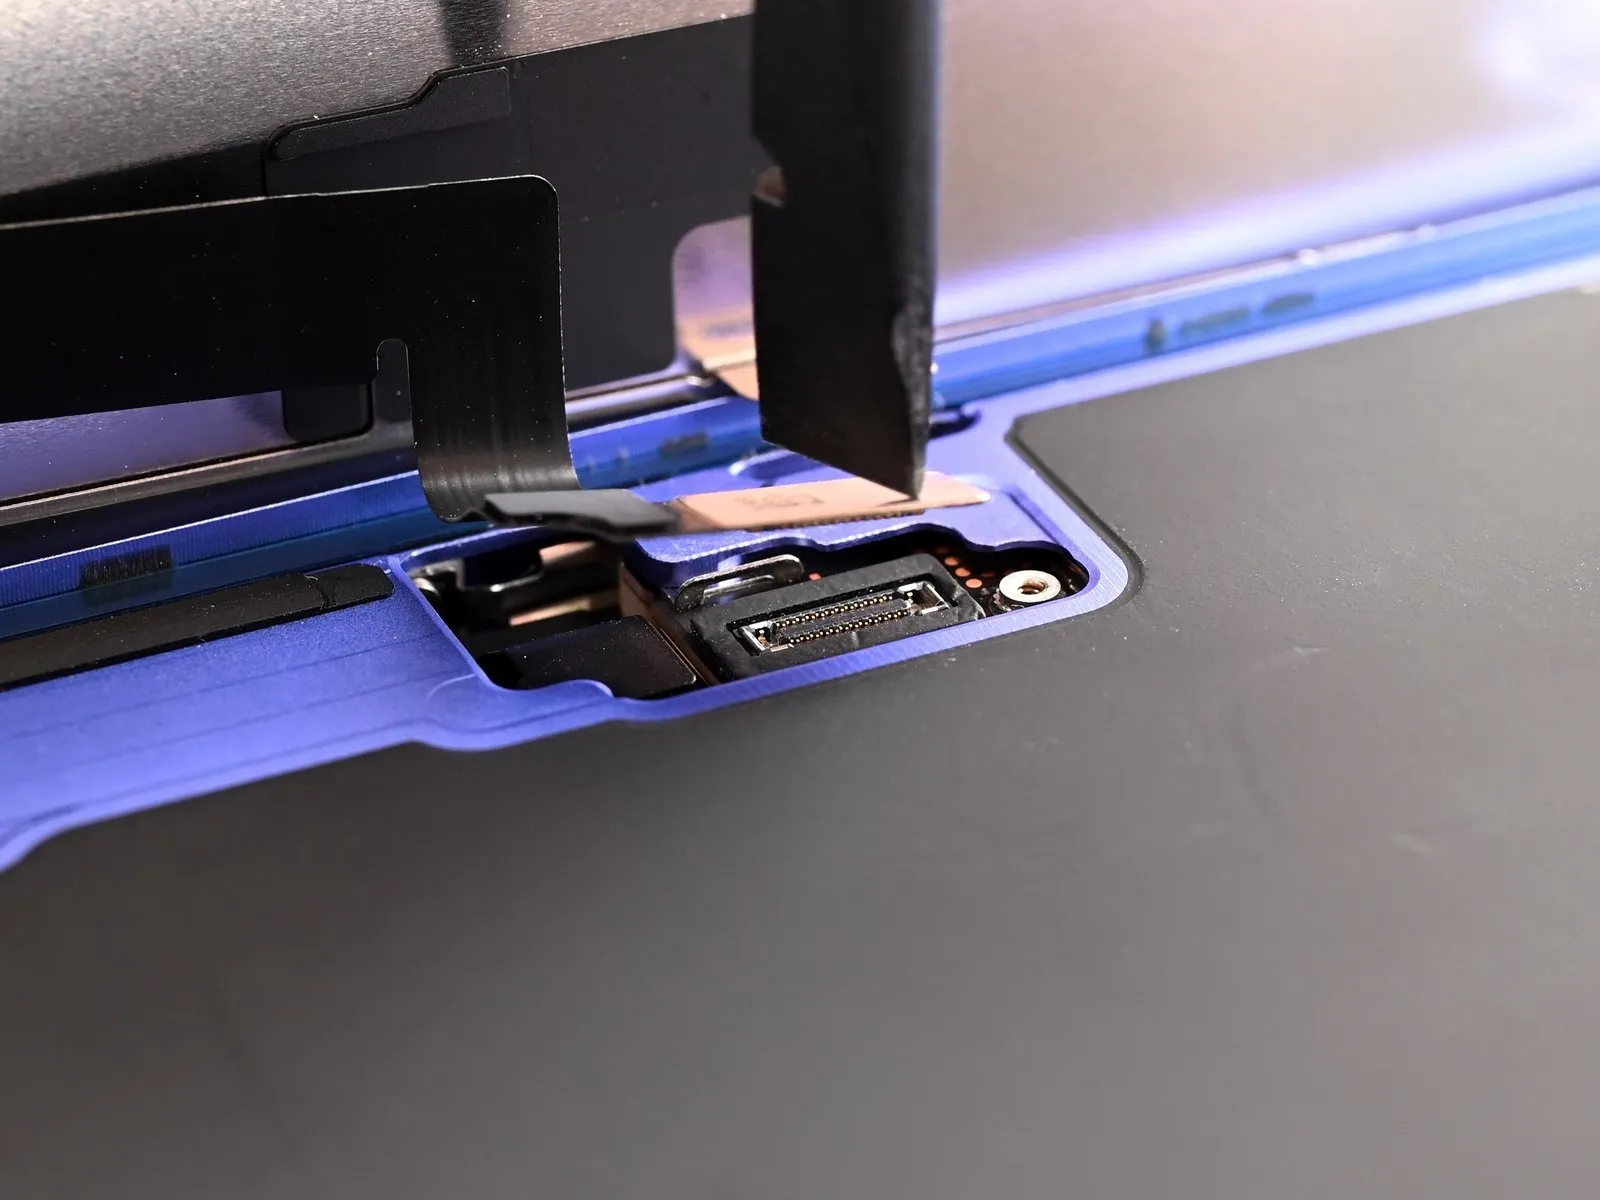
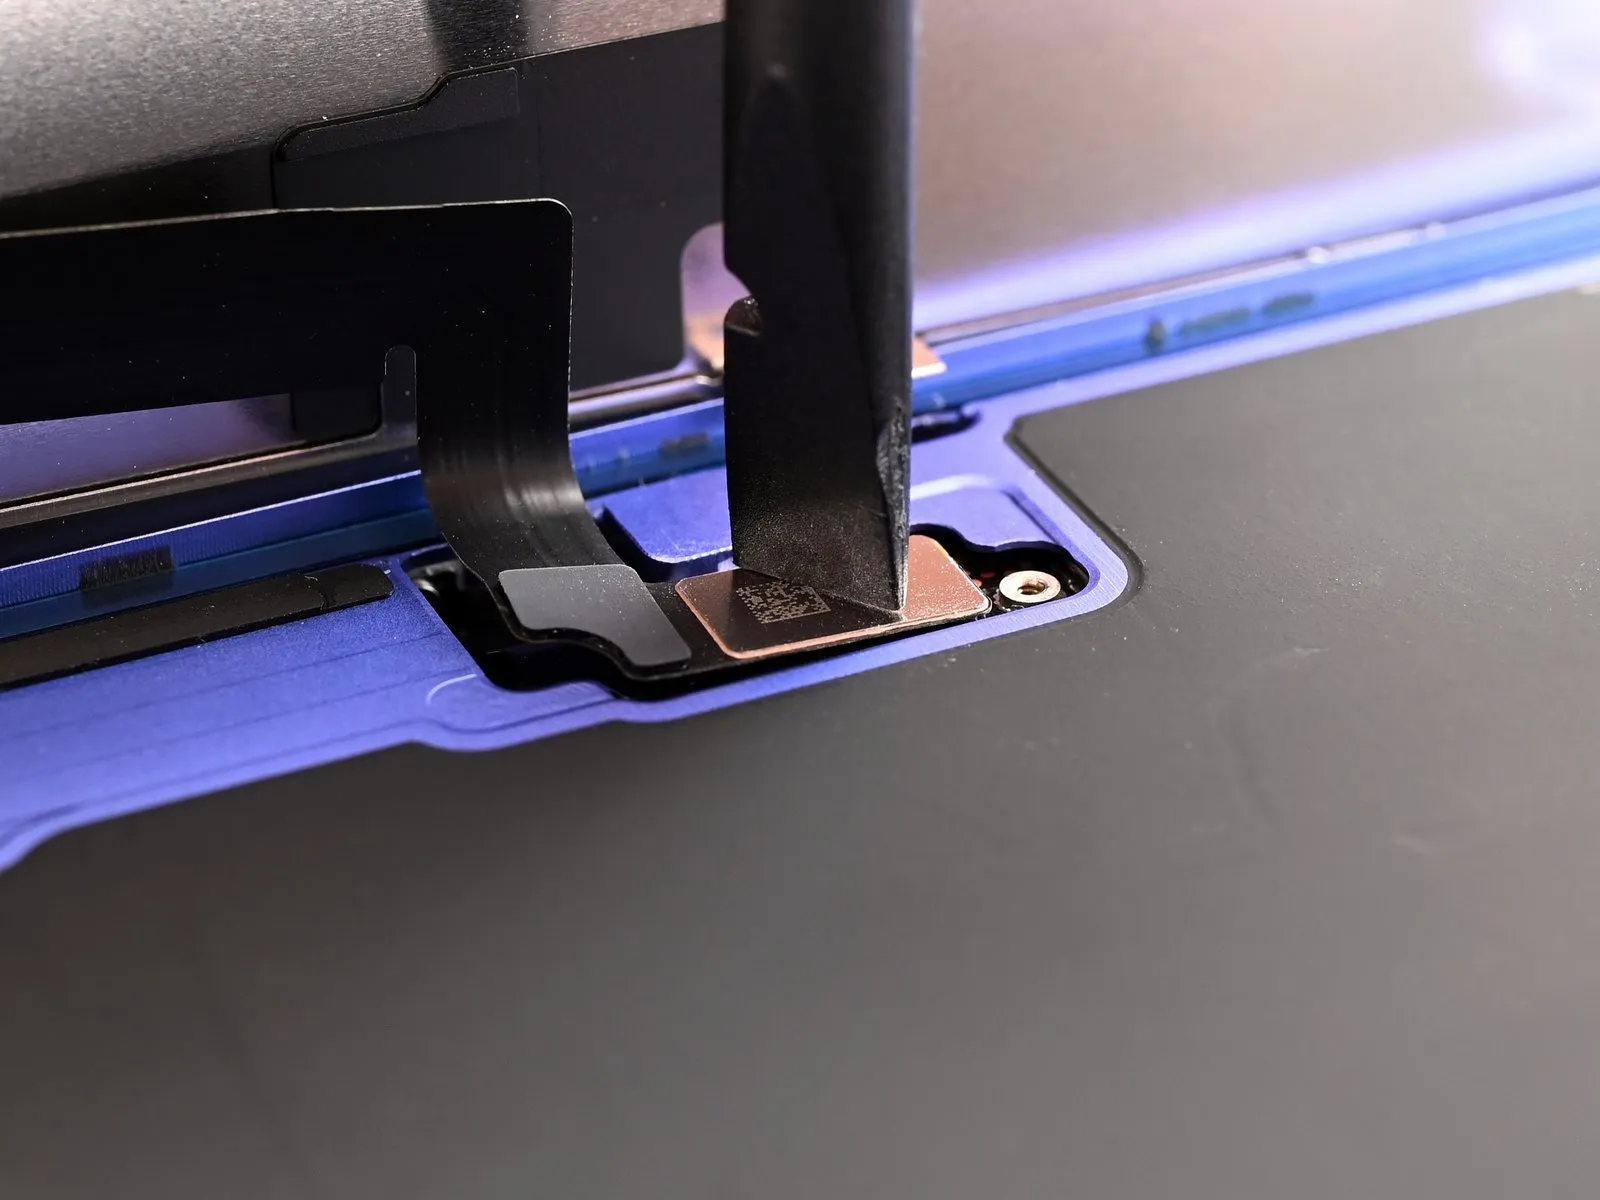
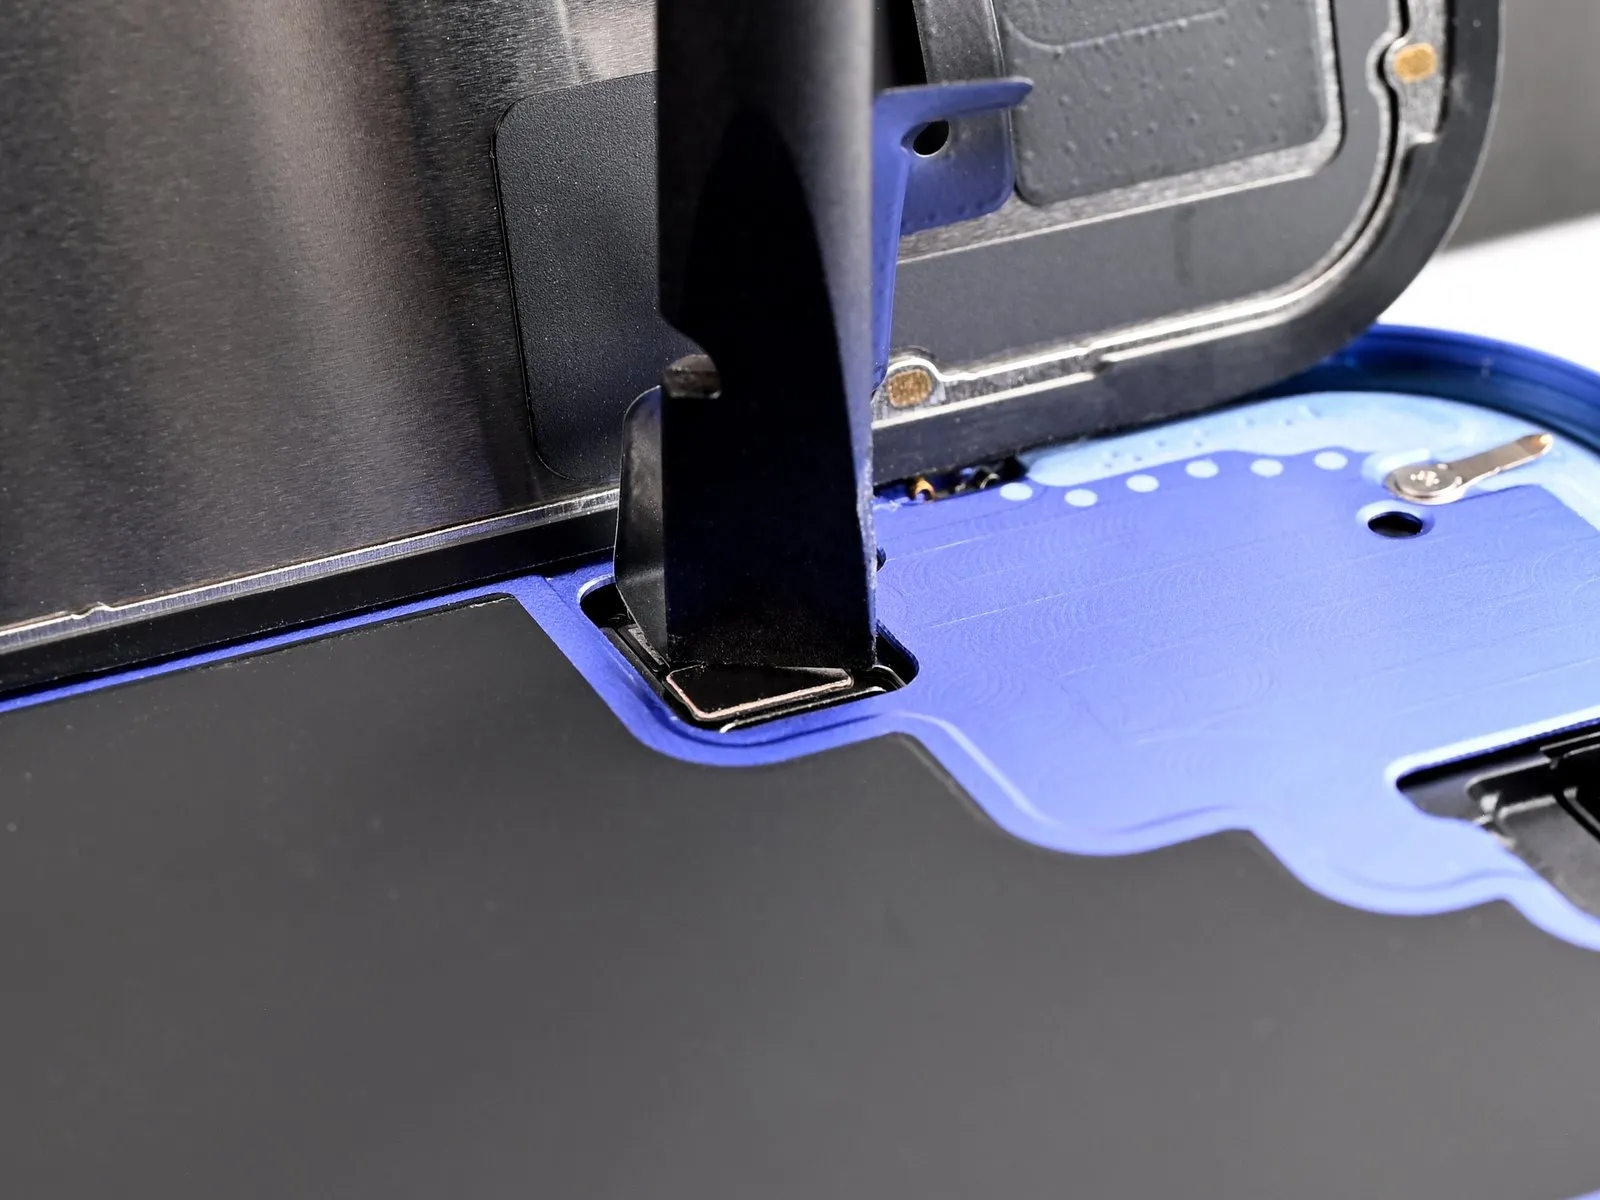
Employ the planar edge of a spudger tool, or a fingertip, to establish contact between the display and front sensor connectors.Ensure proper electrical connection by carefully joining the screen and front sensor press connectors using a flat spudger or a finger.To secure the electrical link, utilize the broad, flat surface of a spudger or your finger when interfacing the screen and front sensor press connectors.
Step 40 | Cover the connectors
To position the screen connector cover onto the screen connector, employ tweezers or your fingertips, guiding it into place with a slight downward tilt to ensure the hook secures properly, subsequently flattening the cover across the connector's surface.
Step 41
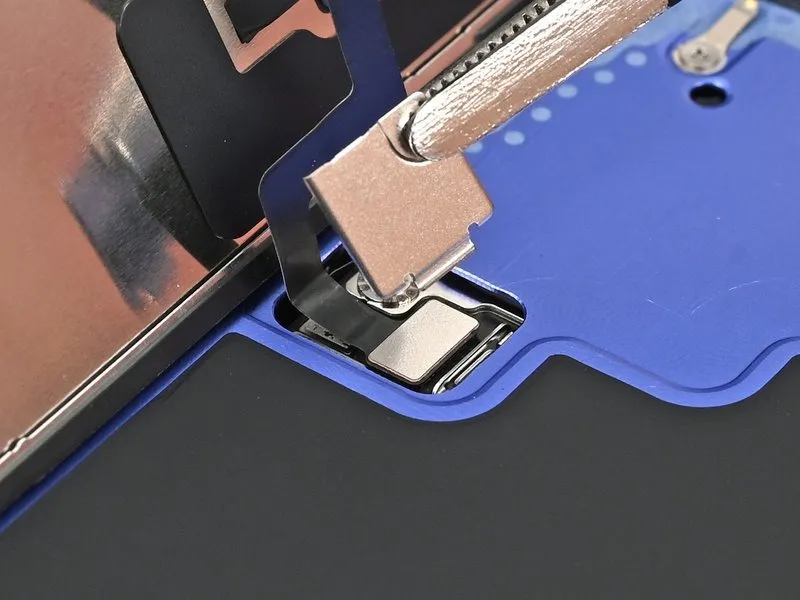
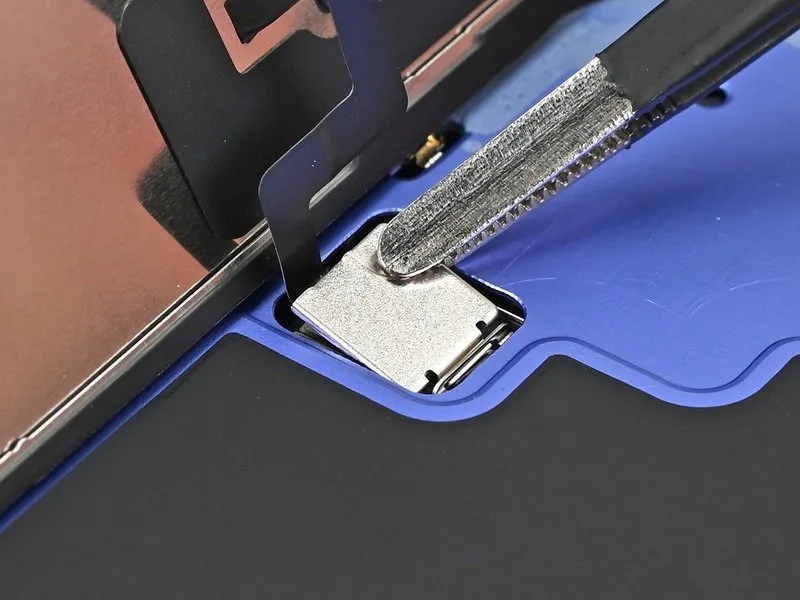
- Employing tweezers or manual dexterity, position the front sensor connector cover onto the front sensor connector, ensuring a 90-degree insertion to properly secure the retaining hook, followed by flattening the cover against the connector's surface.To install the front sensor connector cover, carefully align it with the front sensor connector and slide it into place at a right angle, allowing the hook to latch, subsequently ensuring the cover rests level against the connector.The front sensor connector cover should be affixed to the front sensor connector by initially inserting it perpendicularly, enabling the hook to engage, and then ensuring the cover lies flush with the connector's top surface, utilizing tweezers or fingertips for precise placement.
Step 42 | Install the cover screws
- Employ a specialized tri-point Y000 driver for the installation process.The screws, each measuring 0.9 millimeters in length, require a tri-point Y000 driver for proper engagement.Two screws of 0.9 mm length must be installed using a tri-point Y000 driver.Secure the front sensor connector and screen connector covers by utilizing a tri-point Y000 driver to fasten the screws.A tri-point Y000 driver is essential for the attachment of the two 0.9 mm screws that hold the connector covers in place.
Step 43 | Remove the final adhesive liners
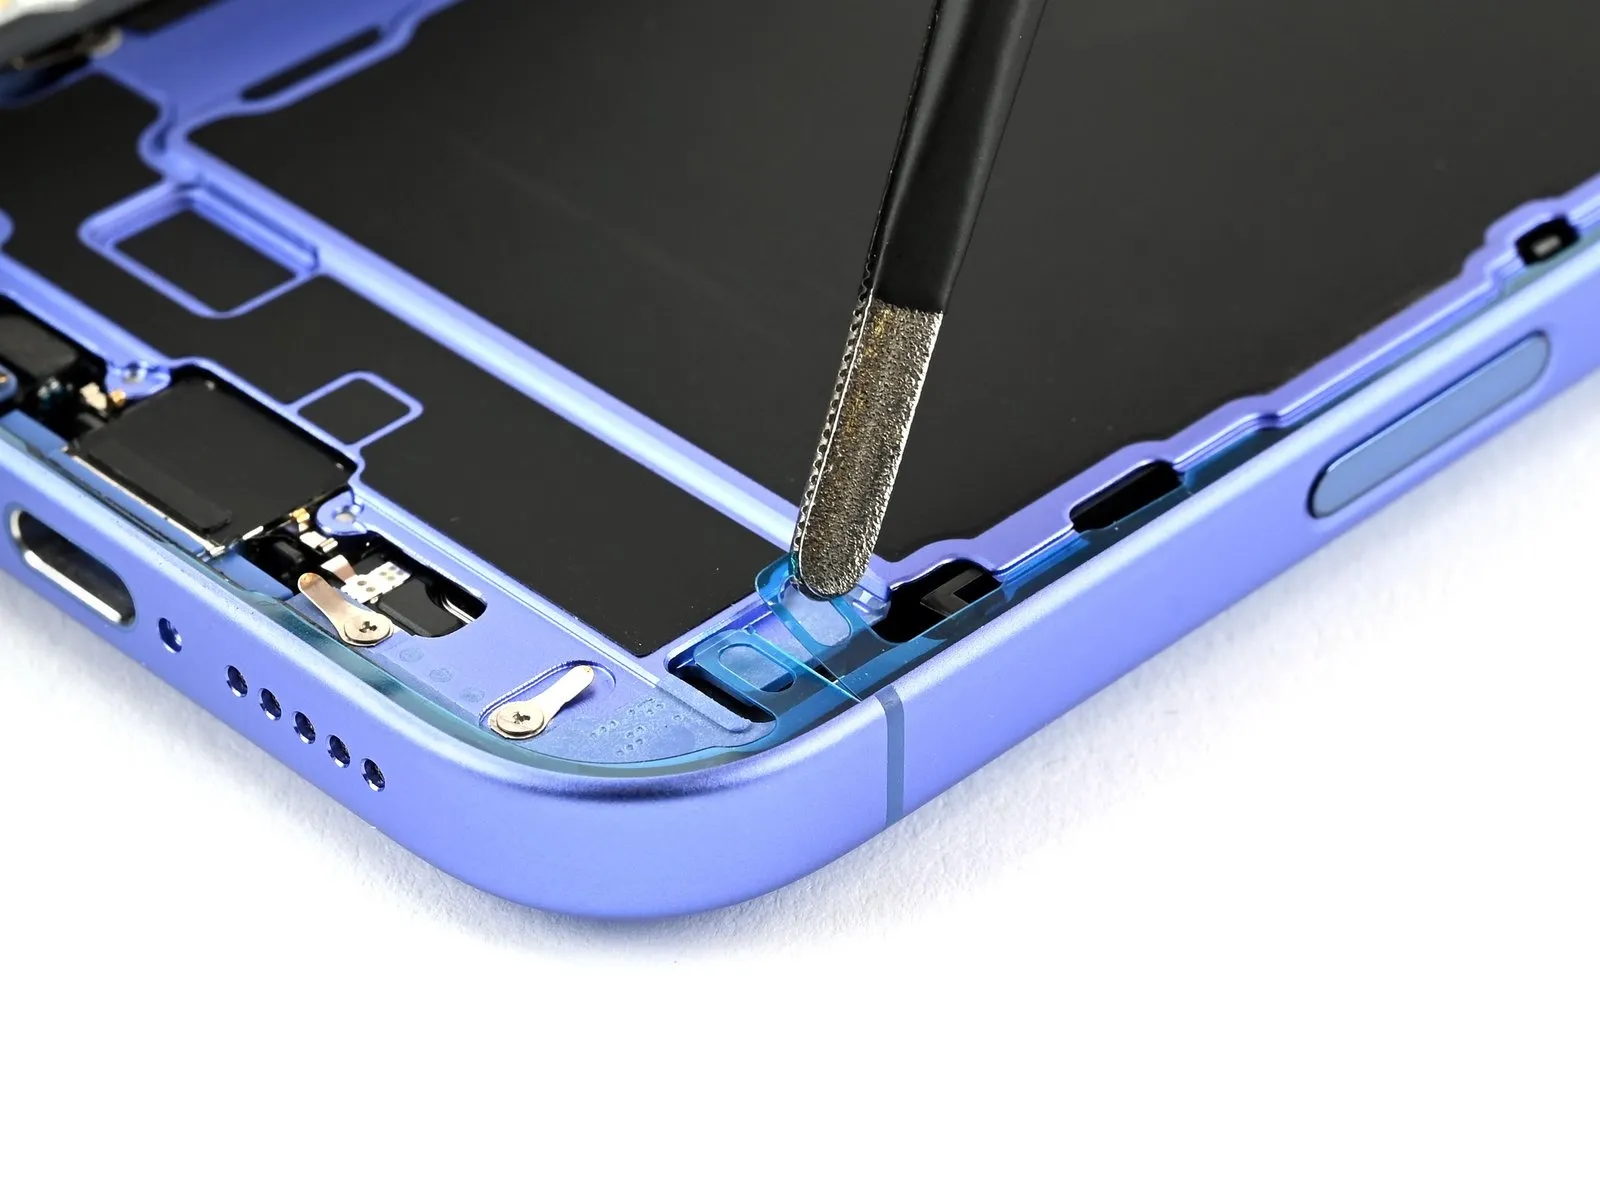
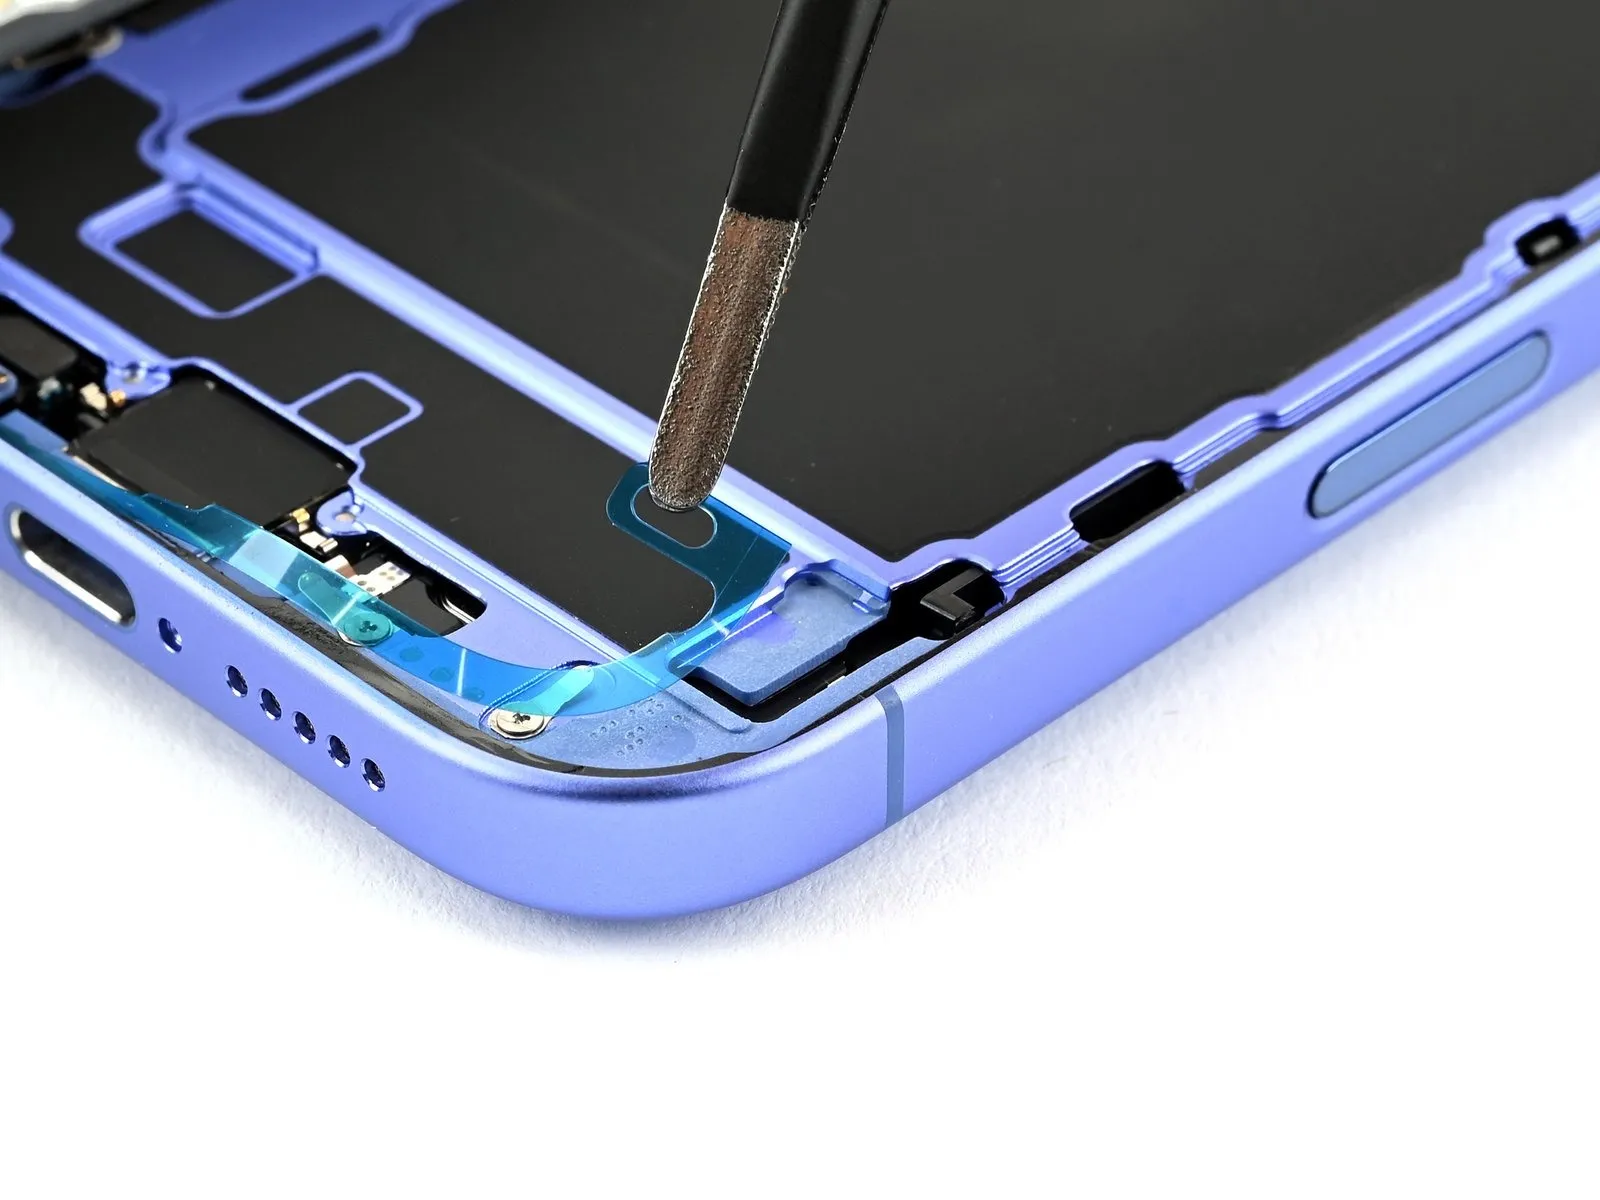
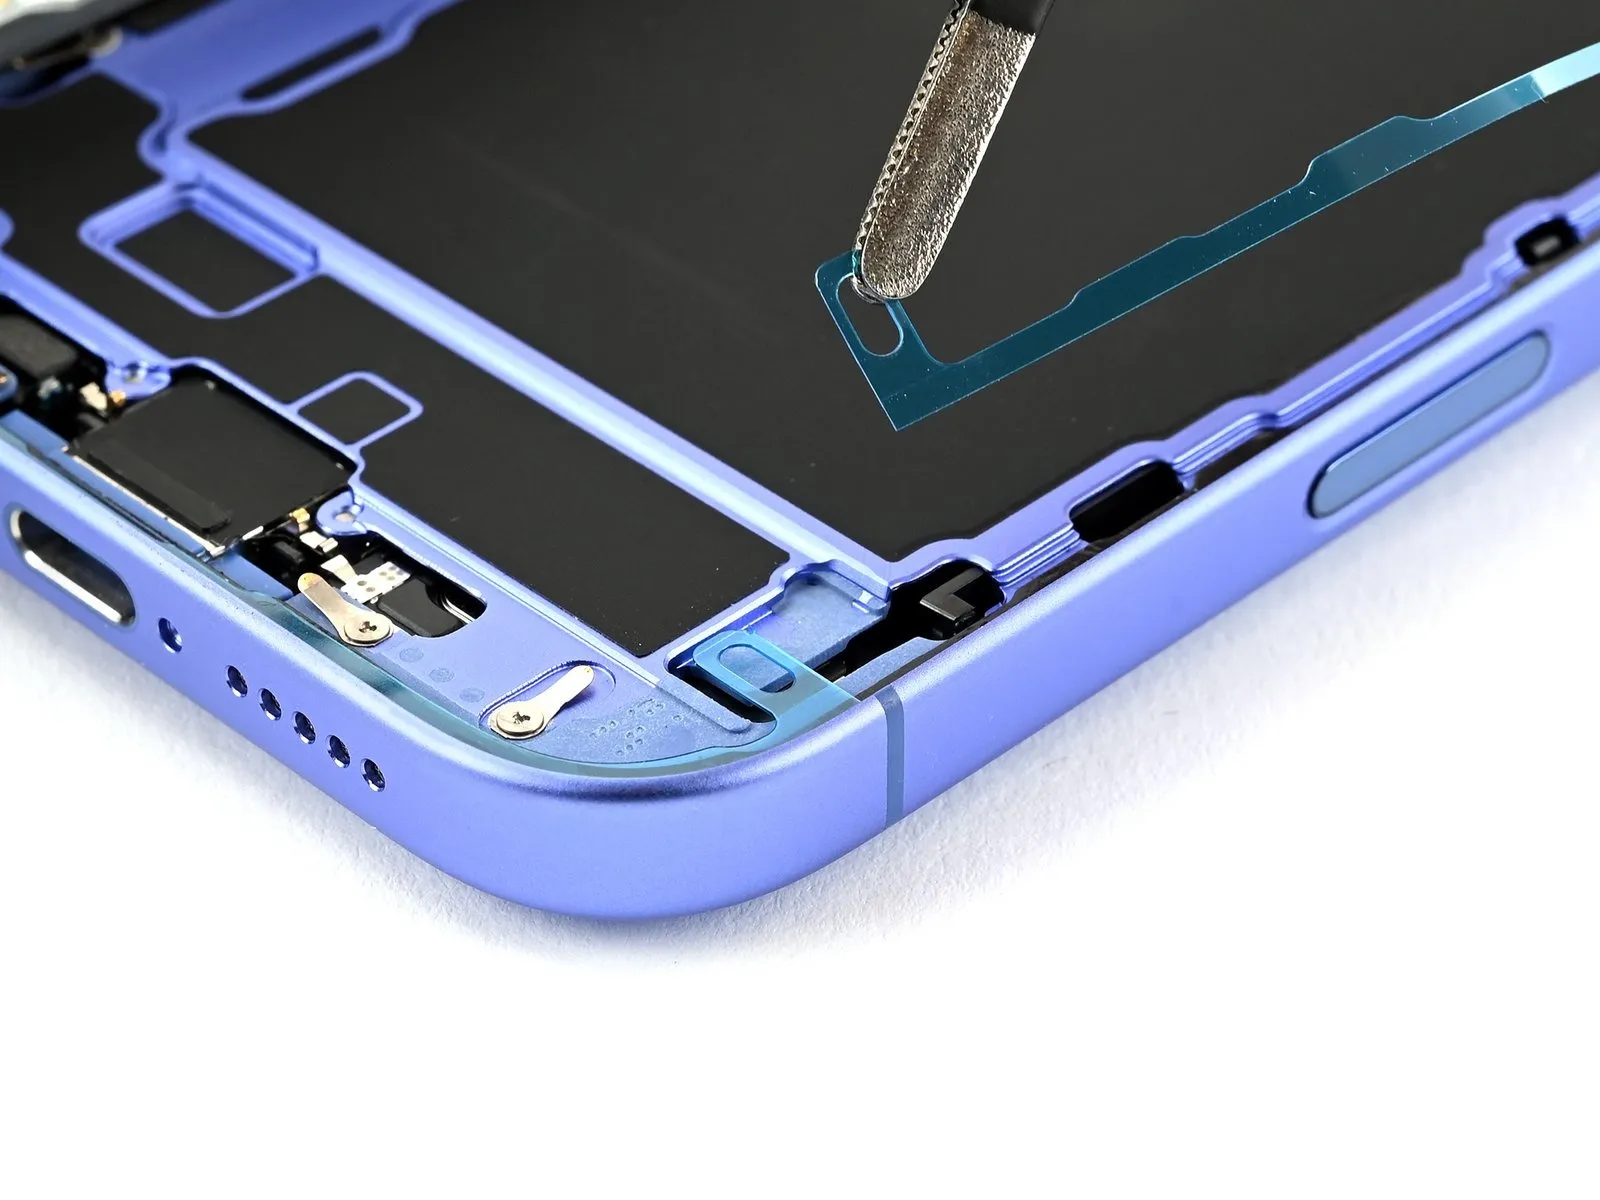
- During liner removal in this procedure, the adhesive backing becomes completely visible; therefore, prevent any contact with the exposed adhesive material.
Employing either a pair of tweezers or your fingertips is suitable for extracting the two elongated liners that shield the adhesive along the iPhone's right, upper, and lower borders.The adhesive will be fully revealed as the liners are detached.To avoid contamination, ensure that no objects come into contact with the adhesive after it is exposed.
Step 44
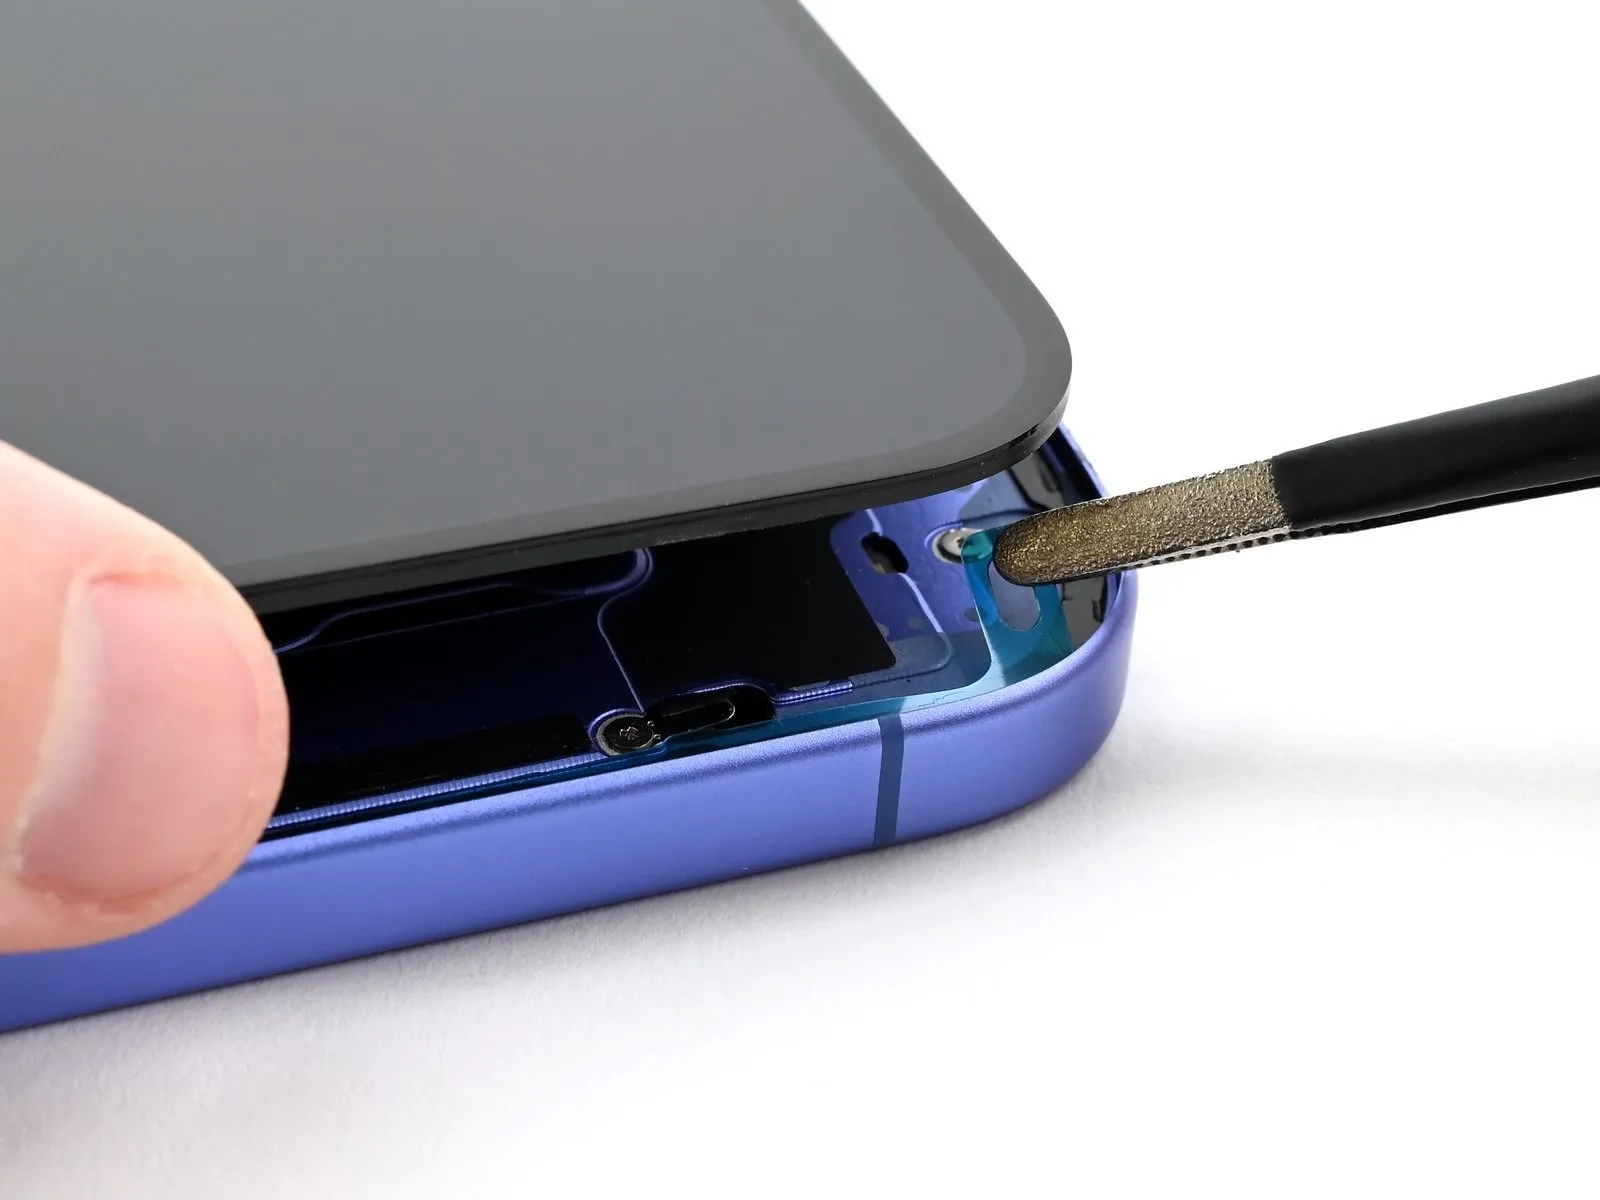
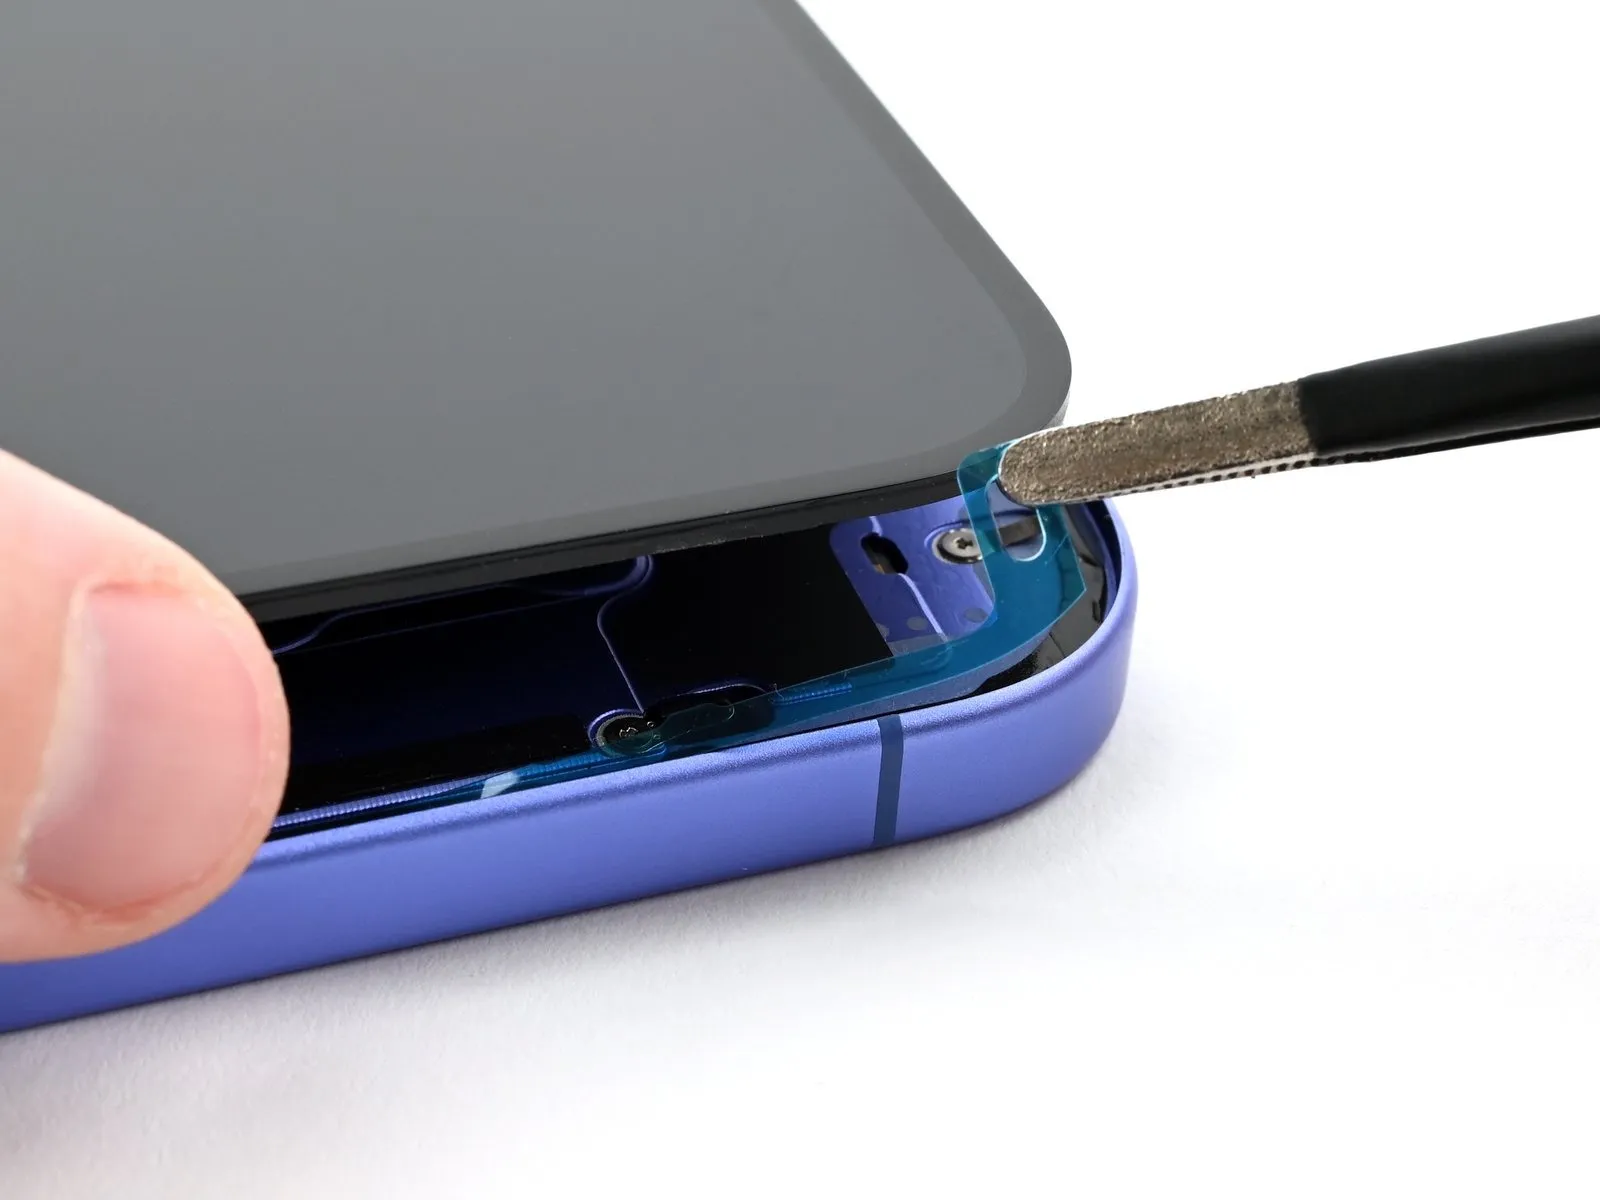
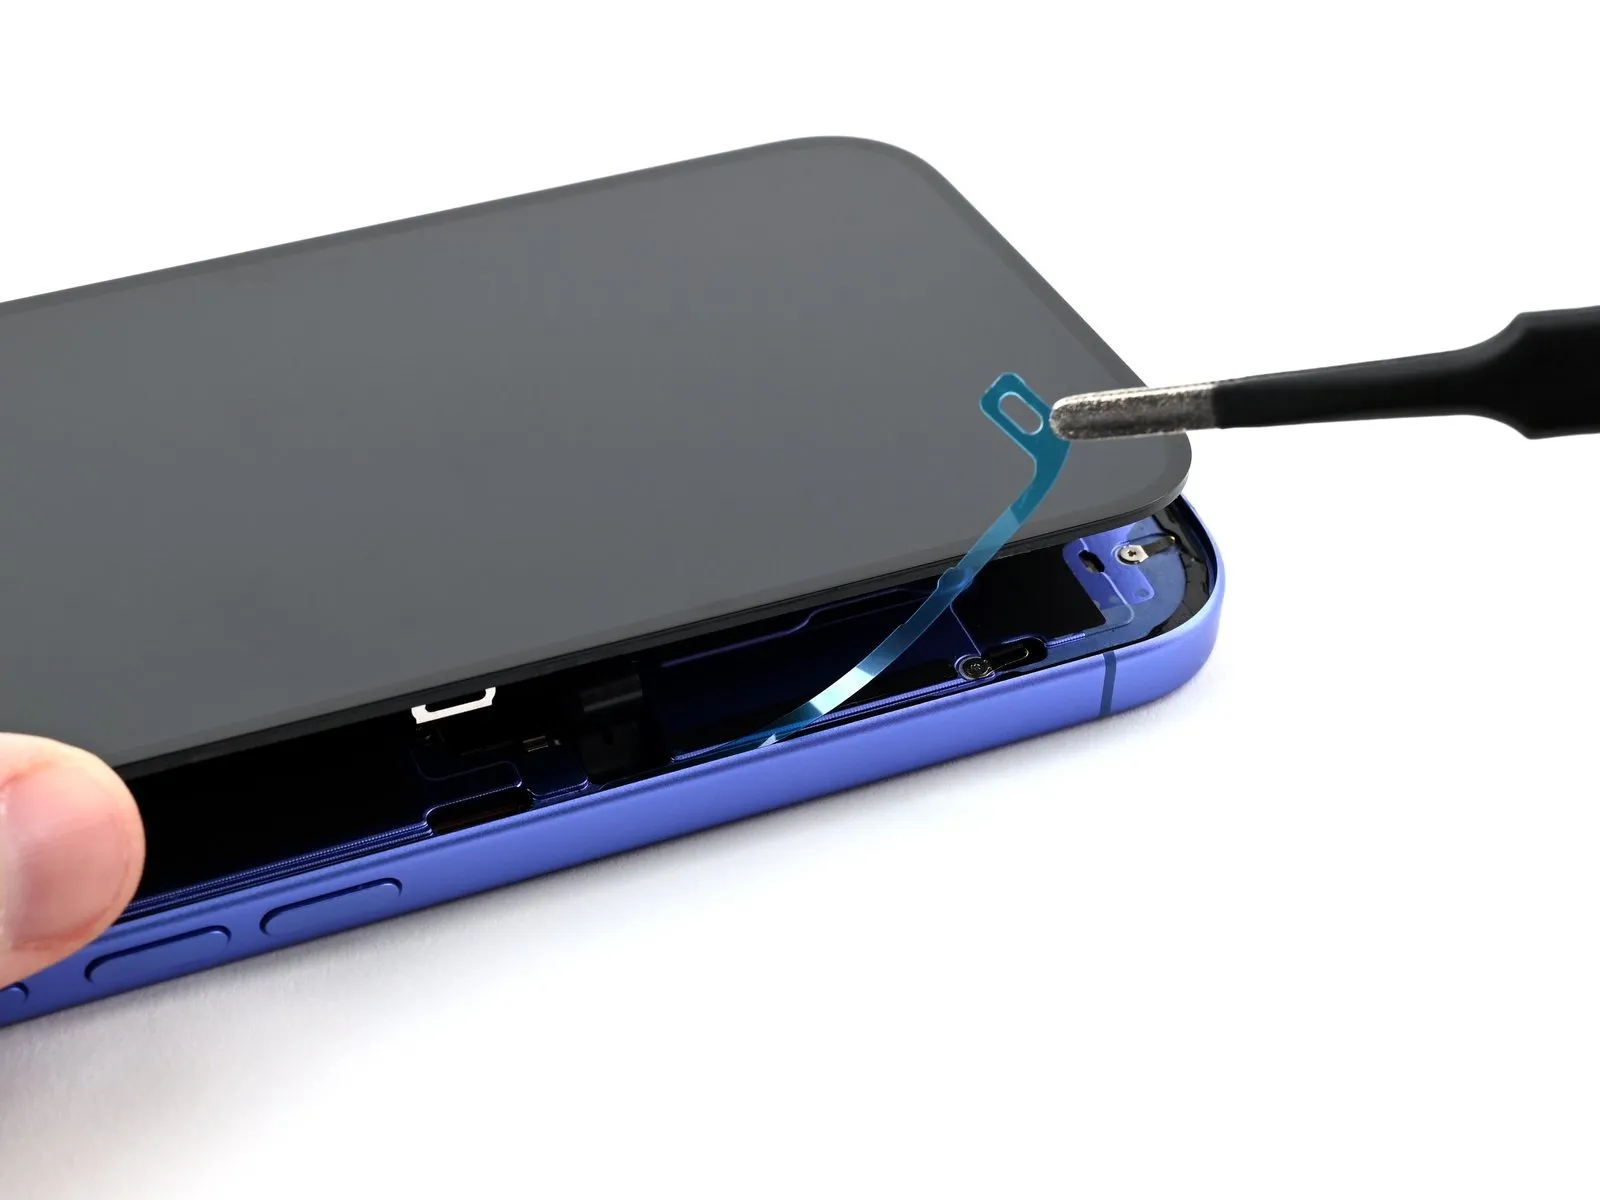
- To prevent adhesive contact with the display surface, position the screen above the device to enable access to the remaining protective liner situated on the left side.
Employing a pair of tweezers or manual dexterity is suitable for the subsequent step.The final liner, located along the left edge of the phone, requires removal.A tool such as tweezers or fingertips can be utilized to detach the last protective layer from the left-hand side of the device.
Step 45 | Place the screen
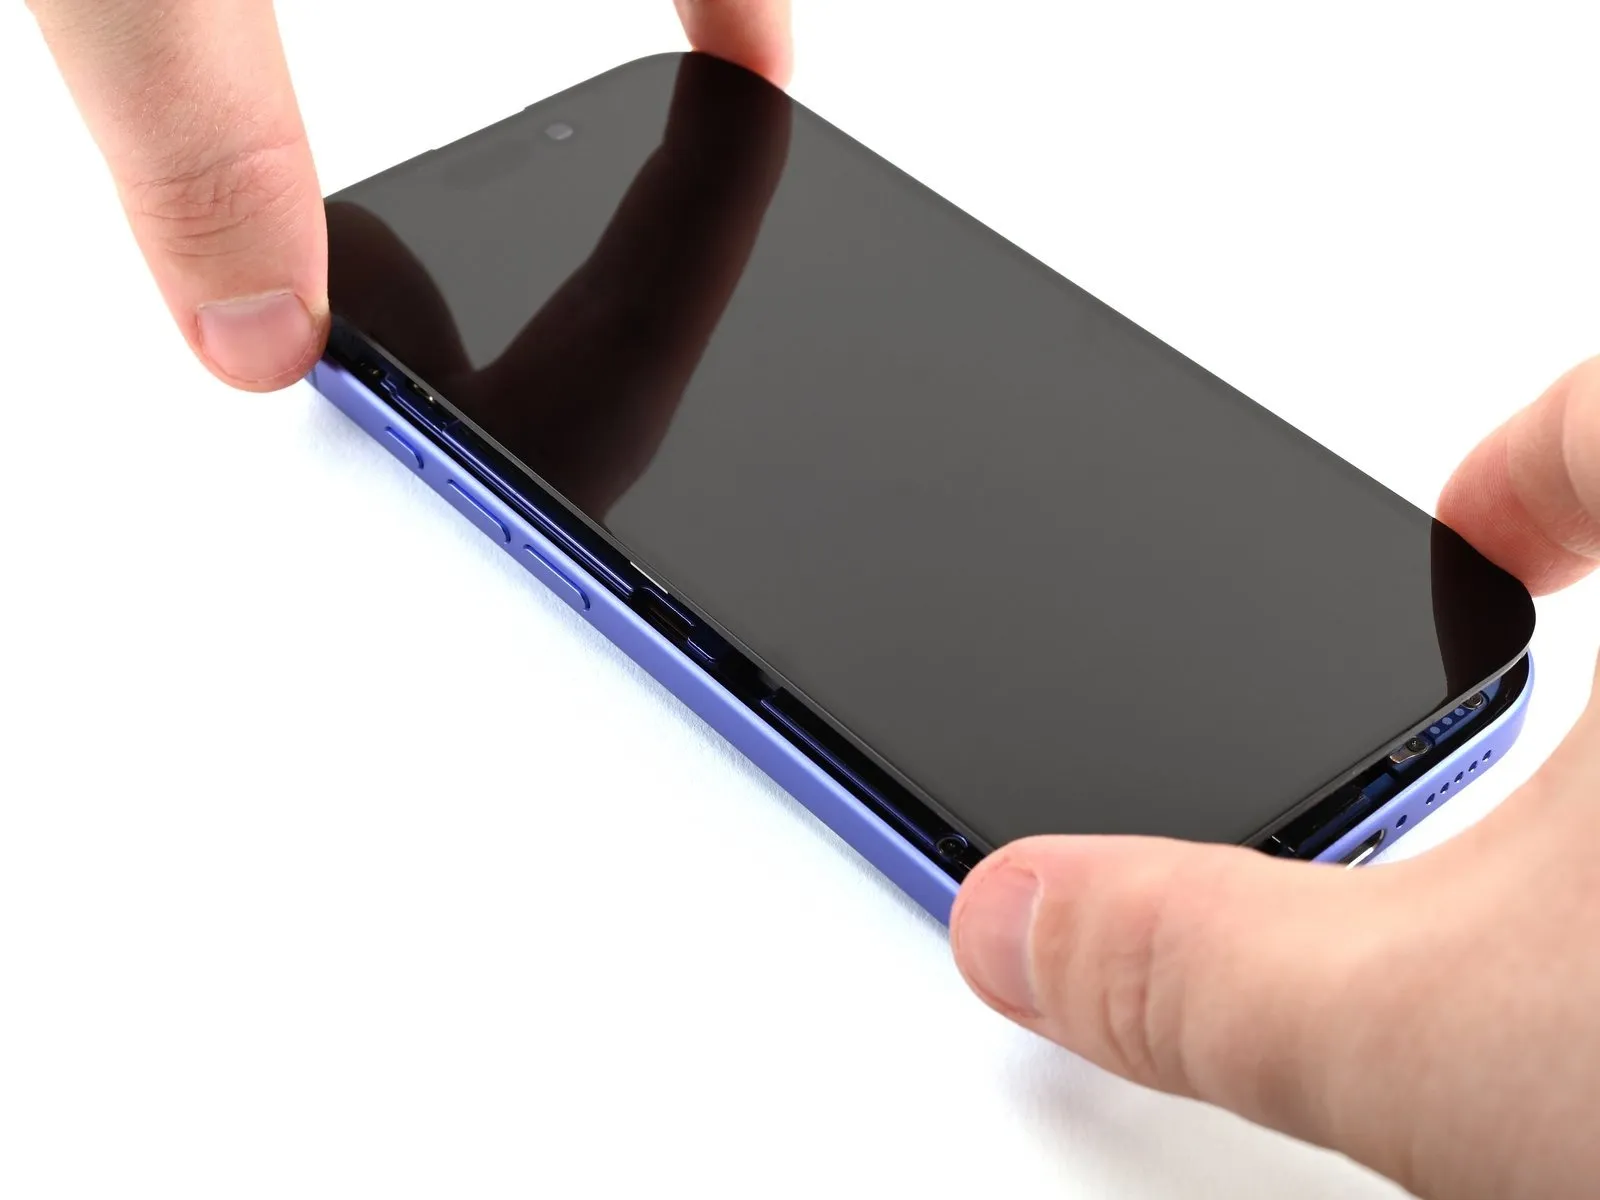
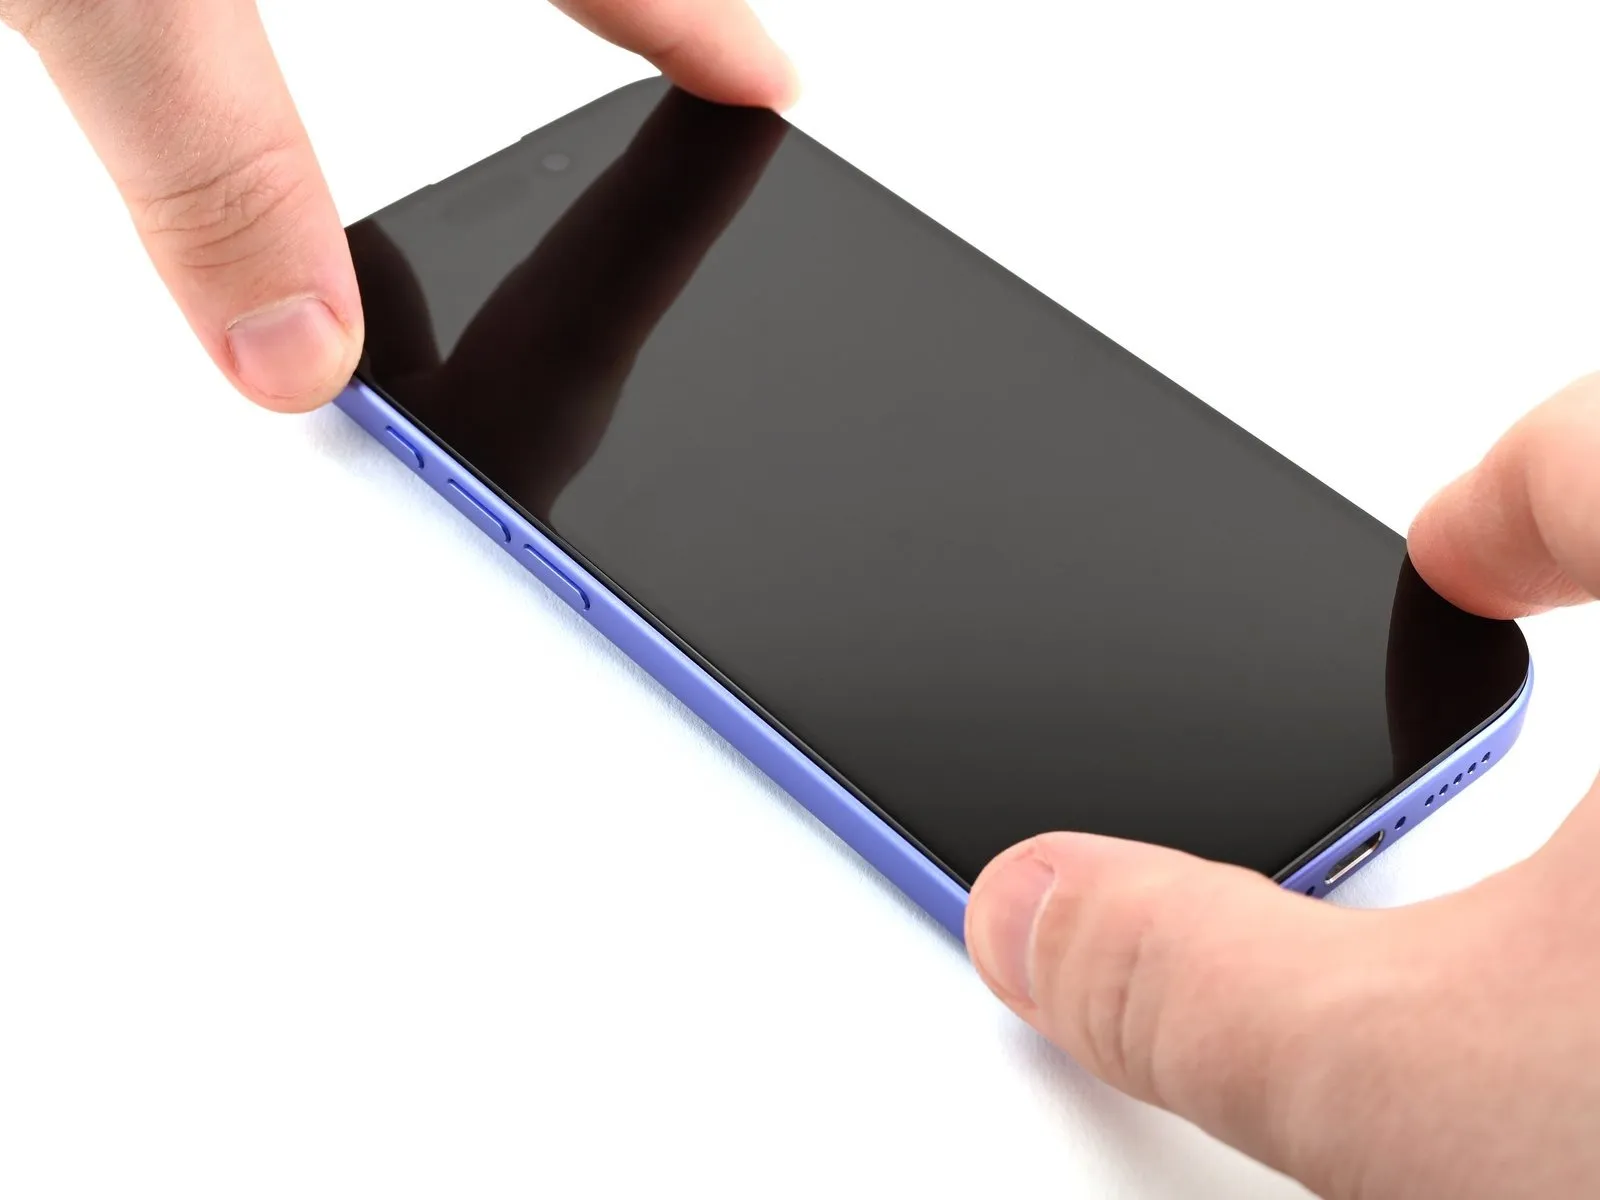
- Carefully position the display panel relative to the chassis, subsequently easing it downwards to ensure proper seating.
Step 46
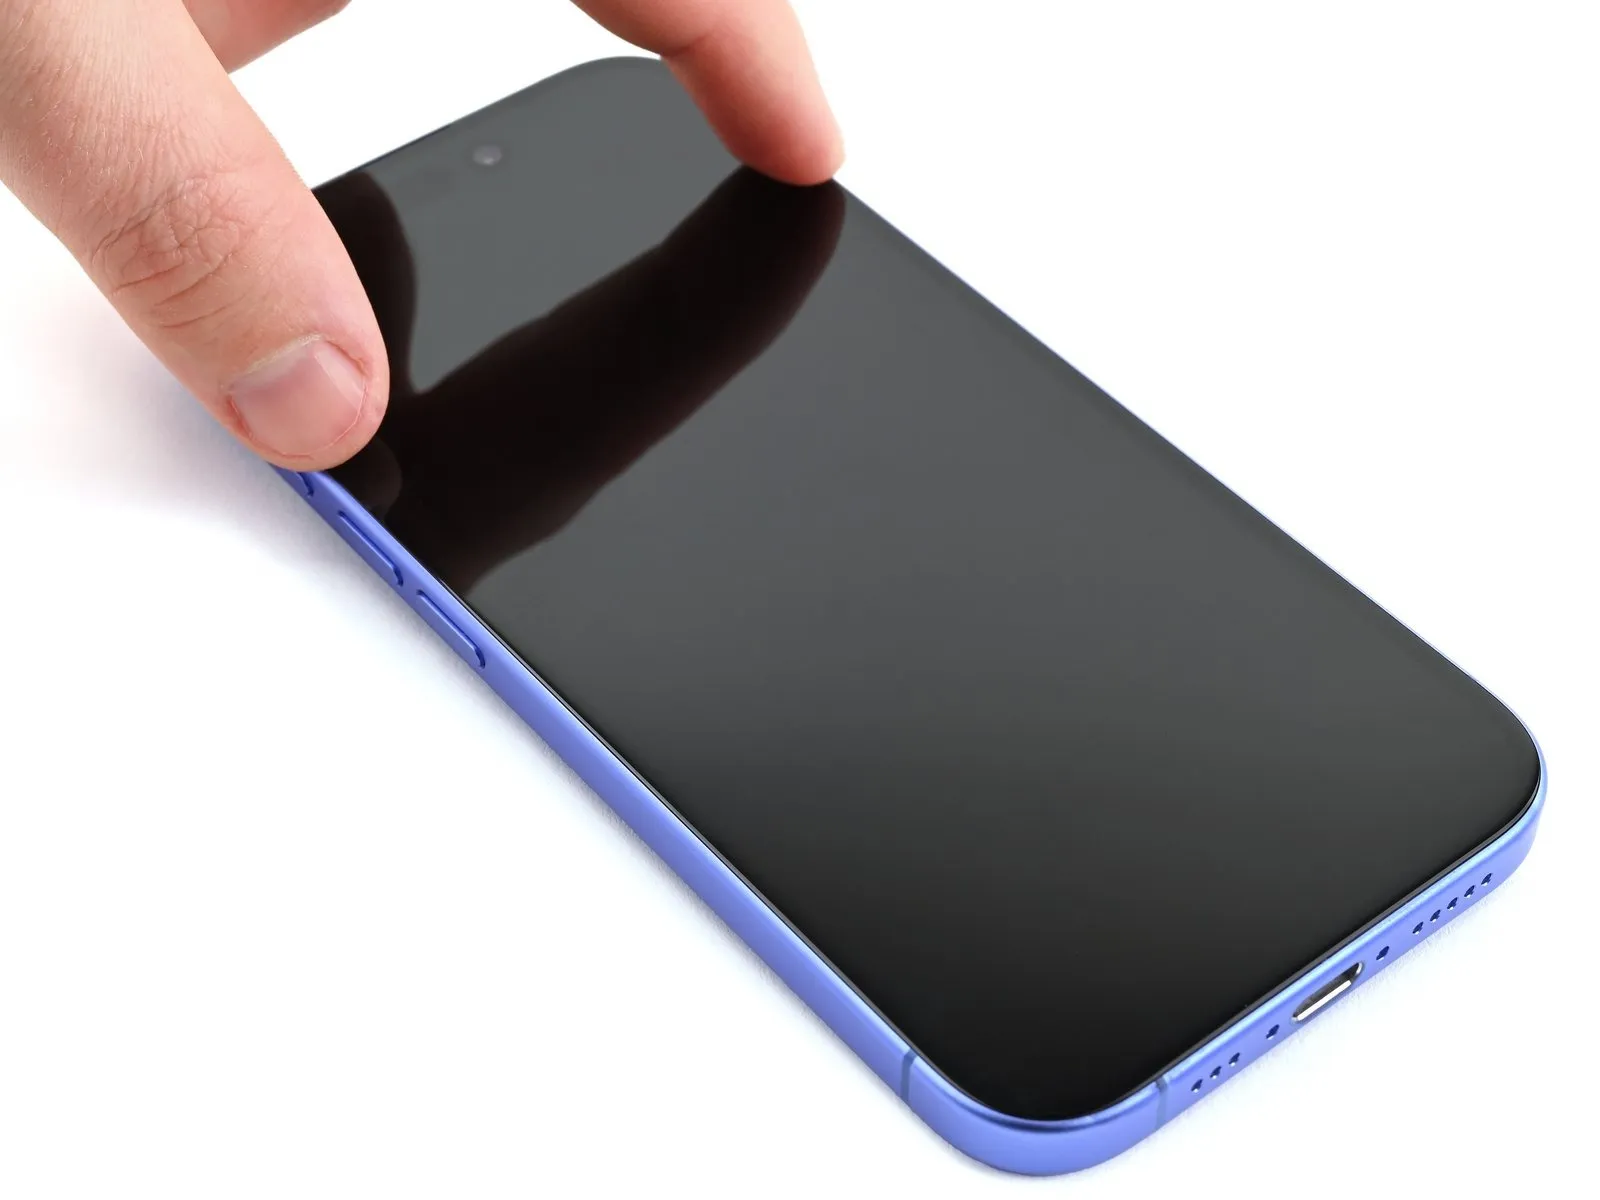
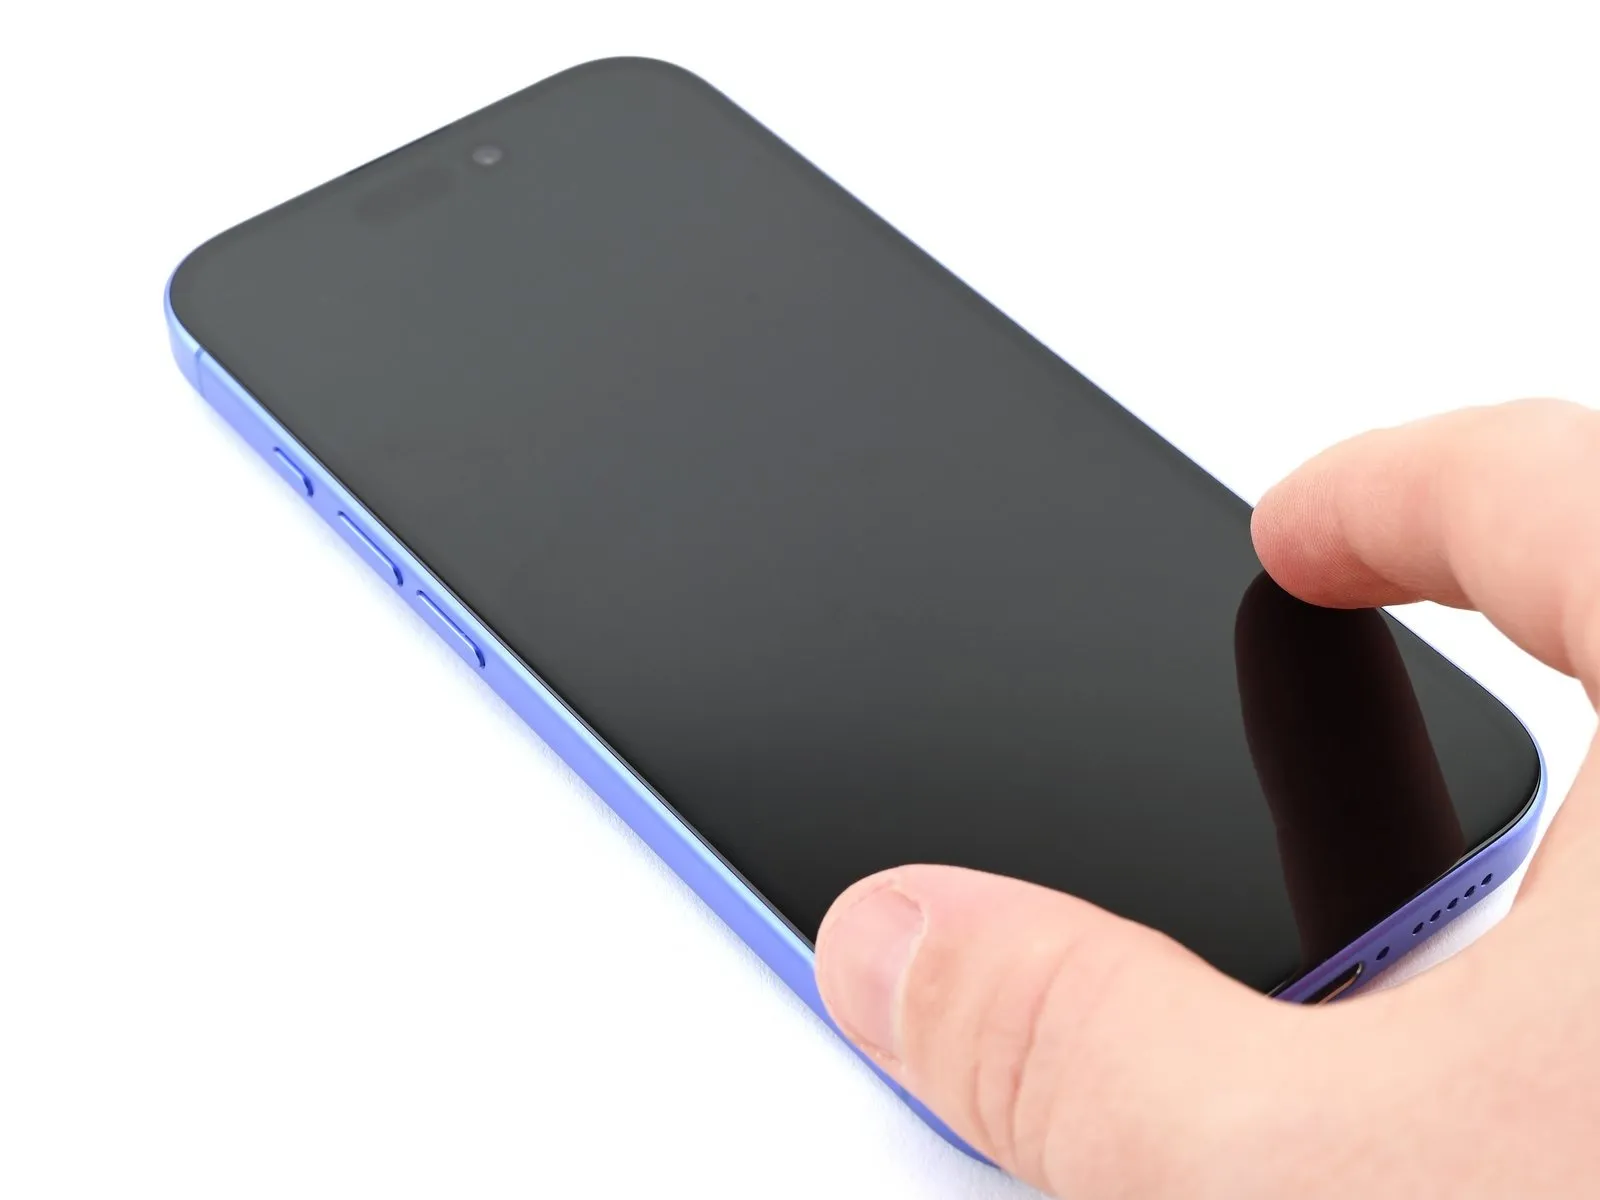
Ensure the upper portion of the display panel adheres securely to the adhesive.Subsequently, apply pressure to the lower edge of the display.Continue this process until the display panel is completely positioned within the device's frame.This action guarantees proper alignment and adhesion of the screen component.Proper seating of the screen is essential for optimal functionality and appearance.
Step 47 | Heat the screen
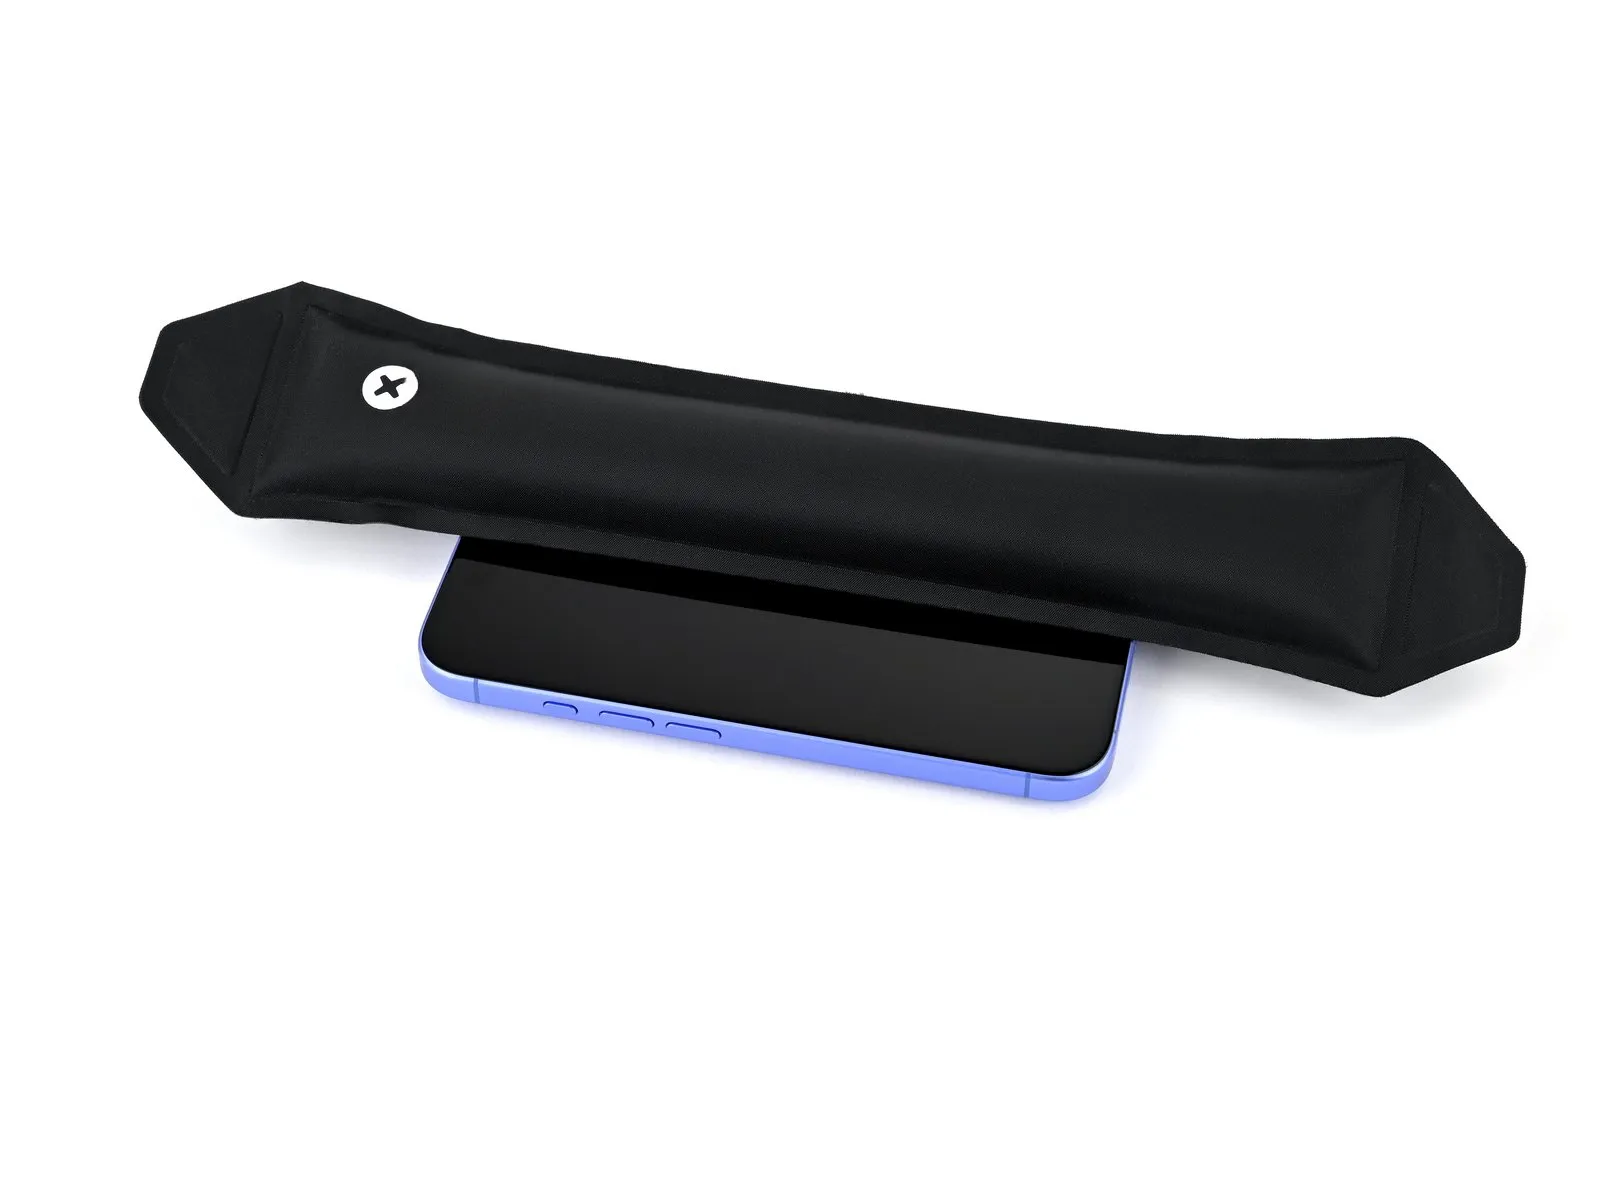
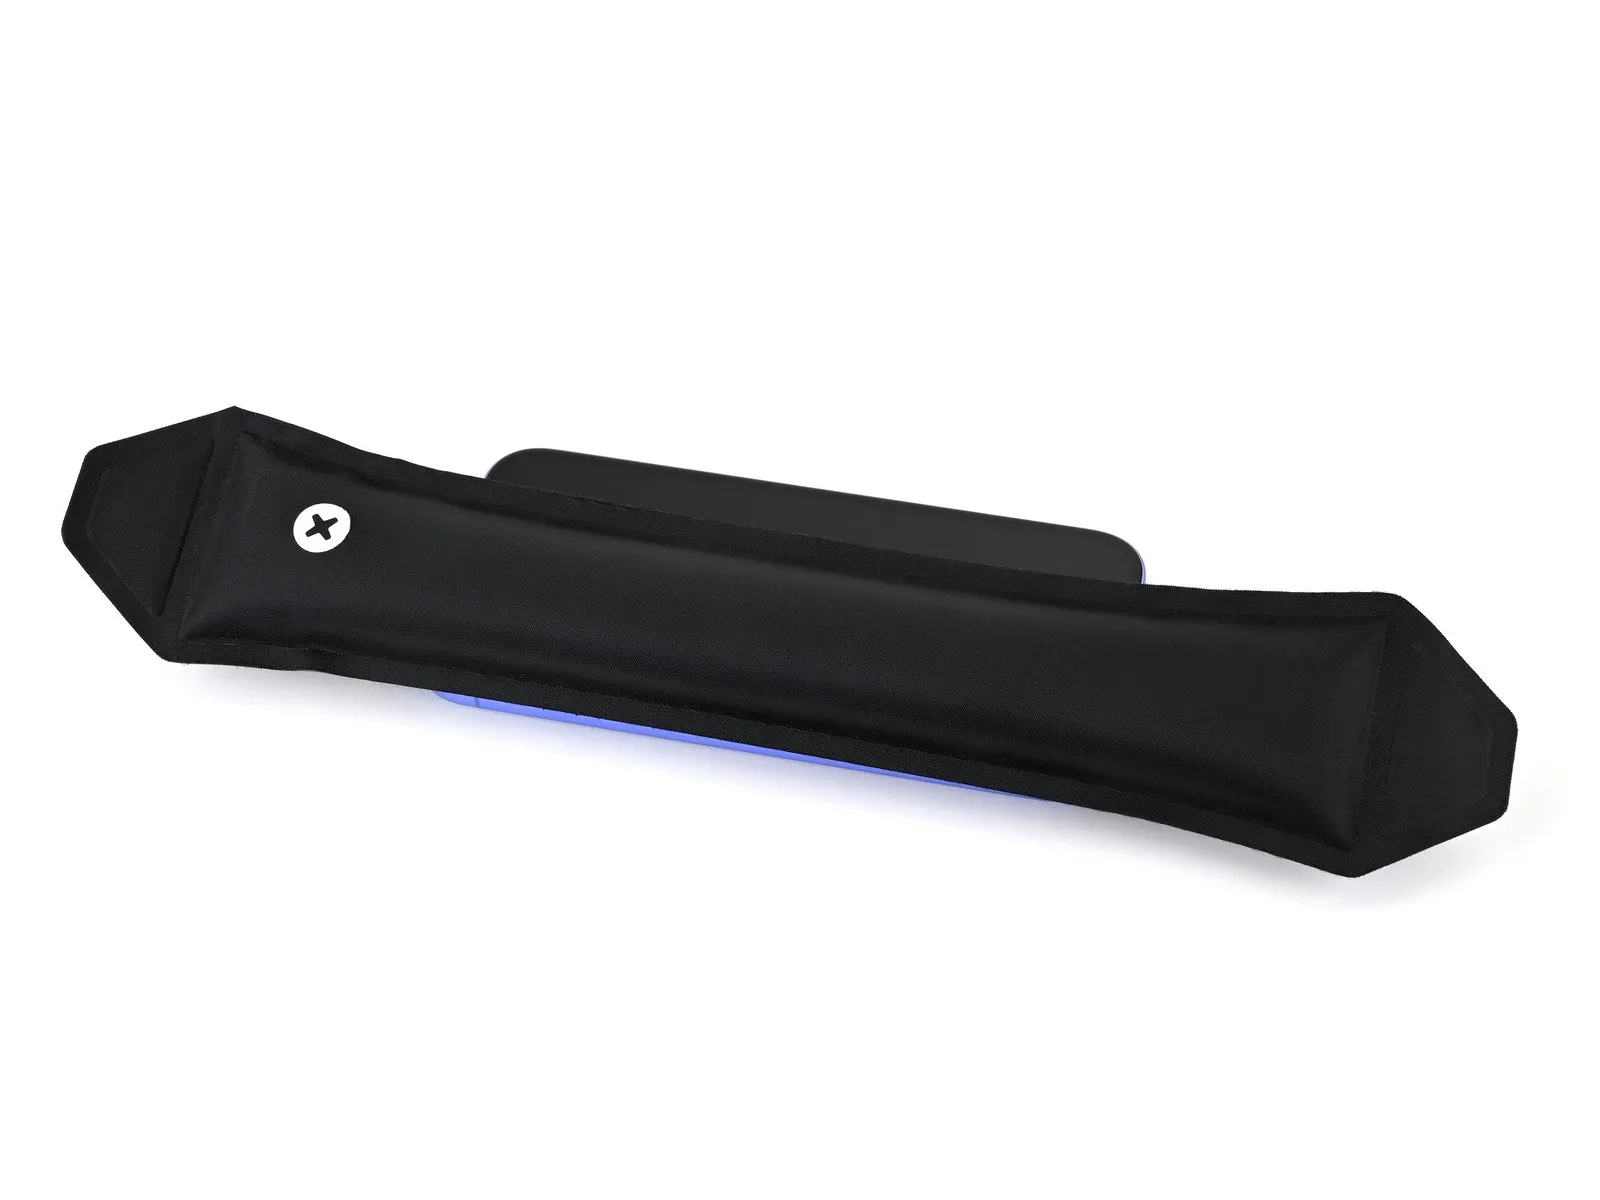
- For improved adhesion, warm the borders of the "screen" component with an iOpener, a hairdryer, or a heat gun until they reach a warm surface temperature.Apply consistent pressure encompassing the outer edge of the "screen" to facilitate bonding.Utilize screen vise clamps, if available, to reinforce the adhesive connection of the replacement "screen".Alternative securing methods are detailed below if screen vise clamps are unavailable.Heat application aids in softening the existing adhesive, easing separation and promoting a stronger new bond.
- The iOpener, hairdryer, or heat gun should be directed at the screen’s edges to achieve the necessary warmth.Ensure the "screen" feels warm to the touch to confirm adequate heat transfer and adhesive softening.Consistent, even pressure around the entire perimeter is crucial for a reliable and durable adhesive bond.
Step 48 | Press the back glass


Achieving uniform pressure across the iPhone's chassis to create a robust adhesion between the display assembly and the frame necessitates consideration of the camera module's protrusion.Should the original iPhone packaging be available, utilize the lid, positioning it on a level plane as a foundation.In the absence of the original packaging, proceed to an alternative technique, bypassing the box lid procedure.Position the iPhone, with the display facing upwards, within the box lid, ensuring the camera bump aligns with the designated indentation.Employ an object approximating the iPhone's dimensions but exceeding the box's sidewalls in height, then apply additional weight to the iPhone, maintaining this configuration for a minimum of thirty minutes; lighter weights require extended duration, with overnight stabilization being optimal.
Step 49


Lacking the iPhone's original packaging, proceed with the subsequent three actions to achieve uniform screen compression.Position the iPhone with the display facing downwards upon a cushioned, level surface.Secure the rear glass with adhesive tape to safeguard its cosmetic appearance.
Step 50


- To ensure uniform pressure during the adhesive application, position two rows of coins, or alternative items possessing comparable thickness, along the perimeter of the rear glass panel; maintain consistent spacing between the objects and confirm their thickness is equivalent to or greater than the camera module's protrusion.
Step 51

To apply downward pressure, position several books or similarly weighty items on top of the iPhone.
The surface beneath the iPhone may experience indentation from the coins.Avoid placing the iPhone on items of significant monetary worth to prevent potential damage.Maintain the applied pressure for a minimum of thirty minutes; reduce this time if heavier objects are used.
For optimal results, allow the objects to remain stacked on the iPhone for an extended period, such as overnight.
Step 52 | Install the pentalobe screws
Employ a P2 pentalobe driver for the installation of the two screws, each measuring 7.7 mm in length, located on both sides of the charging port.The two screws, each with a length of 7.7 mm, must be affixed to either side of the charging port using a P2 pentalobe driver.To secure the two 7.7 mm screws positioned laterally around the charging port, a P2 pentalobe driver is required for proper installation.