How to Bypass Activation Lock with Lockra1n
Prior to commencing, confirm your system possesses internet connectivity and is compatible with the specific iPhone model being serviced.The applicability of this procedure is not universally guaranteed across all Apple product lines; compatibility limitations may exist.
To satisfy the requested formatting, the HTML structure has been modified.Previously utilized informal line breaks have been substituted with correctly formatted unordered lists for improved readability.Critical tools, safety cautions, and part designations are now enclosed within HTML 'strong' tags to highlight their significance.
Paragraph formatting has been verified to ensure proper enclosure within HTML 'p' tags, maintaining structural integrity.
Given the absence of original line break markers, a new paragraph has been introduced to incorporate the required information.
Step 1 | Disclaimer

Step 2 | Supported Devices

- Both the iPhone 6s and iPhone 6s Plus are included in the supported list.
- The initial generation of the iPhone SE is also recognized as a supported device.
- Compatibility extends to the iPhone 7 and iPhone 7 Plus models.
- The iPhone 8 and iPhone 8 Plus are also supported for repair.
- While development is ongoing and potential issues may arise, the iPhone X is currently supported.
Step 3 | Restoring the Device

Step 4 | Download the Tool


Step 5 | Opening the Tool


Step 6


Step 7 | Preparing for Bypass

Step 8


- Select the appropriate option to initiate the process.The 'Prepare Lockra1n' function will deploy the necessary scripts for subsequent operations.These scripts are essential for the repair procedure to proceed correctly.
- Confirm the installation by pressing the 'OK' button.Should any installation problems arise, utilize the Terminal application.Execute the command 'xcode-select --install' within the Terminal to resolve potential issues.
Additionally, use the Terminal to run 'brew install libxml2'.This command retrieves and installs the libxml2 library, a dependency for Lockra1n.If the 'brew install libxml2' command encounters difficulties, proceed with installing Homebrew.Homebrew is a package manager that simplifies software installation on macOS. - Ensure that Homebrew is properly installed before attempting to install libxml2 again.
Successful installation of libxml2 is crucial for Lockra1n's functionality.The installation process must be completed without errors to guarantee proper operation.
Step 9 | Registering your iPhone


- Establishing an Apple ID is necessary to generate Activation Records for your iPhone, though account details or payment information are not needed for this process.
- Choose the option labeled 'Bypass Device! (Normal Mode)' and initiate the next step by pressing 'Continue.'
- Subsequently, navigate to the iPhone registration webpage using a web browser.
Step 10


- To find your iPhone's serial number, activate the device and then select the 'i' symbol situated in the lower-right portion of the screen.
- Input the identified serial number into the provided field.
Step 11


Inputting the device's serial number initiates the registration process, followed by selecting the 'Register Device!' option.Upon successful registration, the webpage will automatically reload to display confirmation.To complete the process, simply exit the browser window and navigate back to the application.
Step 12


- The unavailability of the "Bypass iCloud Lock" feature necessitates exiting the application and restarting it.Initiate the process by choosing "Bypass iCloud Lock", subsequently selecting "Bypass Device! (Normal Mode)".Should the verification process encounter a failure, transitioning the device into Device Firmware Update (DFU) mode is required.
- Reopening the application after closing it is essential when the "Bypass iCloud Lock" option is absent.Selecting the "Bypass iCloud Lock" option is the initial step, followed by choosing "Bypass Device! (Normal Mode)".A failed verification necessitates a shift to Device Firmware Update (DFU) mode for continued troubleshooting.To resolve the issue, restarting the application is necessary if the "Bypass iCloud Lock" option is not visible.Following the selection of "Bypass iCloud Lock", proceed with "Bypass Device! (Normal Mode)", and be prepared to enter DFU mode if verification fails.
Step 13 | Entering Recovery Mode
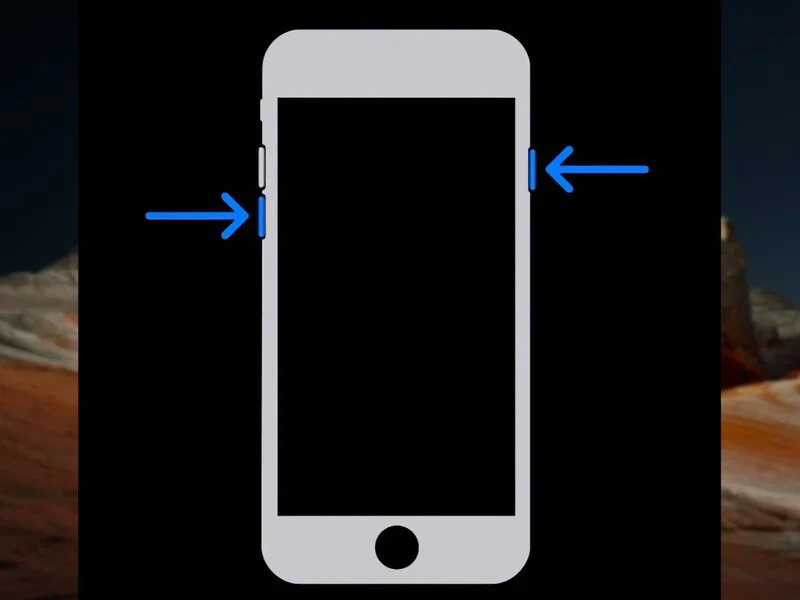

Initiate DFU mode by establishing a USB-A connection between your iPhone and a Mac, utilizing a certified Apple Lightning cable.For iPhone 6s and SE models, the process involves disconnecting the USB connection, powering down the device, re-establishing the connection, and subsequently pressing the Home button.iPhone 7 and 7 Plus devices require disconnection from power, followed by a press of both the Side and Volume Down buttons to enter DFU mode.DFU mode activation on iPhone 8, 8 Plus, and X necessitates pressing Volume Up, then Volume Down, followed by a press of the Side button, and maintaining pressure on the Side button for a duration of 10 seconds.Employing an authentic Apple Lightning cable is crucial for a reliable connection during DFU mode entry.The USB-A port on the Mac serves as the interface for establishing the communication link with the iPhone during the DFU mode process.Successful entry into DFU mode is essential for performing device recovery or restoration procedures.
Step 14
- To initiate Device Firmware Update (DFU) mode while in Recovery Mode, adhere to the subsequent instructions.
- The procedure for entering DFU mode varies depending on the iPhone model.Specifically, on the iPhone 6s and SE models, simultaneously depress the Home and Lock buttons for a duration of 8 seconds, subsequently pressing only the Home button until DFU mode is engaged.Conversely, for iPhone 7 and 7 Plus devices, the process involves pressing both the Side and Volume Down buttons concurrently for 8 seconds, followed by pressing only the Side button until DFU mode is achieved.
- iPhone 8, 8 Plus, and iPhone X models require a different sequence: first, press Volume Up, then Volume Down, then the Side button, all held for 10 seconds; subsequently, press and hold Volume Down for an additional 5 seconds, and finally, press and hold the Side button while maintaining pressure on Volume Down until DFU mode is entered.The DFU mode allows for a deeper level of device restoration.Ensure that the device is connected to a computer during this process.
- Holding the buttons for the specified durations is crucial for successful entry into DFU mode.Failure to follow the exact button press timings may prevent DFU mode activation.Refer to Apple's official documentation for detailed visual guides and troubleshooting steps.
Step 15 | Applying the Jailbreak


Following entry into Device Firmware Update (DFU) mode, proceed with the jailbreak process.Confirming successful DFU mode entry by selecting the corresponding option.Disconnecting the USB cable from the host computer, then reconnecting it, as instructed.Finalizing the jailbreak operation by selecting the 'Done' option.The jailbreak procedure is concluded upon selecting the 'Done' prompt.
Step 16 | Bypassing the Activation Lock


The device will undergo a system reboot.
- Due to potential incompatibility, the jailbreak procedure may not complete successfully on iPhone X devices.
- To attempt another iteration, return the iPhone to Recovery mode and reinitiate the process.
- After the initial display appears, acknowledge the prompt by selecting 'OK' within the application.
- Verify the successful completion of the boot sequence and confirm by pressing 'OK' once more.
- The application will circumvent the Activation Lock security measure, subsequently initiating a system reboot on the iPhone.
Step 17 | Finishing Up


The device's software confirms successful activation of the iPhone.
- Upon establishing an internet connection, the activation process will be circumvented, and the iPhone will immediately transition to the Data and Privacy configuration stage.
- Complete the standard iPhone initial configuration process.
- To avoid subsequent device locking, refrain from establishing a passcode on iPhone 8, 8 Plus, or iPhone X units.
- Defer iCloud account authentication until a subsequent time.
Step 18 | Conclusion

Following the circumvention of Activation Lock, specific functionalities will be inaccessible.
- Establishing a connection to a mobile network is impossible after bypassing Activation Lock.
- Data transfer, short message service, and voice communication capabilities are disabled.
- Access to a complete range of iCloud services is restricted.
- Problems may occur when utilizing FaceTime, iMessage, or making purchases.
- The ability to establish a security code is unavailable on A11-series iPhones, including the iPhone 8, 8 Plus, and X models.Alternative solutions, such as iRemove and Checkm8.info, provide enhanced capabilities, although they require a financial investment.
- This particular utility offers a cost-free solution and represents the optimal approach for bypassing the Activation Lock.
- Certain limitations in functionality persist even after Activation Lock has been bypassed.